7
29. Peak indicator
(PEAK)
This indicator helps you to adjust the level when sampling.
For optimal sampling, adjust the level so that this indicator
lights occasionally.
28.
AC
adaptor
[eek
Use this when you wish to connect
a
separately sold AC
adaptor.
•
Be
sure to use only the specified AC adaptor. Using any
other adapter can cause malfunctions.
This
turns
the power on/off.
27. Power switch
This can be connected to an external MIDI device (sequencer
or keyboard) so that the external device can control the SP-
202. Use
a
MIDI cable (optional) for connection.
26.
MIDI connector
25.
Line
out
iacks (LINE OUT
L,
R)
These audio
outputs
are stereo RCA phono type jacks for
connection to an amp or mixer through which you wish to
play the sampled sounds.
24.
Line
in
iacks (LINE IN L,R)
These
inputs
are stereo RCA phono type jacks for connection
to a CD player or other sound source from which you wish
to sample.
23. External
mic
iack
When you wish to use an external microphone, connect it to
this jack. When an external microphone is used, the built-in
microphone will automatically be defeated.
22.
Source select
switch
(SOURCE
SELECT)
When this switch is in the MIC position, you can sample
from a microphone (external or built-in). When
it
is in the
LINE position, you can sample from
a
device connected to
the line in jacks.
21. Memory
card
slot
(MEMORY CARD)
A memory card (SmartMedia: optional) can be inserted here.
A card can be used to store (backup) the data from internal
memory.
It
is also possible to use card banks
C/D
to record
long samples that the internal memory could not accommo-
date.
20. Source
mix switch
(SOURCE MIX)
When this switch is ON, the sounds of the samples and the
external input (microphone or line
in)
will be mixed and out-
put.
19. Headphone
iack
(PHONES)
A set of headphones can be connected here to hear the same
sound as the line outputs. The jack is for a stereo miniature
type plug.
18. Built-in
microphone
You can use this microphone to sample sounds.
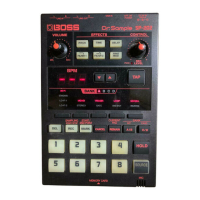
17. Source
pad
(SOURCE)
By
using this pad you can sound/silence the sound from an
external input
without
having to sample it, and can apply
effects to the sound.
16. Hold
pad
(HOLD)
If
you hold down this pad while pressing another pad, the
sample will continue to play even after you release the pad.
When you press a pad, the sample assigned to that pad will
sound. While it is sounding, the pad will light.
15.Pads
14. Bank
buttons
(BANK)
These buttons switch sample banks. The A/B button switch-
es between internal banks A and
B.
The
C/D
button switch-
es between banks C and D when
a
memory card is used.
13. Remain
button
(REMAIN)
When this button is pressed, the BPM display will indicate
the remaining time available for sampling.
At the same time, the button for the current pad and the but-
ton for the effect which is being controlled by the Control
knob will blink.
Use this button to cancel
a
sampling or sample delete opera-
tion
(i.e.,
while REC or DEL is blinking).
12. Cancel
button
(CANCEL)
11.
Mark button
(MARK)
Use this button when you wish to sound only
a
portion of
a
sampled sound. While this
button
is lit, only the specified
portion will sound.