11.
STANDARD
ADJUSTMENTS
11.
STANDARDEINSTELLUNGEN
11.
REGLAGES
STANDARD
11.
AJUSTES
ESTANDARES
11-11.
Adjusting
the
synchronizer
(B722/B724)
11-11.
Einstellen
des
Synchronisators
(B722/B724)
©Needle
up
position
Hochgestellte
Made!
<-no3>
10
-12.5
mm
10-12,5
mm
<-no5>
12.5
-15
mm
12,5
- 15
mm
Needle
down
position
Heruntergestellte
Nadel
19
-
25
mm
Reference
line
Referenzline
0.5
mm
0,5
mm
nM
Rotating
direction
of
machine
Drehrichtung
der
Nahmaschine
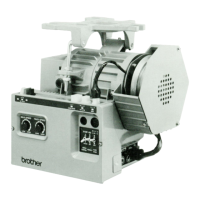
The synchronizer consists of two elements which are used to detect the needle position. One of these elements is
used
to
control
the
needle
down
signal
and
the
thread
trimmer
signal.
When the power is on and the machine is stopped in the needle down position, there should be an 19to 25 mm gap
between the needle plate top and bottom edge of the needle set screw. When the sewing machine is stopped in the
needle up position and the machine pulleyreference line is aligned with the belt cover reference line,there should be
a clearance of 10 -12.5 mm (for -•03 specifications) or 12.5
-15
mm (for -•05 specifications) between the top of the
needle
plate
and
the
tip
of
the
needle.
If
adjustment
is
necessary,
refer to
the
procedure
below.
•
Needle
up
position
stop
adjustment
1.
Turn
off
the
power
switch.
2.
Loosen
the
two
set
screws
O.
3.
Move
set
screw
O in
the
direction of
normal
puley
rotation
to
raise
the
needle
bar
site
direction
to
lower
the
needle
bar.
4. Tighten
the
set
screws
O.
Move
the
screw
O in
the
oppo-
•
Needle
down
and
thread
trimmer
signals
Do not
adjust
the
needle
down
stop
position.
^
Note:
The
synchronizer
is
preadjusted
at
the
factory.
Do
not
remove
the
synchronizer
after
removing
the
pulley.
When
mounting the pulleybe sure to leave a 0.5 mm gap between the
pulley
edge and synchronizer.
Furthermore, tighten the two machine
pulley
set screws so that the rear set screw is at the screw stop on the
upper shaft when seen from the machine pulley turning direction.
•
Der
Synchronisatorbesteht aus
zwei
Elementen, welchedie Nadelposition erfassen.
Bin
Element ist
fOr
das
Auslosen
der Signale zum Absenken der Nadel und zum Abschneiden des Fadens.
•
Bel
eingeschalteter stillstehender
Maschine
muS
bei
heruntergestellter
Nadel
der
Abstand
zwischen
der
Stichplatte
und
der Nadelbefestigungsschraube 19bis25mmbetragen.
Wenn
die
Nahmaschine
mithochgestellter
Nadel
gestoppt
unddie
Bezugslinie
der
Riemenscheibe
aufdie
Bezugslinie
des
Riemenschutzes
ausgerichtet
wird,
muB
der
Abstand
zwischen
der Oberseiteder Stichplatteund der Nadelspitze 10-
12,5
mm
(fiir
Ausfiihrung -003)
bzw.
12,5
- 15 mm
(fiir Ausfiihrung -•05) betragen.
Fiir die Einstellung wird auf die nachstehenden Anweisungen verwiesen.
•
Einstellen
der
oberen
Nadelstopposltion
1.
Schalten
Sie
den
Netzschalter
aus.
2.
Die
beiden
Schrauben
O
Idsen.
3. Die Schraube O in der Drehrichtung der Riemenscheibe drehen, um die Nadelstange O hochzustellen. Wenn die
Schraube O in entgegengesetzter
Richtung
gedreht wird,wird die Nadelstangetiefer gestellt.
4.
Ziehen
Sie
die
Schraube
O
fest.
• Signale zum Herunterstellen der Nadel und fiir den Fadenabschneider
Die
untere
Nadelstopposition
nicht
einstellen.
Hinweis:
DerSynchronisator wird im Herstellungswerk eingestellt.
Bei
abgenommener Riemenscheibe darf der
Synchronisator
nicht
enfernt
werden.
Wenn
die
Riemenscheibe
angebracht
wird,
muB
zwischen
der
Scheibe
und dem Synchronisator ein Abstand von 0,5 mm vorhanden sein.
Ziehen Sie die beiden Riemenscheibenschrauben fest, so daB sich die hintere Schraube am Anschlag der oberen
Welle befindet,
gesehen
von
der
Riemenscheibendrehrichtung.
DB2-B720
series
52