EasyManuals Logo

Citizen CL-E321 User Manual

Citizen CL-E321
101 pages
To Next Page IconTo Next Page
To Previous Page IconTo Previous Page
Page #74 background imageLoading...
Page #74 background image
74
7. Release the FEED key once the buzzer emits a long tone.
The sensor adjustment process starts.
Once sensors have been adjusted, the buzzer emits 1 short tone, and the printer restarts.
The buzzer emits 1 long tone if sensor adjustment fails. If this happens, check the sensor
and media positions.
To cancel sensor adjustment, continue pressing and holding the FEED key for at least
3 seconds at step 7.
The buzzer emits 4 short tones, and the printer restarts.
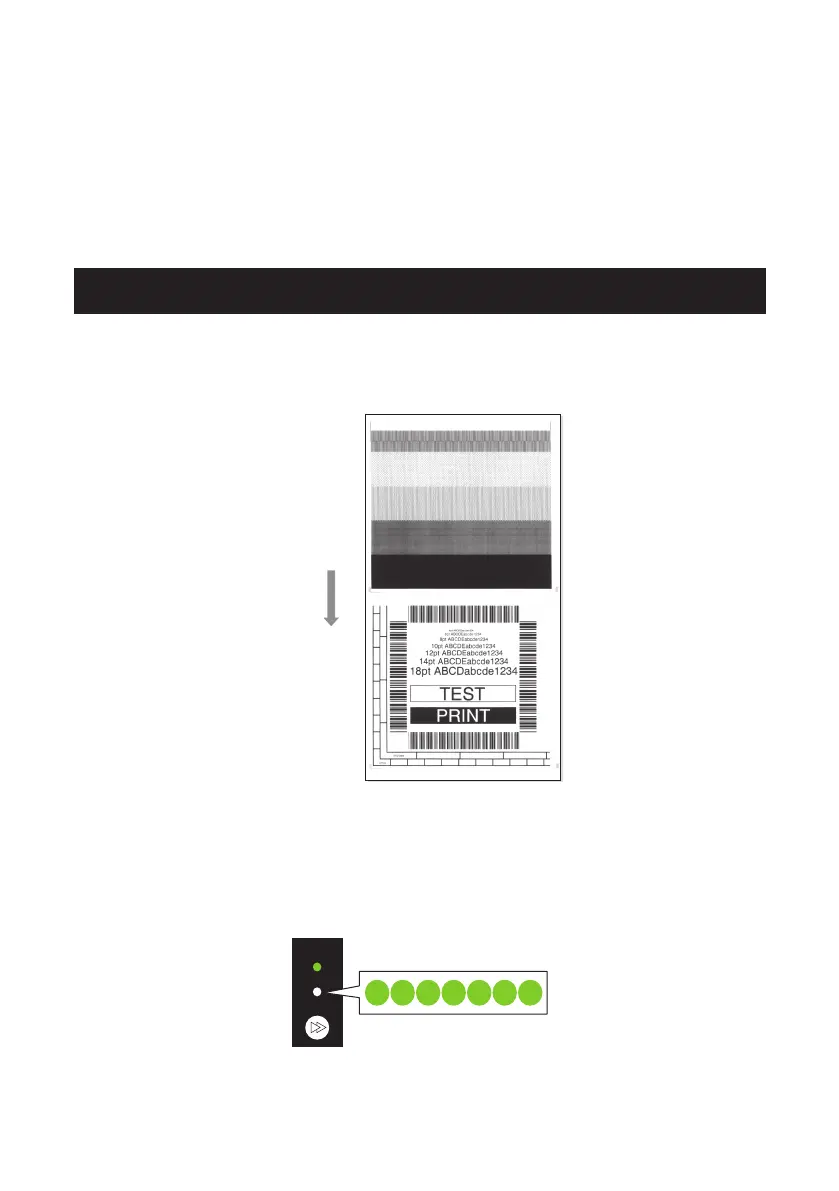
7.2 Test print mode
This mode prints the test sample.
This printer can print test samples to label media and continuous media.
Printing test samples is a quick way to check print quality.
Dimension of
media feed
Load media and then perform the following procedure.
1. Turn on the power to the printer while pressing and holding the FEED key to start the
printer in special function mode.
2. Press the FEED key twice to select test print mode.
The buzzer emits 2 short tone.
The status LED also ashes quickly in green.

Table of Contents

Other manuals for Citizen CL-E321

Questions and Answers:

Question and Answer IconNeed help?

Do you have a question about the Citizen CL-E321 and is the answer not in the manual?

Citizen CL-E321 Specifications

General IconGeneral
Print TechnologyThermal Transfer / Direct Thermal
Resolution203 dpi
Power Supply100-240V AC, 50/60 Hz
Max Print Width4.1 inches (104 mm)
Media SensorTransmissive and reflective sensor
InterfaceUSB, Serial (RS-232)
Media Width1.97 to 4.33 inches (50 to 110 mm)
Supported Barcode TypesCode 39, Code 128, ITF, Codabar, UPC-A, UPC-E, EAN-8, EAN-13, POSTNET
Supported Media TypesContinuous, Die-cut
Media Thickness0.0635 – 0.254 mm (2.5 - 10 mil)
Print SpeedUp to 8 inches per second

Related product manuals