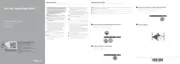
Figure 75. Removing the left control panel
Next step
1 Install the left control panel.
Installing the left control panel
Prerequisites
1 Follow the safety guidelines listed in the Safety instructions.
2 Follow the procedure listed in the Before working inside your system.
3 Remove the front bezel.
4 Remove the air shroud.
Steps
1 Route the control panel cable through the side and the guide slots in the system.
NOTE
: Route the cable properly to prevent the cable from being pinched or crimped.
2 Align and insert the left control panel assembly in the slot on the system.
3 Connect the control panel cable to the system board connector.
4 Using the appropriate screwdriver, replace the screws that secure the left control panel assembly to the system.
102
Installing and removing system components

 Loading...