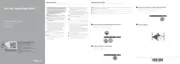
Figure 52. Installing the optional optical drive
Next steps
1 Install the front bezel.
2 Follow the procedure listed in the After working inside your system.
Processor and heat sink
Removing the heat sink
Prerequisites
WARNING
: The heat sink may be hot to touch for some time after the system is powered down. Allow the heat sink to cool
before removing it.
1 Follow the safety guidelines listed in the Safety instructions.
2 Follow the procedure listed in the Before working inside your system.
3 Remove the air shroud.
4 Remove the expansion card riser.
Steps
1 Using a Philips #2 screwdriver, loosen the screws on the heat sink in the order mentioned below:
a Loosen the rst screw three turns.
b Loosen the screw diagonally opposite to the screw you loosened rst.
c Return to the rst screw and loosen it completely.
d Repeat the procedure for the remaining two screws.
2 Lift the heat sink away from the system.
Installing and removing system components
81

 Loading...