Steps
1. Align and place the auxiliary and main antennas into its slot on the palm-rest and keyboard assembly.
2. Reroute the auxiliary and main antennas using the routing guides on the palm-rest and keyboard assembly.
3. Adhere the tapes securing the auxiliary and main antennas to the palm-rest and keyboard assembly.
4. Replace the two captive screws (M1.4x2.5) to secure the main antenna on the palm-rest and keyboard assembly.
5. Replace the two captive screws (M1.4x2.5) to secure the auxiliary antenna on the palm-rest and keyboard assembly.
Next steps
1. Install the system board.
2. Install the audio jack.
3. Install the graphics fan.
4. Install the processor fan.
5. Install the battery.
6. Install the M.2 2230 solid state drive or M.2 2280 solid state drive.
7. Install the base cover.
8. Follow the procedure in After working inside your computer.
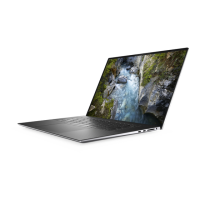
Palm-rest and keyboard assembly
Removing the palm-rest and keyboard assembly
Prerequisites
1. Follow the procedure in Before working inside your computer.
2. Remove the base cover.
3. Remove the M.2 2230 solid state drive or M.2 2280 solid state drive.
4. Remove the battery.
5. Remove the processor fan.
6. Remove the graphics-card fan.
7. Remove the audio jack.
8. Remove the speakers.
9. Remove the display assembly.
10. Remove the system board.
NOTE:
The system board can be removed or installed together with the heat sink attached. This simplifies the
procedure and avoids breaking the thermal bond between the system board and the heat sink.
11. Remove the power button board with finger print reader.
12. Remove the WLAN antennas.
About this task
The following image indicates the palm-rest and keyboard assembly and provides a visual representation of the removal
procedure.
96
Removing and installing Field Replaceable Units (FRUs)