Autosampler ASPQ 3300 PlasmaQuant MS product family
122
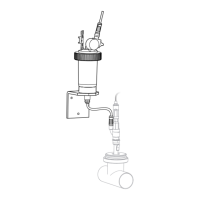
4. Connect the pump tubing to the lower inlet connector (1a) of
the wash cup. Clamp the tubing between two stoppers into
the pump with the connection to the wash cup facing
upwards. Connect the other end of the pump tubing (1b)
with a coupling to the aspiration tubing for the wash
solution.
Connect the waste tubing (2a) to the upper outlet connector
of the wash cup. Clamp the tubing between two stoppers into
the pump with the connection to the wash cup facing
downwards. Connect the other end of the tubing (2b) with
the waste tubing and place it in the waste container on the
floor.
Notice! Note the pump direction! The pump moves in a
clockwise direction.
Close the pressure bars over the pump tubing.
7. Insert the cannula into the holder on the autosampler head.
Move the holder along the Z-axis (down and up) and check
whether the cannula fits through the guide at the lower end
of the head. Fasten the cannula with the nut on the holder
(arrow in figure on the left).
8. Guide the sample capillary tubing initially in a loop through
the hook on the cannula holder (1).
Thread the tubing from the left side through the hook (2) at
the lower end of the head.
10. Place the tubing at the rear in the guides at the rear of the
autosampler arm.
 Loading...