PlasmaQuant MS product family Autosampler ASPQ 3300
123
11. Set all eight DIP switches (1) to off (right position); none of
the switches is set to "ON".
Connect the autosampler (2, "HOST") with the interface cable
to the computer. Use the provided USB-adapter, if necessary.
Connect the mains cable to the autosampler (3) and then
with the mains socket.
14. Connect the autosampler tubing to the sample tubing of the PlasmaQuant MS.
15.
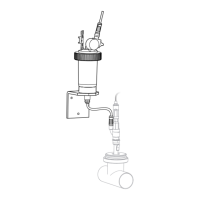
Set the pump speed on the autosampler with the speed controller (10 in Fig. 63) so that the liquid level
remains constant and not too much rinse solution overflows.
11.3 Maintenance
Contamination on the sample tray and the housing can be removed with a dry cloth on
a daily basis as required. In addition, if required:
Replace the pump tubing
Replace the cannula and the suction tubing
Clean the wash cup after overflow
11.3.1 Replacing the cannula and the sample tubing
The autosamplers are delivered with a cannula to which the sample tube is attached.
Cannula and sample tube are always replaced at the same time.
1. Switch off the automatic sampler at the power switch.
2. Cut the connection between the sample tube of the autosampler and the basic
unit.
3. Carefully pull the sample tube off the tube guides on the automatic sampler.
4. Unscrew the cannula from the holder on the automatic sampler. Remove the
cannula with sample tube and coupling pieces from the holder in the automatic
sampler.
5. Prepare the new cannula with sample tube:
Attach the coupling piece (1) to the sample tube.
Push the narrow end of the conical nipple downward into the cannula. Position
the conical nipple near the upper edge of the cannula.
Push the banjo bolt (3) from below onto the cannula. Screw the banjo bolt into
the coupling piece (1).