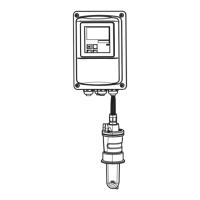
Maintenance Smartec S CLD132
54 Endress+Hauser
7 Maintenance
Take all necessary measures in due time to guarantee the safety of operation and reliability of the
entire measuring system.
Maintenance on the Smartec S CLD132 includes:
• Calibration (see chapter "Calibration")
• Cleaning of assembly and sensor
• Checking of cables and connections.
#
Warning!
• Please be aware of effects work performed on the instrument might have on the process control
system or the process itself.
• When removing the sensor during maintenance or calibration, please consider potential hazards
due to pressure, high temperatures and contamination.
• Disconnect the instrument from the power source before opening it up.
Work with live lines may only be performed by trained electricians!
• Switched contacts may be supplied from separate circuits. These circuits must also be
de-energised before work on the terminals is performed.
Caution ESD!
• Electronic components are sensitive to electrostatic discharges. Personal protective measures,
such as discharge via PE or permanent grounding using a wrist strap, are to be taken.
• For your own safety, use only original spare parts. Original parts will guarantee functionality,
accuracy and reliability after repairs.
!
Note!
Please contact your Endress+Hauser representative if you have any questions. You can also send
your queries to the Endress+Hauser Service Organisation via the Internet: www.endress.com
7.1 Maintenance of Smartec S CLD132
7.1.1 Dismantling Smartec S CLD132
"
Caution!
Consider potential effects on process when removing the instrument from service!
!
Note!
For item numbers see the exploded view drawing in chapter 9.5.
1. Remove the cover (item 40).
2. Remove the internal protecting cover (item 140). Release the lateral latches with a
screwdriver.
3. Pull off the five-pole terminal block first to de-energise the instrument.
4. Then pull off the remaining terminal blocks. Now you can dismantle the instrument.
5. Loosen 4 screws to remove the complete electronics box from the steel housing.
6. The power supply module is snapped in and can be loosened and removed by slightly bending
the electronics box walls. Start with the rear catches!
7. Pull off the ribbon cable connected (item 110); now the power supply can be removed.
8. The central module is also snapped in and easy to remove. Note! The central module may be
fastened with an additional centre screw. Remove this screw if present.

 Loading...