SC-S30600 Series Revision B
DISASSEMBLY & ASSEMBLY Disassembly and Assembly Procedure 144
Confidential
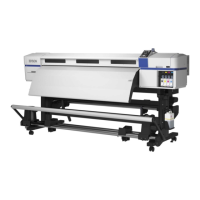
12. Disconnect the cable of the Reel Unit.
13. Remove the five screws, and remove the Right Rear Cover.
A) Silver M4x10 S-tite screw with washer: 4 pcs
B) Silver M3x6 screw: 1 pcs
Figure 3-96. Removing the Right Rear Cover
14. Remove the screw that secures the joint.
C) Silver M3x6 screw with built-in washer: 1 pcs
15. Remove the two screws, and separate the upper joint and lower joint.
D) Silver M3x10 screw: 2 pcs
.
Figure 3-97. Removing the Joint
A
A
A
A
B
Cable of the
Reel Unit
Right Rear Cover
When the joint is removed in the next step, ink may drip off
from the tube. Prepare a waste cloth or the like in advance and
be careful not to contaminate the surroundings.
When removing/attaching the screw that secures the joint, hold
the mounting plate with your hand during the work to prevent
the plate from being deformed. If the plate becomes deformed,
flatten it as it was.
 Loading...