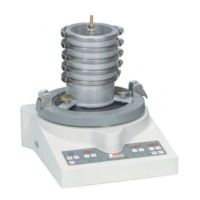
1 Clamping lid with a nozzle
2 Clamping ring with fast locking clamp
3 Sieve pan (with funnel)
4 Sieve spacer ring with 2 seals
5 Micro-precision sieve
n T
urn the rubber pad on the vibratory plate unl three caps can be
seen; there are three threaded bore holes under the caps.
n Take o the caps and screw the sieve pan (with funnel) (3) onto the
cen
tre of the vibratory plate using the clamping elements and
knurled screws. The three clamping elements are now lying on the
lower edge of the sieve pan and the vibratory plate.
n Close the hose with a hose clamp.
n Switch on the sieve shaker in "MICRO" operang mode.
n F
asten the rst spacer ring onto the sieve pan (3) using the clamping
ring (2).
n Then, ll the sieve pan with the funnel (3) and the spacer ring (4)
with liquid up t
o the seal ring.
n Fit the rst sieve (5) - sieve foil at the boom -
lted at rst so that
the air under the sieve can escape.
n Lower the sieve slowly. The liquid now rises above the sieve foil.
n Place another spacer ring (4) on the sieve and fasten both spacer
rings to one another with a clamping ring (2).
n If se
veral sieves are used in the sieve stack, aach the subsequent
sieves in the same manner.
n Fill every sieve with liquid before ng the next sieve.
n F
asten the sieve cover (1) on the top spacer ring using a clamping
ring (2).
n Connect a hose (with hose clamps) to the coupling on the sieve
cover, through which water can be fed.
6.4.4 Wet sieving with micro-precision sieves
Remove the lid and pour the sieving stock in suspensions onto the top
sie
ve. Liquid can be sprayed in through the nozzle in the lid. Keep in
mind, however, that consumpon can be considerably reduced by the
me sieving is nished; it is therefore necessary to adjust the quanty of
liquid.
Introducing the liquid (water or alcohols) using a spray bole has proven
successful. It makes it possible to disperse the sieving stock in a targeted
manner and accelerate sieving progress (=sieving without sieve cover).
When sieving in the top sieve is nished, lower the liquid level to the
height of the sieve foil, close the outlet again and reduce the amplitude
to 0.1 - 0.2 mm. Then remove the sieve cover, spacer ring and the sieve.
Using the device
- 30 -