4
Continue configuration on the user interface.
Establishing a
connection via
LAN
As standard, the Ohmpilot obtains its IP address automatically from the DHCP
server, meaning that no settings are generally necessary.
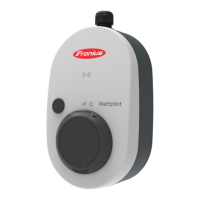
The inverter automatically searches for the Ohmpilot, and the search process
may take up to 5 minutes. If the red LED is not lit and the green LED is flashing,
the Ohmpilot is working correctly.
A static IP address can be assigned to the Ohmpilot via the user interface.
Set Up Network, symbolic representation
1
In the web browser, open the address http://ohmpilotL.local.
Alternatively, the IP address assigned by the DHCP server can also be read
out. Almost every router displays its connected devices (clients) on its user
interface. Apps such as Fing can help you find the automatically assigned IP
address. Alternatively, the Ohmpilot can also be searched on the network us-
ing the Fronius Solar.start App.
NOTE!
Accessing the Ohmpilot via the network.
In networks with a DNS suffix, the Ohmpilot can be accessed at http://ohmpi-
lotL.<DNS-Suffix>, e.g. http://ohmpilotL.fronius.com
To set the IP address manually, the "Static" option must be selected. Then enter
the desired IP address.
The Ohmpilot can then be reached at http://ohmpilotL.local or at the fixed IP
address assigned.
Establishing a
connection via
WLAN
There are two options for connecting the Ohmpilot to an existing WLAN network:
Connecting via WPS (WiFi Protected Setup)
1
Press the button on the Ohmpilot 1x.
The blue LED flashes (once) as long as WPS is active.
40