10
|
HEAT-TIMER CORP.
059327–00 REV. C
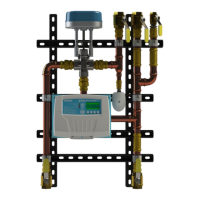
The installation process for ETS-LT consists of the following basic steps:
1 Initial installation (see “Design Considerations” on page 10).
2 Mounting the ETS-LT assembly (see page 11).
3 Connecting the ETS-LT assembly power wiring (page 15).
4 Upgrade/optional wiring the ETS-LT (see page 40).
5 Starting up the ETS-LT (page 25).
SUPPLIED MATERIALS
The following materials are supplied with the control module:
• Installation and Operation Manual (P/N 059326–50).
• Warranty Card (P/N 059115–00).
REQUIRED MATERIALS (NOT SUPPLIED)
The following materials/tools are required for installation, but are not supplied:
• General tool kit (screwdrivers, wire strippers, power drill, etc.).
• 14 AWG cable (used for incoming 120Vac power).
• Electrical conduit.
• Piping and fitting material.
• Mounting Hardware.
DESIGN CONSIDERATIONS
When installing the system, certain design considerations must be taken into account. These include:
• Selecting a Location for the ETS-LT Assembly (see page 11).
• Mounting the ETS-LT Assembly (see page 11).
• General Electrical Guidelines (see page 13).
• General Piping Guidelines (see page 13).
• Recirculation Pump Sizing (see page 14).
04 INSTALLATION INSTRUCTIONS