52 53
24. scroll to highlight the S/W eld and press the jog dial to
activate the menu.
25. Scroll to select the switch you have chosen to control dual
rates and press the jog dial to conrm.
26. Physically move the switch to the desired position for
lowrates(check position by [0],[1],[2] on the up right side
of the graph)
Repeat steps 5~23to tune low-rate throws and exponential values.
Repeat 4~26 to tune each control function.
27. Press the back button to return to model menu..
Switch Assignment
The nal settings in the D/R & EXP menu should reect the model aircraft manufacturer’s
suggested control surface deections for each function. Some manufacturers also provide
suggested exponential values.
TipTip
Tip
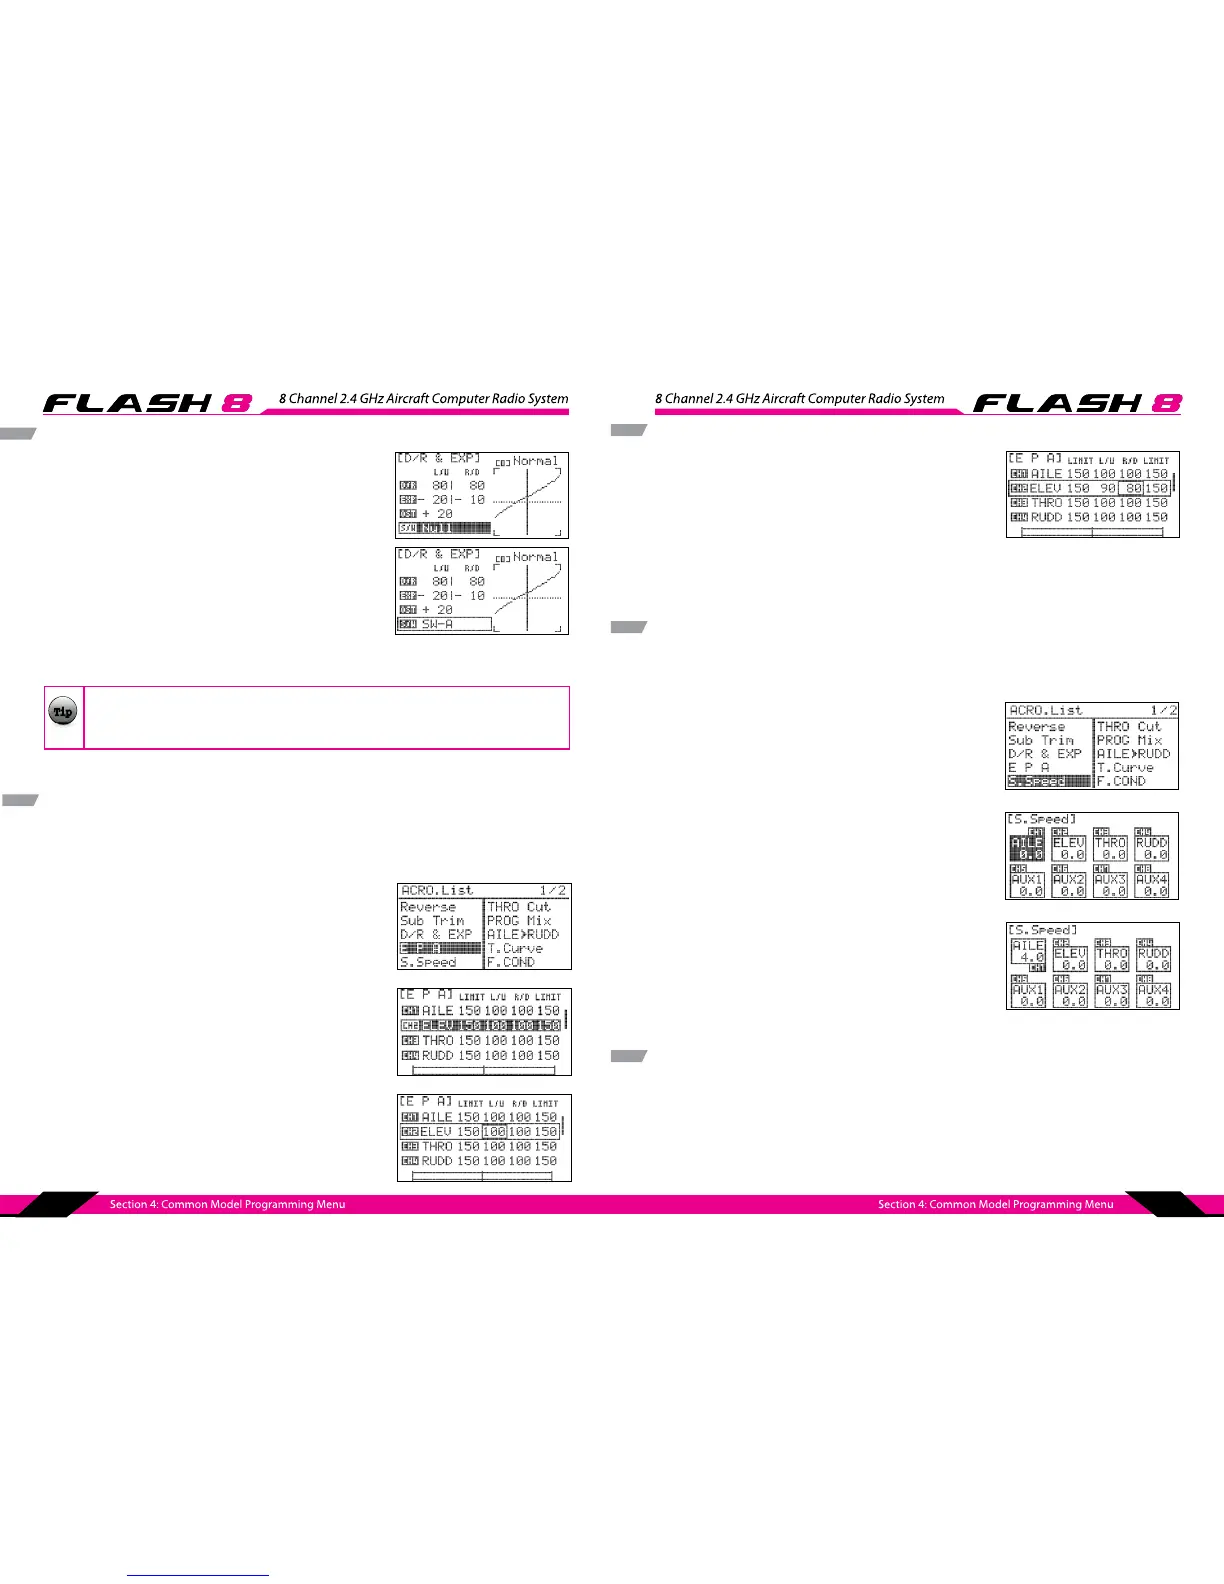
The End Point Adjustment (EPA) feature allows you to ne tune the maximum servo movement for every
channel. This capability is very useful when dealing with models that require small control movements or
in cases where binding/damage could occur from excessive control movement.
EPA
1. From the model menu, scroll to highlight “EPA” and press the
jog dial once to enter the EPA menu.
2. Scroll to the control surface to be adjusted and press the jog
dial to activate the EPA sub-menu.
3. Scroll to highlight the “L/U” (left/up) eld and press the jog dial
to activate the menu.
4. Rotate the jog dial to increase (clockwise) or decrease
(counter-clockwise) the desired left (AILE, RUDD) or up (ELEV)
servo endpoint. Press the jog dial to conrm your input.
EPA cont.
5. Scroll to highlight the “R/D” (right/down) eld and press the
jog dial to activate the menu.
6. Rotate the jog dial to increase (clockwise) or decrease
(counter-clockwise) the desired right (AILE, RUDD) or down
(ELEV) servo endpoint. Press the jog dial to conrm your input.
7. Press the back button the return to the EPA menu.
8. Repeat steps 2 through 8 for the control surfaces you would like to adjust.
9. Press the back button again to return to the model menu.
The Servo Speed (S.SPEED) feature allows you to ne tune the maximum servo movement for every
channel. This capability is very useful when dealing with models that require small control movements or
in cases where binding/damage could occur from excessive control movement.
S.SPEED
1. From the model menu, scroll to highlight “S.SPEED” and
press the jog dial once to enter the servo speed menu.
2. Scroll to the channel to be adjusted and press the
jog dial to activate the menu.
3. Rotate the jog dial clockwise or counter-clockwise to alter the
speed of the servo. The selected value is the transit time of the
servo in seconds (0-25.0).
4. Once you have achieved the desired servo speed, press the
jog dial to conrm your change.
5. Press the back button to return to the model menu.
The FLASH 8 provides three user-programmable mixes which can be used for a wide variety of custom
functions that are not available with the built-in mixes and options. A common use for these mixes is
to correct unwanted behavior of an aircraft. This could be automatically applying a bit of rudder with
throttle to counteract torque/P-factor eects, or applying elevator during knife-edge ight to correct an
undesired tucking tendency. Maybe you just want the head on your model’s pilot gure to turn when you
taxi out to the runway. Programmable mixes can make it happen.
PROG.MIX