74 75
Elev>Camb cont.
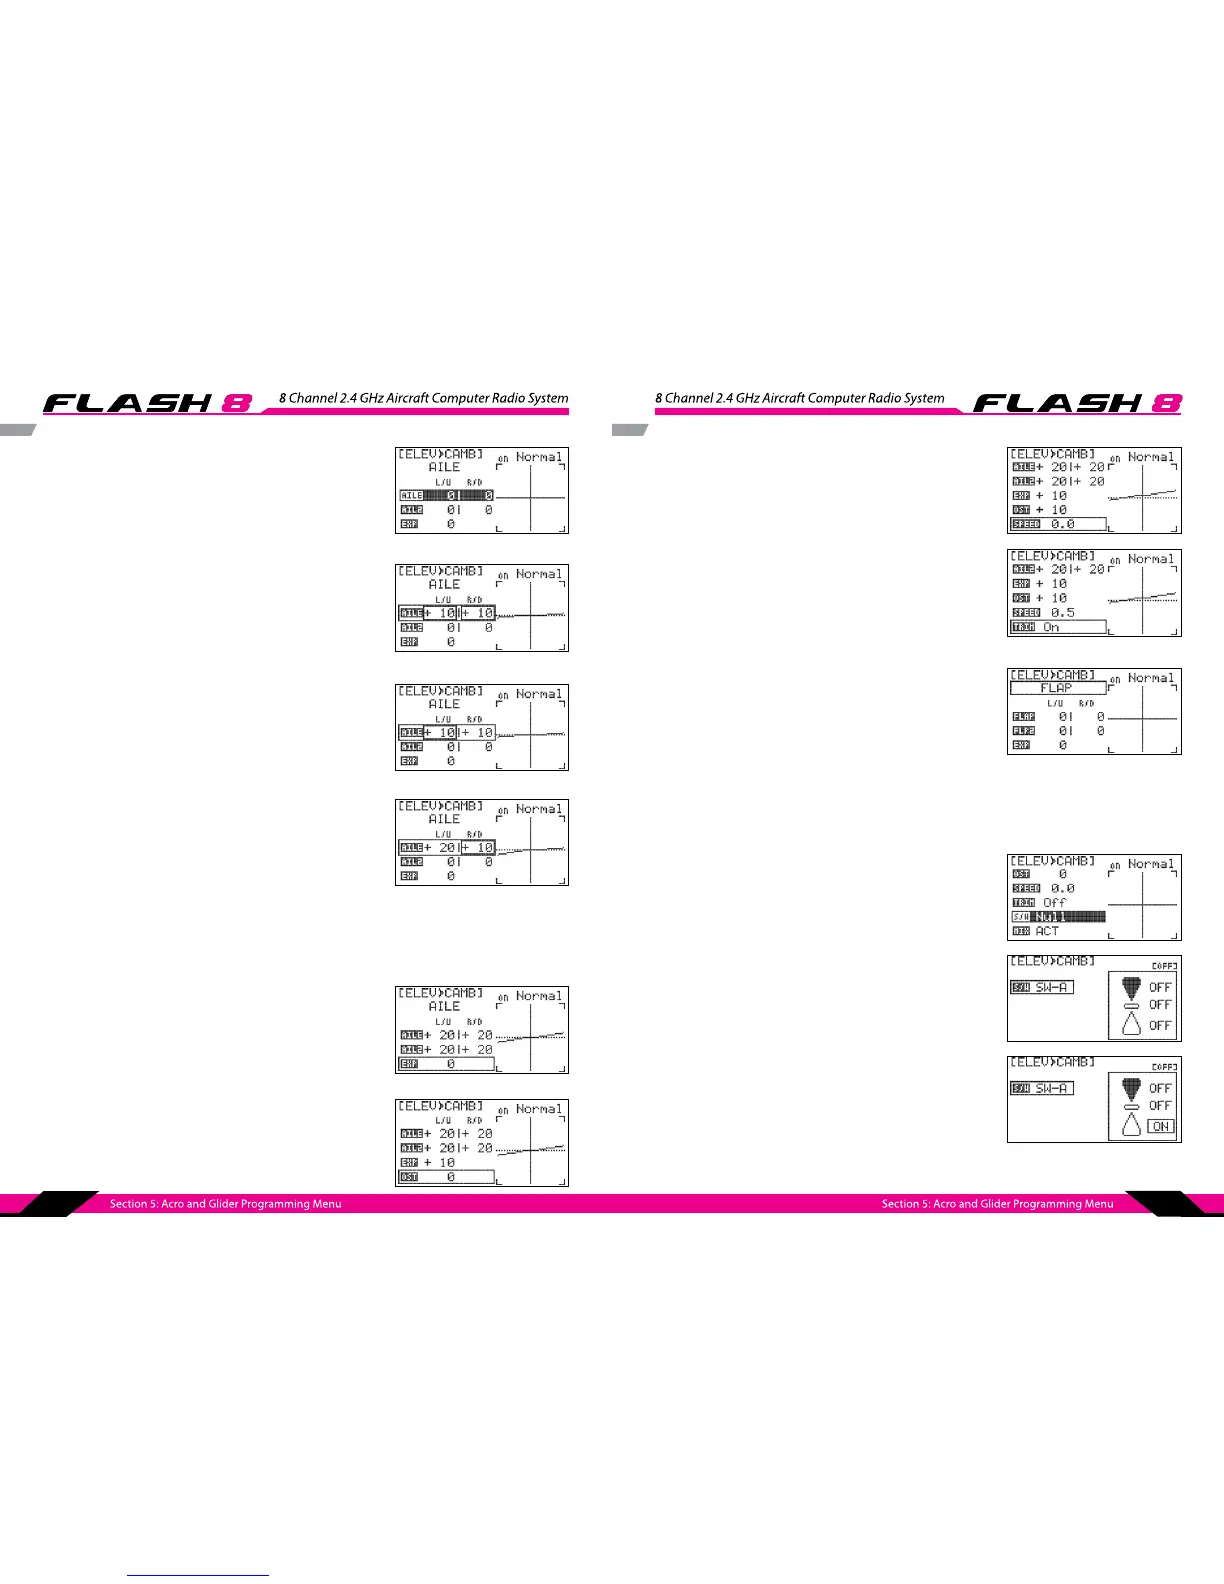
6. Scroll to the top row of the value table (“AILE”) and press the
jog dial to activate the menu.
7. Rotate jog dial to highlight “L/U” (Left/Up) “R/D” (Right/Down)
eld and press the jog dial to activate the menu.
8. Rotate the jog dial to set the servo endpoint
[increase(clockwise) or decrease(counter clockwise)] for
“AILE” receiver slot(channel 1) for when a pitch up & down
command is given.
9. Scroll to highlight “L/U” (Left/Up) eld and press the jog dial to
activate the menu.
10. Rotate the jog dial to set the servo endpoint [increase
(clockwise) or decrease (counter clockwise)] for processing
elevator stick up command. Press the jog dial to conrm your
input.
11. Scroll to highlight “R/D” (Right/Down) eld and press the
jog dial to activate the menu.
12. Rotate the jog dial to set the servo endpoint
[increase (clockwise) or decrease (counter clockwise)] for
processing elevator stick down command. Press the
jog dial to conrm your input.
14. Scroll to highlight the “EXP” eld and press the jog dial to
activate the selection.
15. Rotate the jog dial to input the desired exponential travel of
the aileron servos when reacting to this mix. The setting does
not aect exponential travel of the servos when roll
commands are given.
16. Scroll to highlight “OST” eld and press the jog dial to
activate the menu.
17. Rotate the jog dial to set the Oset value of the desired
channel. Press the jog dial to conrm your input.
13. Repeat steps 6-12 to set the endpoints for the servo attached to the “AIL2” receiver slot (second row of
the value table). As with the previous settings, the values input here do not aect the servo travel
when roll commands are given.
Elev>Camb cont.
- The switch position menu will appear. Scroll to highlight the
switch position that you will use to enable the mix. Press the
jog dial to conrm your selection.
18. Scroll to highlight ”SPEED” eld and press the jog dial to
activate the menu.
19 Scroll the jog dial to set the speed of servo movement for
elevator and press the jog dial to conrm your input.
Speed is not applied while the channel is in action.
20. Scroll to highlight the “TRIM” eld and press the jog dial to
activate the menu.
21. Scroll to select “ON” or “OFF” and press the jog dial to conrm
your selection. When “ON” is selected, the mix reacts to trim
adjustments of the elevator. Otherwise, the mix ignores
elevator trim changes.
22. If the model is equipped with aps, scroll to the function eld
(“AILE” or “FLAP”) and press the jog dial to activate the menu.
Otherwise, skip to step 24.
23. Scroll to select “FLAP” and press the jog dial to conrm your
selection.
24. Repeat steps 5-21 to congure the ap movements for this mix.
If using only one ap servo, congure only the “FLAP” row of the value table.
If using two ap servos, congure both rows of the value table.
25. Scroll to the “S/W” eld and press the jog dial twice to
activate the menu.
26. Scroll to select a switch to activate the mix.
Press the jog dial to conrm your selection.
a. If you choose the “NULL” option, the mix will remain active at
all times for this model.
b. If you choose a switch: