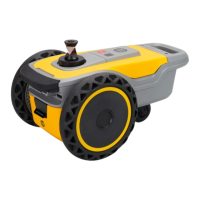
Accuracy dashboard
With the release of Value Pack 2.2, the control panel will include a dashboard that displays the status of
various indicators relevant to the overall accuracy of the system.
The purpose of this dashboard is to alert users to any factors that could influence the accuracy of their
jobs.
Each indicator has three statuses: excellent, fair, or poor.
Not all indicators contribute equally to the overall accuracy of the system. When the status of a critical
indicator deteriorates, notifications will be triggered.
If an indicator status is not excellent, that does not necessarily mean that the job cannot be performed
within the accuracy specifications.
However, it is helpful to alert the user when any status is not excellent, as taking simple actions to
improve the indicator can benefit the overall accuracy of the job.
By collecting the different statuses of all indicators and considering their corresponding weight in terms
of the impact each metric can have on the overall accuracy of the system, the system can display an
overall accuracy status.
Table 2-1
Robotic Total Station indicators
Indicator Description Poor (red) Fair (yellow) Excellent
(black)
Actions
Distance to
prism
Indicates the distance
between the RTS and the
tracked prism.
0–3 m (0–9.8
ft)
3–6 m (9.8–
19.7 ft)
> 6 m (19.7 ft) Positioning the robot too close to the RTS
can affect accuracy. Always ensure the RTS
is set at least 6 m (19.7 ft) away from the print
area. If you cannot move the station further
away, put it as low as possible on the tripod.
Data rate Shows the frequency of
RTS measurements sent
to the robot, highlighting
deviations from the RTS
nominal frequency.
±20% versus
nominal
frequency
±8% versus
nominal
frequency
Nominal
frequency
If this indicator displays red or yellow, the
RTS may lack necessary configurations for
the appropriate refresh rate or could be
malfunctioning. Contact your HP SitePrint
specialist.
Setup
angular
amplitude
Tracks setup quality by
measuring the angular
amplitude of the control
points used for RTS setup.
< 30° 30°–60° > 60° Always perform your RTS setup using
best practices and maximize the angular
amplitude.
Accuracy dashboard 25