Chapter Four: Operation How To Check the Zero
41
Chapter Four: Operation
Caution
Only qualified individuals should perform the installation and any
user adjustments. They must comply with all the necessary ESD and
handling precautions while installing and adjusting the instrument.
Proper handling is essential when working with all highly sensitive
precision electronic instruments.
How To Check the Zero
Check the transducer zero before operating the unit initially and then periodically as required.
The zero can be set (or reset) by adjusting the zero potentiometer located on the top cover of the
transducer or, on the front panel of an MKS Power Supply/Readout, if you are using one.
Note
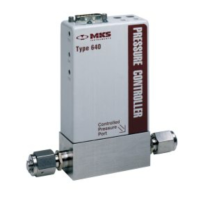
The port labeled “Controlled Pressure Port” serves as the transducer inlet
ort. Figure 3, page 17, shows the labels on the unit.
How To Zero a Type 640B (Absolute) Unit
To zero a 640B controller (with an absolute transducer inside) you must pump the unit, with the
power on, down to a pressure less than the transducer’s resolution (0.01% of Full-scale).
Note
The zero adjustment must be made at a pressure less than the transducer’s
resolution (0.01% of F.S.).
In addition, you should position the unit in the same orientation as it will
be positioned when installed in your system.
Zeroing a transducer above its stated minimum resolution creates a zero offset relative to true
absolute pressure. All subsequent readings are then linear and accurate relative to the offset
value.
Note
If your system cannot achieve a sufficiently low pressure to set the
transducer zero, you may use a vacuum leak detector with sufficient
vacuum pumping (to achieve a proper zeroing pressure). In this case,
mount the unit on the leak detector in the same plane of orientation as it
will be during actual use.