EasyManua.ls Logo

NextWave Digital SHARK LCD - User Manual

NextWave Digital SHARK LCD
64 pages
Print Icon
To Next Page IconTo Next Page
Loading...
SHARK
®
LCD Pendant Control
User’s Manual
®
Question and Answer IconNeed help?

Do you have a question about the NextWave Digital SHARK LCD and is the answer not in the manual?

Summary

Warranty and Safety Information

Product Warranty Details

Details the two-year limited warranty for material and workmanship defects.

Safety Information

Read and follow all safety instructions for the SHARK CNC Owner's Manual.

System Requirements and Support

LCD Pendant System Requirements

Compatibility with SHARK HD and SD series CNC machines and control box requirements.

Technical Support

Information on obtaining technical assistance and contact details.

Serial Number and Software License

Locating and recording serial numbers and license information for easy reference.

Basic Parts and Connections

Pendant Cable Connection and Safety

Registering Your SHARK HD CNC

Product Registration Process

CNC Machine Unlock Process

Calibration and Unlocking Confirmation

Main Control Screen Overview

Axis Position Fields

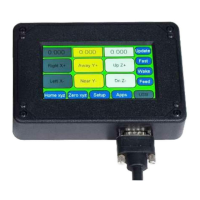
Description of the fields showing current axis locations and how to edit them.

Jog Buttons and Speed Control

Using jog buttons to move axes and toggle jog speed settings.

Zeroing and Special Functions

Using Mv 0,0, Zero xyz, Setup, Apps, and USB functions.

Axes Position Fields Explained

X and Y Axis Edit Screen

Z-axis Edit Screen

A-axis Edit Screen

Setup Menu Screen Navigation

Jog Speed Configuration

Adjusting the speed for jogging the CNC axes.

Display and Audio Settings

Configuring LCD brightness, beep sound, and environment settings.

Machine Configuration Settings

Setting model number, display units, safe height, and file delay.

Jog Speed Settings

LCD Brightness and Beep Sound Adjustment

Noisy Environment and Spindle Polarity

Model Number Configuration

Display Metric (mm) Setting

Safe Height Setting

File Character Delay Setting

Apps Menu Screen Navigation

Calibration and Zeroing Apps

Touch Plate Calibration and Virtual Zero for accurate setup.

Job Array, Homing, and Digitizer

Duplicating parts, setting machine home, and mapping shapes.

Laser and 4 th Axis Functions

Laser engraving and rotary axis accessory configuration.

Touch Plate Calibration Procedure

Touch Plate Speed and Thickness

Virtual Zero App Overview

Virtual Zero: Design and Toolpaths

Virtual Zero: Saving Toolpaths

Virtual Zero: Touch Source Selection

Virtual Zero: Speed and Scan Area

Virtual Zero: Enabling Scan

Virtual Zero: X and Y Axis Zeroing

Virtual Zero: Z Axis Zeroing

Virtual Zero: Selecting Toolpath File

Virtual Zero: Scan Region Options

Virtual Zero: Scan Area Definitions

Virtual Zero: Capturing Scan Points

Virtual Zero: Running Toolpath

Virtual Zero: Next Toolpath and Bit

Virtual Zero: Using Existing Points and Calibrating New Bit

Virtual Zero: Completing Project

Boundary Monitor and Center Finder

Job Array Functionality

Job Array Configuration Details

Home X & Y Axes Setup

Home X & Y Axes Positioning

Home X & Y Axes Outcome

XY Offset for Project Zero

Applying XY Offset to Project Zero

Digitizer Accessory Usage

Laser Module Functions

4 th Axis Accessory Configuration

Miscellaneous Apps and Info Screens

About Screens Details

Maintenance and Firmware Updates

Ready2 Control Software Option

NextWave Digital SHARK LCD Specifications

General IconGeneral
BrandNextWave Digital
ModelSHARK LCD
CategoryController
LanguageEnglish