2 – ENGLISH
ENGLISH
Translation of the original instructions in full
CONTENTS
GENERAL SAFETY WARNINGS AND
PRECAUTIONS
1
1 GENERAL SAFETY WARNINGS AND PRECAUTIONS
1.1 GENERAL WARNINGS
a
Prior to installing the appliance, carefully read and
observe these instructions, since incorrect installa-
tion can cause serious harm to people and damage
to the appliance. Store them with care.
a
According to the latest European legislation, an au-
tomated device must be constructed in conformity
to the harmonised rules specied in the current
Machinery Directive, which allow for declaring the
presumed conformity of the automation. Conse-
quently, all the operations for connecting the prod-
uct to the mains electricity, its commissioning and
maintenance must be carried out exclusively by a
qualied and expert technician.
a
In order to avoid any danger from inadvertent re-
setting of the thermal cut-off device, this appliance
must not be powered through an external switching
device, such as a timer, or connected to a supply
that is regularly powered or switched off by the cir-
cuit.
a
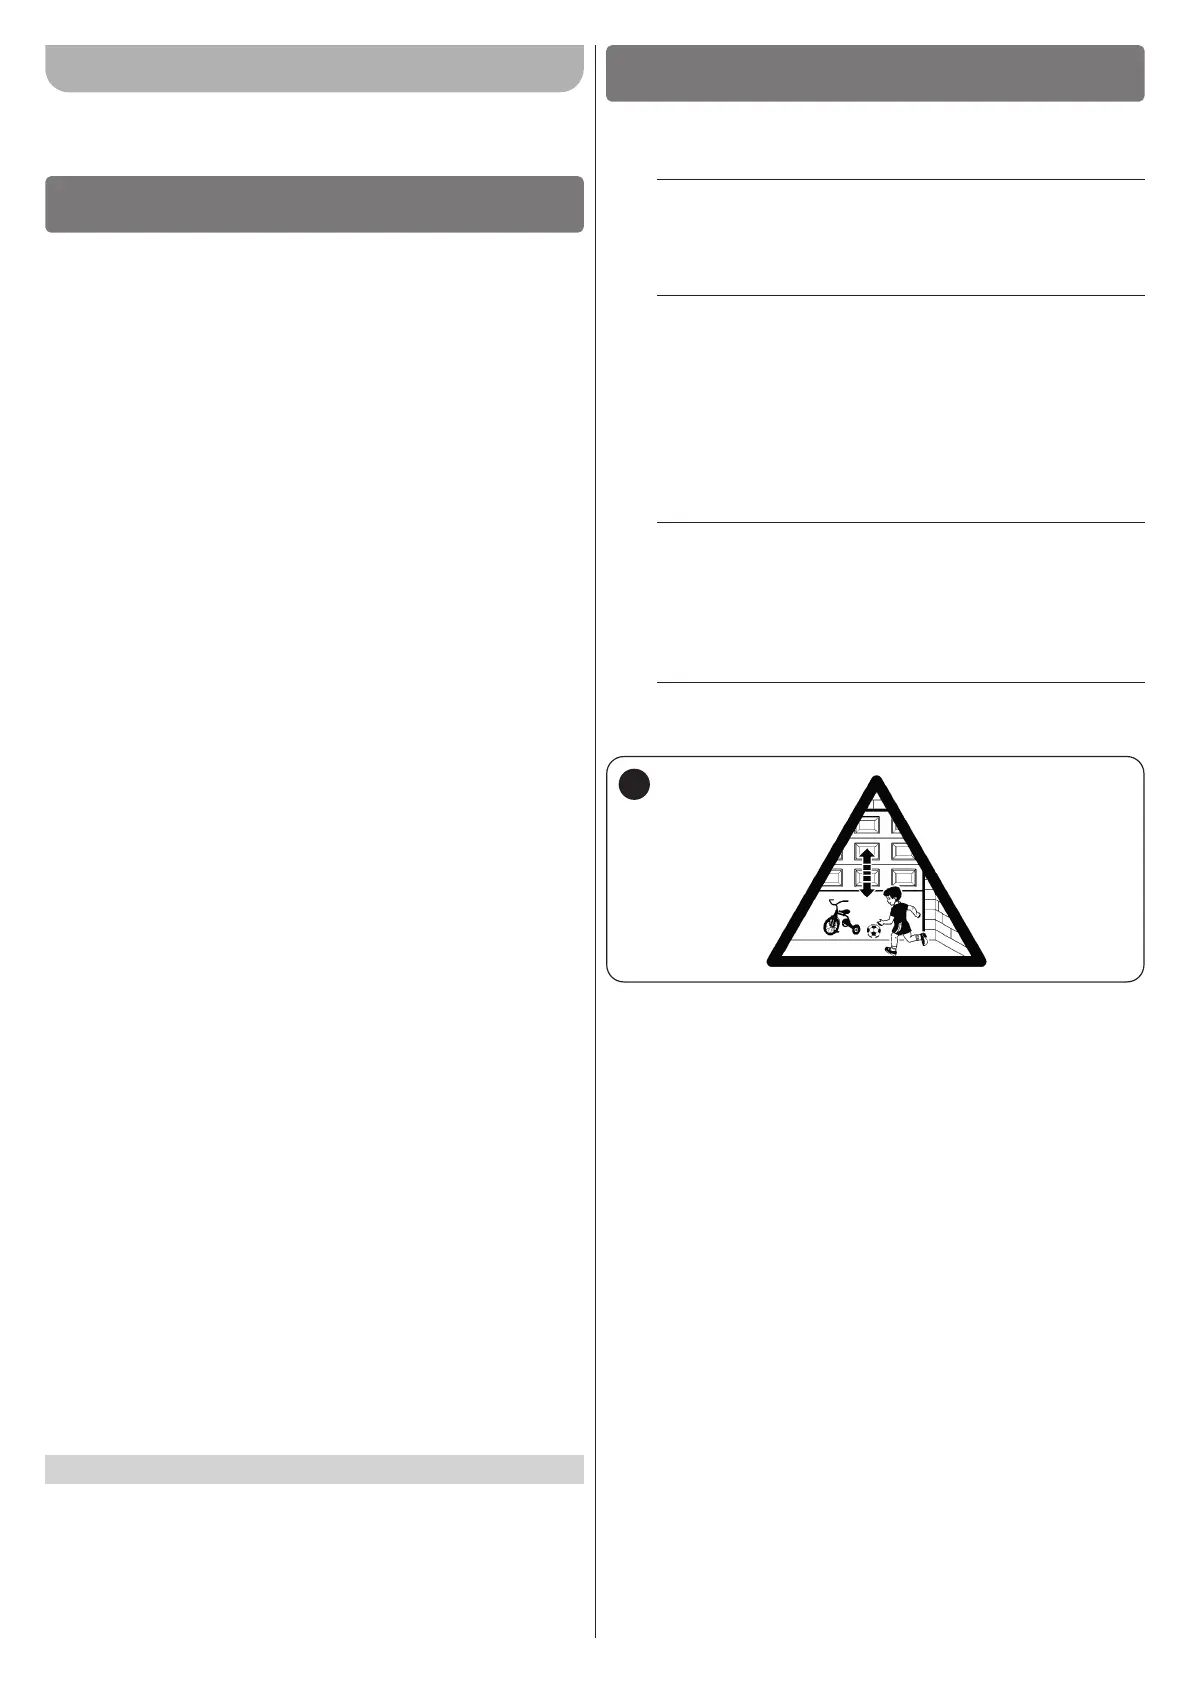
Permanently afx a label or sign to the door with the
following image (minimum height 60 mm) “Figure 1“
1
WARNING! Please abide by the following warnings:
– Before commencing the installation, check the “Product
technical specications”, in particular whether this prod-
uct is suitable for automating your guided part. Should it
not be suitable, do NOT proceed with the installation.
– The product cannot be used before it has been commis-
sioned as specied in the “Testing and commissioning”
chapter.
– Before proceeding with the product’s installation, check
that all the materials are in good working order and suited
to the intended applications.
– The product is not intended for use by persons (including
children) with reduced physical, sensory or mental capac-
ities, nor by anyone lacking sufcient experience or famil-
iarity with the product.
– Children must not play with the appliance.
– Do not allow children to play with the product’s control
devices. Keep the remote controls out of reach of chil-
dren.
1 GENERAL SAFETY WARNINGS AND PRECAUTIONS . . . . . 2
1.1 General warnings . . . . . . . . . . . . . . . . . . . . . . . . . . . . . . . . . 2
1.2 Installation warnings . . . . . . . . . . . . . . . . . . . . . . . . . . . . . . . 3
2 PRODUCT DESCRIPTION AND INTENDED USE . . . . . . . . . 3
2.1 List of constituent parts . . . . . . . . . . . . . . . . . . . . . . . . . . . . . 3
3 INSTALLATION . . . . . . . . . . . . . . . . . . . . . . . . . . . . . . . . . . . . . 4
3.1 Pre-installation checks . . . . . . . . . . . . . . . . . . . . . . . . . . . . . 4
3.2 Product usage limits . . . . . . . . . . . . . . . . . . . . . . . . . . . . . . . 4
3.3 Product identification and overall dimensions . . . . . . . . . . . . 4
3.4 RECEIPT OF THE PRODUCT . . . . . . . . . . . . . . . . . . . . . . . . 4
3.5 Pre-installation works . . . . . . . . . . . . . . . . . . . . . . . . . . . . . . 5
3.6 Installing the gearmotor . . . . . . . . . . . . . . . . . . . . . . . . . . . . . 6
3.7 Manually unlocking and locking the gearmotor . . . . . . . . . . . 9
4 ELECTRICAL CONNECTIONS . . . . . . . . . . . . . . . . . . . . . . . 10
4.1 Preliminary checks . . . . . . . . . . . . . . . . . . . . . . . . . . . . . . . 10
4.2 Wiring diagram and description of connections . . . . . . . . . . 11
4.2.1 Wiring diagram . . . . . . . . . . . . . . . . . . . . . . . . . . . . . . . . 11
4.2.2 Description of connections . . . . . . . . . . . . . . . . . . . . . . . 11
5 FINAL CHECKS AND START-UP. . . . . . . . . . . . . . . . . . . . . . 12
5.1 Power supply connection . . . . . . . . . . . . . . . . . . . . . . . . . . 12
5.2 Programming the door opening and closing positions . . . . . 12
5.3 Automatic force search . . . . . . . . . . . . . . . . . . . . . . . . . . . . 14
5.4 Checking the door movement . . . . . . . . . . . . . . . . . . . . . . . 14
5.5 Inverting the direction of motor rotation . . . . . . . . . . . . . . . . 14
6 TESTING AND COMMISSIONING. . . . . . . . . . . . . . . . . . . . . 15
6.1 Testing . . . . . . . . . . . . . . . . . . . . . . . . . . . . . . . . . . . . . . . . 15
6.2 Commissioning . . . . . . . . . . . . . . . . . . . . . . . . . . . . . . . . . . 15
7 PROGRAMMING . . . . . . . . . . . . . . . . . . . . . . . . . . . . . . . . . . 16
7.1 Using the programming buttons . . . . . . . . . . . . . . . . . . . . . 16
7.2 Programming the control unit . . . . . . . . . . . . . . . . . . . . . . . 16
7.3 Setting of the motor force . . . . . . . . . . . . . . . . . . . . . . . . . . 18
7.4 Setting the motor speed . . . . . . . . . . . . . . . . . . . . . . . . . . . 18
7.5 Setting the automatic closing . . . . . . . . . . . . . . . . . . . . . . . 19
7.6 Setting the FLASH function . . . . . . . . . . . . . . . . . . . . . . . . . 19
7.7 Setting the PHOTOTEST operation . . . . . . . . . . . . . . . . . . . 20
7.8 Setting the tension release . . . . . . . . . . . . . . . . . . . . . . . . . 20
7.9 Setting the SbS operation . . . . . . . . . . . . . . . . . . . . . . . . . . 21
7.10 Memory deletion . . . . . . . . . . . . . . . . . . . . . . . . . . . . . . . . . 21
7.11 Memorising the transmitters . . . . . . . . . . . . . . . . . . . . . . . . 21
7.11.1 Procedure for memorising transmitter buttons . . . . . . . . 22
7.11.2 Number of transmitters that can be memorised . . . . . . . 22
7.11.3 Transmitter memorisation and deletion procedures . . . . . 22
7.12 LOCKING AND UNLOCKING THE MEMORY . . . . . . . . . . . 23
7.13 Special functions . . . . . . . . . . . . . . . . . . . . . . . . . . . . . . . . . 23
7.13.1 “Always open” function . . . . . . . . . . . . . . . . . . . . . . . . . 23
7.13.2 “Move anyway” function . . . . . . . . . . . . . . . . . . . . . . . . . 23
8 TROUBLESHOOTING GUIDE . . . . . . . . . . . . . . . . . . . . . . . . 24
8.1 Troubleshooting . . . . . . . . . . . . . . . . . . . . . . . . . . . . . . . . . 24
8.2 Signals on the control unit . . . . . . . . . . . . . . . . . . . . . . . . . . 25
8.3 Signalling through warning light . . . . . . . . . . . . . . . . . . . . . . 26
8.4 Signals with courtesy light . . . . . . . . . . . . . . . . . . . . . . . . . . 26
9 FURTHER DETAILS (Accessories) . . . . . . . . . . . . . . . . . . . . 27
9.1 Adding or removing devices . . . . . . . . . . . . . . . . . . . . . . . . 27
9.1.1 STOP input . . . . . . . . . . . . . . . . . . . . . . . . . . . . . . . . . . 27
9.1.2 Photocells with PHOTOTEST function . . . . . . . . . . . . . . 27
9.1.3 Electric lock . . . . . . . . . . . . . . . . . . . . . . . . . . . . . . . . . . 28
9.2 Connecting and installing the back-up battery . . . . . . . . . . . 28
9.3 Connecting the Oview programmer . . . . . . . . . . . . . . . . . . . 29
9.4 Connecting other devices . . . . . . . . . . . . . . . . . . . . . . . . . . 29
10 PRODUCT MAINTENANCE. . . . . . . . . . . . . . . . . . . . . . . . . . 30
11 PRODUCT DISPOSAL . . . . . . . . . . . . . . . . . . . . . . . . . . . . . . 30
12 TECHNICAL SPECIFICATIONS. . . . . . . . . . . . . . . . . . . . . . . 31
13 CONFORMITY . . . . . . . . . . . . . . . . . . . . . . . . . . . . . . . . . . . . 32
INSTRUCTIONS AND WARNINGS. . . . . . . . . . . . . . . . . . . . 33