InstallingtheGrandConcertoSysteminYourHome
I. CAT5Termination
TheGrandConcertoSystemusesCAT5cableforControlPadcontrolandeithertwoorfour-conductor16-gaugespeakerwire.All
thewireis “homerun” fromeachzonetothelocationoftheGrandConcertoamplifierandAudioSourceequipment.
CompleteCAT5CrimpingInstructions
TheNuVoaudiosystemsrequireCAT5,unshielded,twisted
pair(UTP)forcommunicationbetweentheControlPadsand
themainamplifierunit.Eachendofthewireisterminated
withanRJ45connector.
TheGrandConcertoSystemcanaccommodate2,000total
feetofCAT5cable.Forthemostreliableoperation,itisbest
thatnosinglerunofCAT5exceeds250feet.
ThecorrectwiringschemefortheCAT5cableisstandard
EIA/TIA568A.ProperlyterminatingtheCAT5cableiscrucial
fortheoperationofthesystem.Itisveryimportanttousea
goodqualitycrimptool,andtesteachendtoendrunwitha
CAT5wiretestertoinsurethatyoursystemoperates
flawlessly,Fig.1.
1.Stripa2to3inchportionoftheinsulation,exposingthe
4twistedpairs.
2.Untwistthewiresandfanthemoutindividually.Arrange
thewiresintothecorrectcolorschemeasshowninFig.1.
3.Flattenthewiresintheircorrectorderandtrimthem
evenlyacrossthetop.Mostcrimptoolshaveawire
trimmerbuilt-in.Itisbesttotrimthewirestoabout½”
inlength.
4.Whileholdingthewiresflatbetweenyourthumband
forefinger,insertthewiresintotheRj45connectorso
eachisinitsownslot.PushthewireintotheRJ45soall8
conductorstouchtheendoftheconnector.Theinsulation
jacketshouldextendbeyondthecrimppointoftheRJ45.
5.InserttheRJ45intothecrimptoolreceptacleandsqueeze
thetoolfirmly.Notethataratchettypetoolshould
tightendownuntilitnolongerclicks.
6.TheRJ45shouldbefirmlycrimpedtotheCAT5insulation.
Itisnecessarythatthecolorschemeberepeated
identicallyoneachendofthewire.
7.TesteachterminationwithaCAT5Testerbefore
completingtheinstallation.
Step-by-StepCrimpingInstructions:
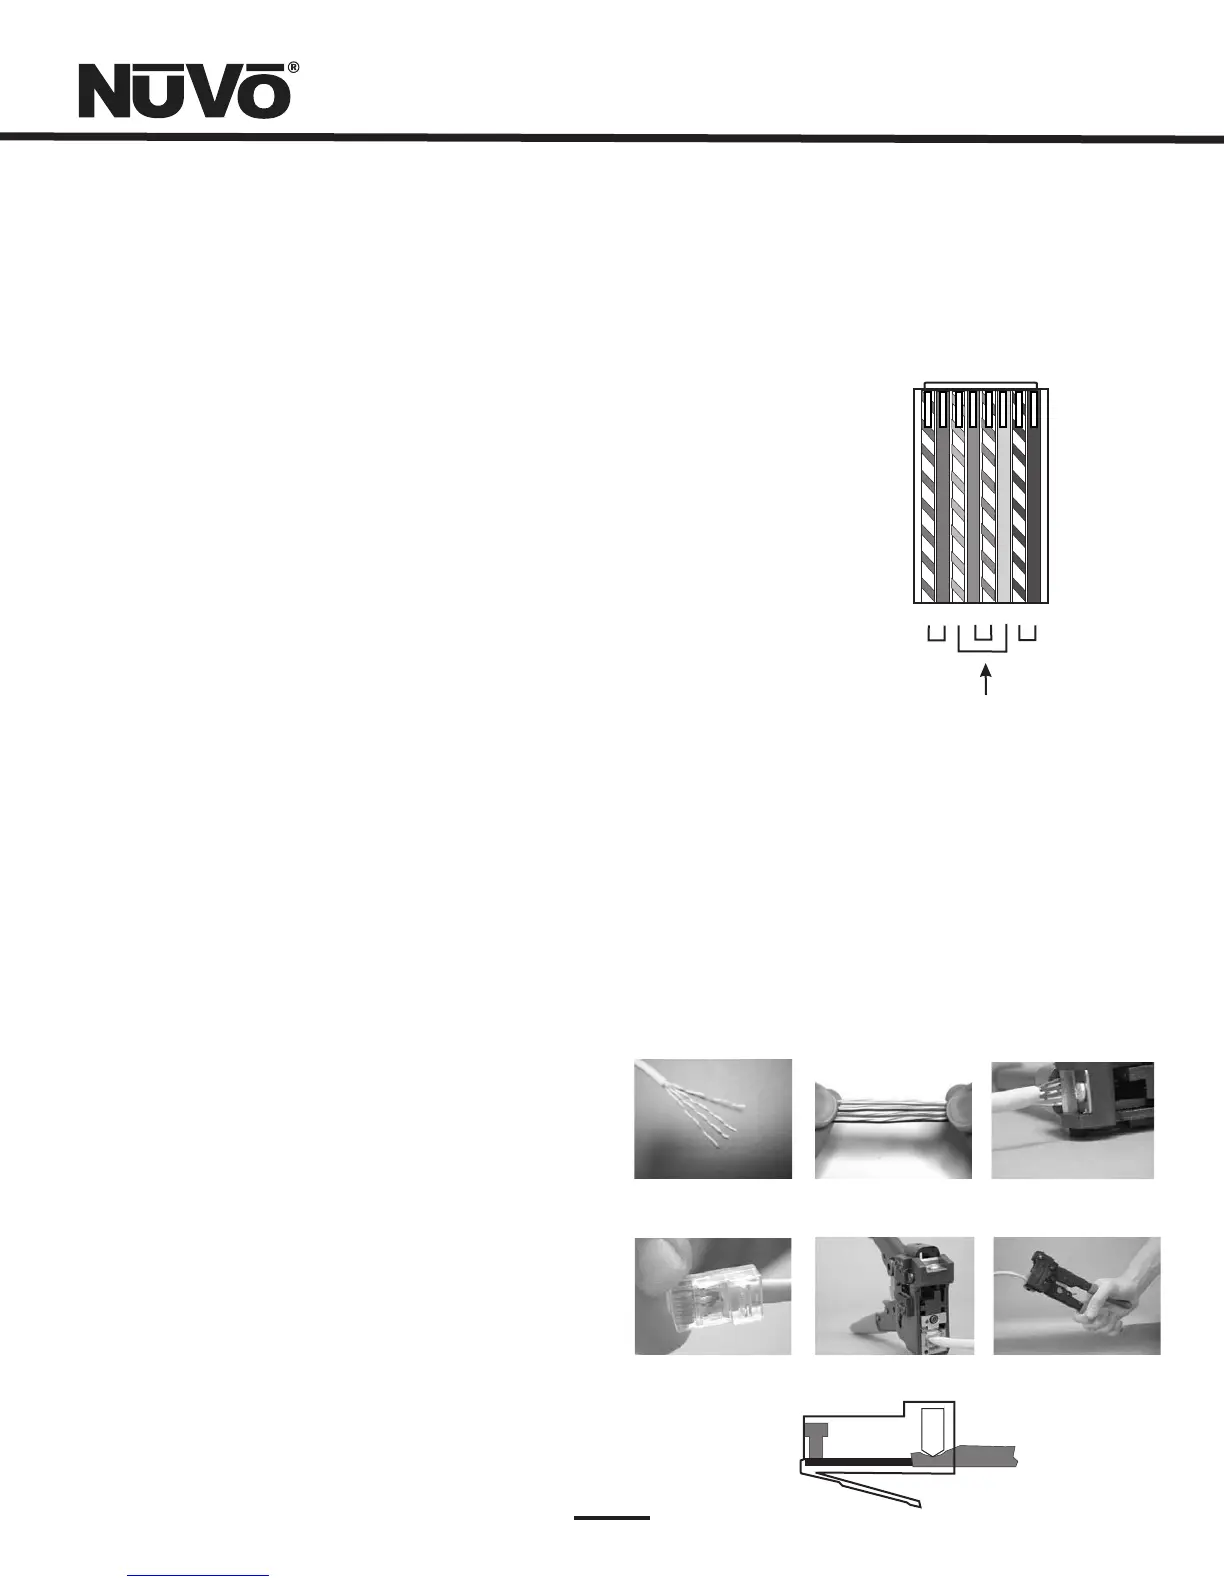
Fig.1:EIA568AwiringschemeforCAT5Cable
Pin#
1.GreenStripe
2.Green
3.OrangeStripe
4.Blue
5.BlueStripe
6.Orange
7.BrownStripe
8.Brown
Note:Colorslistedas “stripe” areawhitewire
withacoloredstripe.
Step1 Step2 Step3
Step4
Step5 Step6
1 2 3 4 5 6 7 8
Topviewwith
tabdown.
Wiresinsertfrom
thisend.
Pair2
Pair3
Pair4
Pair1
IR Active
Gro
u
nd
ControlDa
t
a Bus-
Con
tro
lDa
t
a
Bus+
IR Data
Ground
+24V P
o
wer
Ground
10