4
10
9
10
D
10
9
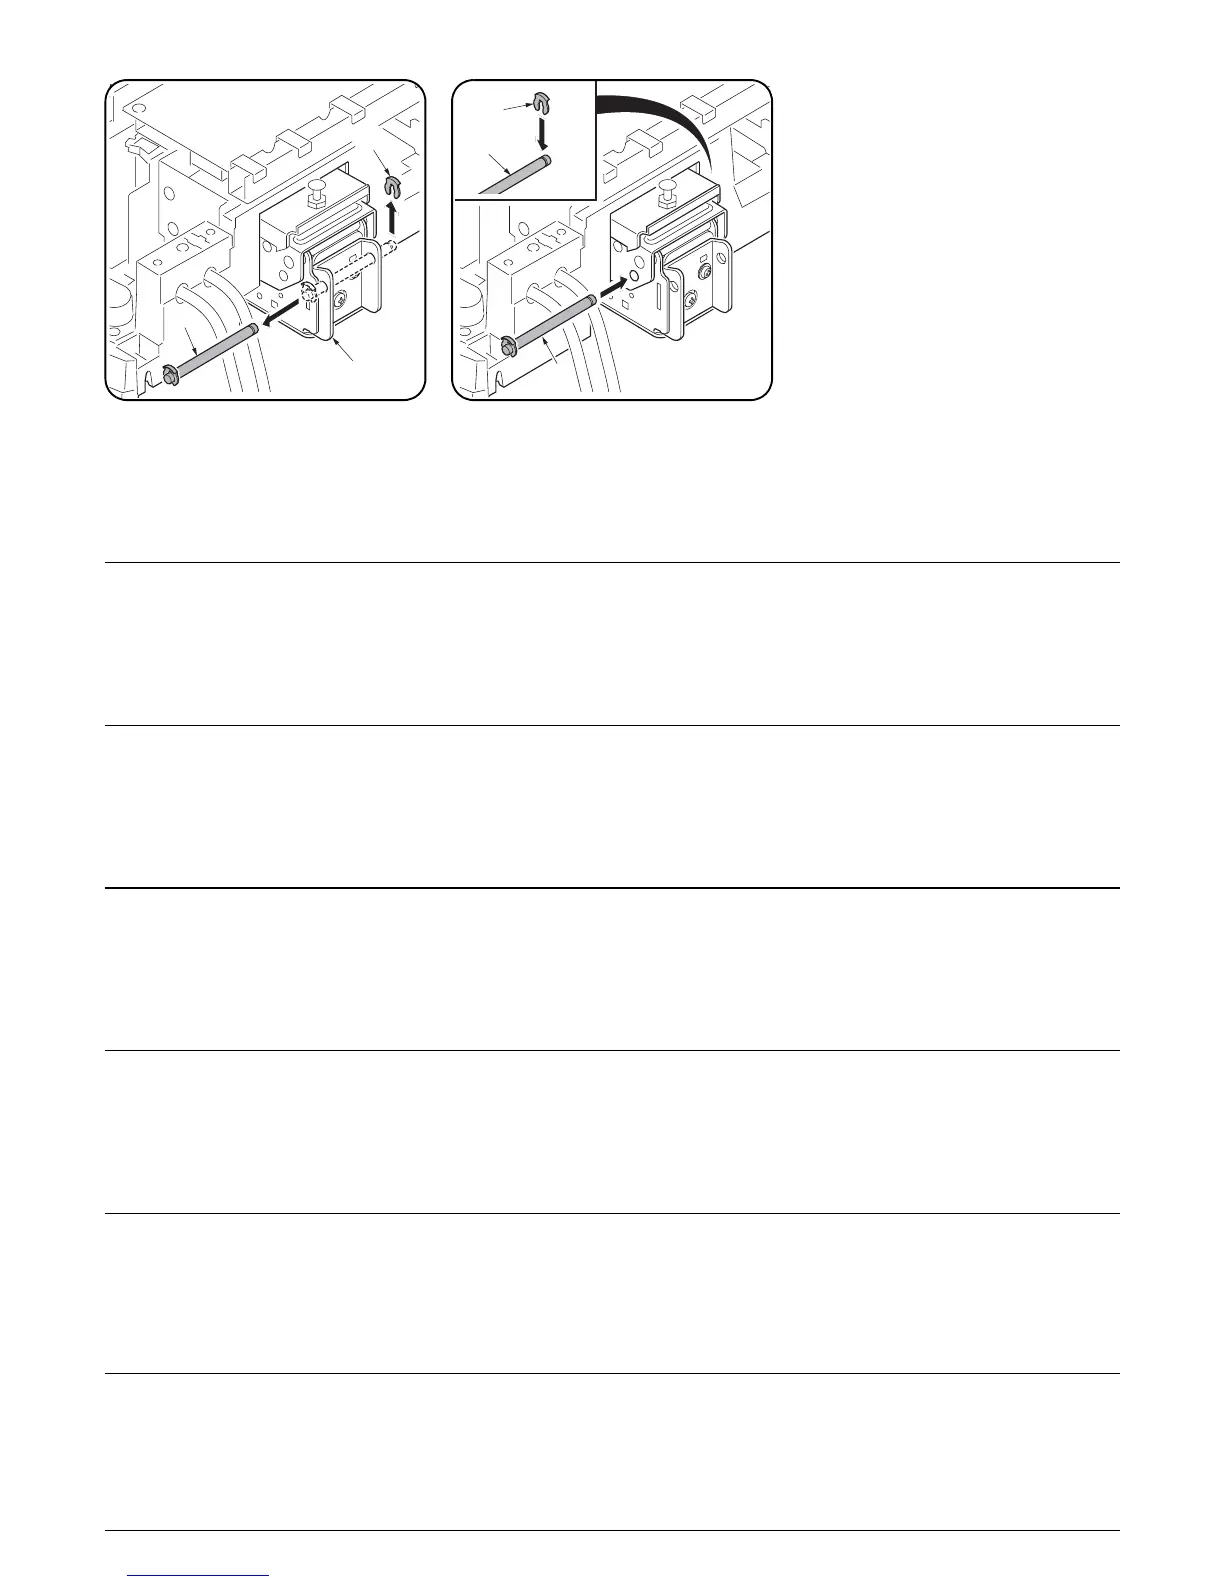
9. 手順 6 で取り付けた角度規制金具 (D) のス
トップリング (9)1 個を外し、シャフト (10)
を取り外す。
10.右ヒンジ後側にシャフト (10) を挿入する。
11.ストップリング (9) をシャフト (10) の溝に
取り付け、シャフト (10) を固定する。
12.手順 8 で外した後カバー(8) をビス (7)4 本
で元通り取り付ける。
13.以下の手順から実行する。
DP-760(カラー機) : 手順 14
DP-760(モノクロ機): 手順 24
DP-750 : 手順 32
9. Remove stop ring (9) of angle control fitting
(D) that has been installed in step 6 to
remove shaft (10).
10.Insert shaft (10) into the rear side of the right
hinge.
11. Attach stop ring (9) to the notch of shaft (10)
and secure shaft (10).
12.Reinstall rear cover (8) that has been
removed in step 8, with four screws (7).
13.Move to:
Step 14 when using DP-760
(full-color machines), or
Step 24 when using DP-760
(monochrome machines), or
Step 32 when using DP-750.
9. Retirer l’anneau de butée (9) de la fixation
d’angle (D) installée à l’étape 6 pour enlever
la tige (10).
10.Insérer la tige (10) à l’arrière de la charnière
droite.
11. Fixer l’anneau de butée (9) sur l’encoche de
la tige (10) et mettre en place la tige (10).
12.Remettre en place le couvercle arrière (8)
retiré à l’étape 8 à l’aide des quatre vis (7).
13.Passer à:
Etape 14 en cas d’utilisation DP- 760
(machines entièrement en couleurs), ou
Etape 24 en cas d’utilisation DP-760
(machines monochromes), ou
Etape 32 en cas d’utilisation DP-750
9. Retire el anillo de retención (9) del herraje
de control de ángulo (D) que se instaló en el
paso 6 para retirar el eje (10).
10.Inserte el eje (10) en el lado trasero de la
bisagra derecha.
11. Fije el anillo de retención (9) a la muesca del
eje (10) y asegure el eje (10).
12.Reinstale la cubierta trasera (8) que ha
retirado en el paso 8 con cuatro tornillos (7).
13.Vaya:
al paso 14 cuando utilice DP-760
(máquinas a todo color), o
al paso 24 cuando utilice DP-760
(máquinas monocromáticas), o
al paso 32 cuando utilice DP-750.
9. Anschlagring (9) von der
Winkeleinstellbefestigung (D) abnehmen, die
in Schritt 6 montiert wurde, um die Welle (10)
zu entfernen.
10.Welle (10) in die Rückseite des rechten
Scharniers einsetzen.
11. Anschlagring (9) an der Wellenkerbe (10)
anbringen und Welle befestigen (10).
12.Die in Schritt 8 abgenommene
Rückabdeckung (8) wieder mit vier
Schrauben (7) einbauen.
13.Weitergehen zu:
Schritt 14, wenn DP-760
(Vollfarbenmaschinen)
verwendet werden, oder
Schritt 24, wenn DP-760
(Monochrommaschinen)
verwendet werden, oder
Schritt 32, wenn DP-750 verwendet wird.
9. Rimuovere l’anello di bloccaggio (9)
dell’accessorio di regolazione angolare (D)
che era stato installato al Punto 6 per
rimuovere l’albero (10).
10.Inserire l’albero (10) nella parte posteriore
della cerniera destra.
11. Applicare l’anello di bloccaggio (9)
nell’incavo dell’albero (10) e assicurare
l’albero (10).
12.Rimontare il coperchio posteriore (8)
rimosso al Punto 8 con quattro viti (7).
13.Andare a:
Passo 14 quando si DP-760
(Macchine a colori), o
Passo 24 quando si DP-760
(Macchine in bianco e nero), o
Passo 32 quando si DP-750.
9. 拆下在第 6 步中安装的角度控制配件(D)的
止动环(9),以将轴(10)拆下。
10.将轴(10)插入到右部铰链的后部。
11.将止动环(9)安装到轴(10)的切口并将轴
(10)固定。
12.用 4 颗螺钉(7)将步骤 8 中拆下的后盖板
(8)重新安装。
13.移至:
步骤 14(使用 DP-760 时,彩色机器),或者
步骤 24(使用 DP-760 时,黑白机器),或者
步骤 32(使用 DP-750 时)。

 Loading...