INF-3
SECTION 1 SERVICE INFORMATION
<RZ31K/RS30K>
Chapter 1 Preparation — About your projector
28 - ENGLISH
f Avoid contact with liquids or moisture.
f Do not attempt to modify or disassemble the remote control.
f Do not swing the remote control holding onto the strap when a strap is attached.
f Observe the following instructions that are indicated on the caution label at the back of the remote control:
g Do not use old battery with new one.
g Do not use batteries other than the type specied.
g Be sure the batteries are inserted properly.
For other instructions, read the instructions related to batteries that are described in “Read this rst!”.
1.Do not use old battery with new one.
2.Do not use batteries other than the
type specified.
3.Be sure the batteries are inserted properly.
Made in China
N2QAYB001052
Caution label at the back of the remote control
Note
f When operating the remote control by directly pointing the remote control signal receiver of the projector, operate the remote control at
a distance approx. 30 m (98'5") or shorter from the remote control signal receiver. The remote control can control at angles of up to ±15°
vertically and ±30° horizontally, but the effective control range may be reduced.
f If there are any obstacles between the remote control and the remote control signal receiver, the remote control may not operate properly.
f The signal will be reected off the screen. However, the operating range may be limited from light reection loss due to the screen material.
f If the remote control signal receiver directly receives strong light, such as uorescent light, the remote control may not operate properly. Use
it in a place distant from the light source.
f The power indicator <ON (G)/STANDBY (R)> will blink if the projector receives a remote control signal.
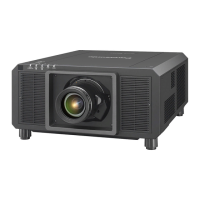
Projector body
1
2
3
4
56
7 7
11
8
10 8 8 99
13 14
9 9
9 9 99
15
912 9 916 179
Front
Side
Rear
Projection direction
1 Remote control signal receiver (front)
2 Power indicator <ON (G)/STANDBY (R)>
Indicates the status of the power.
3 Light source indicator <LIGHT1>
Indicates the status of light source 1.
4 Light source indicator <LIGHT2>
Indicates the status of light source 2.
5 Temperature indicator <TEMP>
Indicates the internal temperature status.
6 Filter indicator <FILTER>
Indicates the status of the air lter unit.
7 Adjustable feet
Adjusts the projection angle.
8 Air intake port
9 Screw holes for eyebolts
Screw diameter: M10, tapping depth inside the projector:
35 mm (1-3/8")
10 Air lter cover
The air lter unit is inside.
1. 2. Projector body

 Loading...