DSU
DSU
ISDN
SENSOR
ISDN
STEP2 STEP3
DIAL
MEMORY
CALL
REDIAL
DELETE
ESC
AUDIO MUTE
MENU
ALM MEMORY
ENTER
TELE WIDE
AF
NEAR
FAR
STEP1
Remote Controller WV-CU20
123
456
78
0
9
12345
#
VIDEO
AUTO/MANU
ALM ACK
ONE TOUCH DIAL
STEP2 STEP3
DIAL
MEMORY
CALL
REDIAL
DELETE
ESC
AUDIO MUTE
MENU
ALM MEMORY
ENTER
TELE WIDE
AF
NEAR
FAR
STEP1
Remote Controller WV-CU20
123
456
78
0
9
12345
#
VIDEO
AUTO/MANU
ALM ACK
ONE TOUCH DIAL
LINE
1
LINE
2
RING.VOL
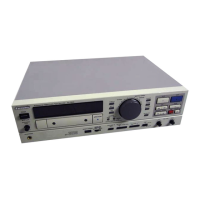
AV Codec WJ–AV
POWER
ON
OFF
REMOTE
LINE
1
LINE
2
RING.VOL
AV Codec WJ–AV
POWER
ON
OFF
REMOTE
ON
OFF
POWER
ON
OFF
POWER
Combination camera
Colour/black and white camera
Coaxial cable
(with BNC plug)
ISDN
VIDEO IN 2
VIDEO IN 3
VIDEO IN 1
VIDEO IN 4
VIDEO IN 5
SENSOR IN/
TRIGGER OUT
AV Codec
(receiver)
AV Codec
(transmitter)
Controller
Monitor
MONITOR 1MONITOR 1
(for maintenance)
Controller Monitor
Remote control
(front or rear)
Remote control
(front or rear)
■ Standard System Configuration
● Controller connections
Only one controller should be connected to the AV
Codec. Connection of two or more units may result in
misoperation.
Note
The controller should be connected to the REMOTE jack or
port on the front or rear, using the cable specified below.
For front connections: 6-conductor DIN cable (attached to the
controller)
For rear connections: 6-conductor modular cable (attached to
the controller)
 Loading...