English
22
NUMBER KEY / DISPLAY DESCRIPTION
1 KEY ON/OFF Allows you to start up or shut down the stove.
2 KEY STAND-BY
Pressing the stand-by key and holding it down (for around 5 seconds) until KEYPAD BLOCKED
appears on the display will disable the keypad. To re-enable the keypad press the stand-by key
and hold it down (for around 8 seconds) until KEYPAD UNBLOCKED appears on the display.
3 K
EY POWER
A
llows you to select the power setting. With the SELECT key you can choose between the four
a
vailable settings, P1-P2-P3-P4.
4 KEY FAN SPEED
Allows you to choose the speed setting on the Multifuoco fan. With the SELECT key you can choose
between the three available settings, 1-2-3.
5 K
EY SELECT
A
llows you to choose: • power level - having previously pressed the POWER key
•
fan speed - having previously pressed the FAN SPEED key
•
temperature - having previously selected the TEMPERATURE key.
6 KEY TEMPERATURE
Allows you to set the room temperature. The SELECT key will allow to choose the desired
temperature between 7°C and 30°C.
7 KEY TIMER Displays the current date and time.
8 KEY MENU
Allows: • access to the programming menu
• return to the initial display.
9 KEY SET Confirm MENU selected
10 KEY MENU SELECTION Scrolls through the programming MENU
11 KEY ESC Returns to previous menu
12 KEY OPT
Displays the MULTICOMFORT temperatures. The dash before the temperature shows which
sensor is giving the temperature reading.
13 DISPLAY Shows on three lines the function settings, the current time and the temperature.
14 DISPLAY POWER Shows the power setting selected, P1-P2-P3-P4.
15
DISPLAY MULTIFUOCO
Shows the Multifuoco setting selected, 1-2-3.
16 DISPLAY DAYS OF THE WEEK
Shows the day of the week, 1 Monday, 2 Tuesday, 3 Wednesday, 4 Thursday, 5 Friday, 6 Saturday,
7 Sunday.
17
DISPLAY RADIO SIGNAL EMISSION
Active if the remote is receiving data from the stove
18 DISPLAY TIMER Shows that the timer is engaged
19 DISPLAY SAFETY Symbol appears when the safety system is activated
20 DISPLAY FLAT BATTERY Shows that the battery is flat
6.3 Lighting for the first time
• Before lighting the stove, check that the grate is correctly inserted
and pushed towards the left.
• When lighting the stove for the first time or when it has not been used
for some time, it is advisable not to operate the stove at full power
immediately. For the first few days, operation at medium power is
recommended to allow all materials and mechanical parts to settle.
Upon first ignition certain odours may be given off due to the
evaporation of paint or grease. To alleviate the problem just air the
room. Do not remain in the room when there are odours, as the fumes
may be harmful to people or pets.
• When the pellet hopper is loaded for the first time the loading auger
has to fill up; during this period the pellets will not be fed into the
firebox.
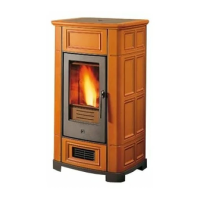
6.4 Startup and normal operation - Fig. 54
• Before proceeding with lighting the stove:
Ensure that the hearth door is well closed.
• Check that the pellet hopper is full or at least contains enough pellets for
the stove to run for the desired period.
• When the stove is connected to the power supply but is not yet lit, the
display will show the readout OFF and in the lower half the current time,
the measured temperature and the previously set power and fan settings.
Fig. 54
OFF
09:53 20
.
c