• Select the current sensor which is connected to the battery. You can select
only current sensors that are not already used by an existing battery
configuration.
For a battery configuration without a shunt, leave current sensor empty.
• Select a temperature sensor if you have one installed.
• Confirm and save the battery configuration with button.
The newly added battery should now be visible on one of the PICO’s screens once
you exit the settings menu.
6.5 Tank configuration
PICO shows all properly configured Tanks. Each configured Tank will
automatically show up on PICO.
The following section describes how to set up a tank on PICO.
6.5.1 Add new Tank
The following steps are equal for SCQ25T/SC302T/ST107 modules. It is required
to properly install your module of choice. The installation is described in the
corresponding module manual. After successfully installing the module, you can
configure the tank by following these steps:
In the settings menu, navigate to DEVICES TANKS.
Select “Add new” and fill in the requested data.
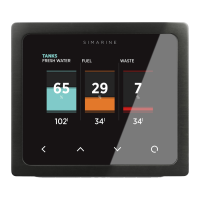
• NAME - Name the tank accordingly (FRESH WATER, WASTE
WATER, FUEL 1 etc.)
• TYPE - Select the tank type (WATER, FUEL, WASTE WATER), which
defines the color of the tank on PICO’s screen.
• SENSOR TYPE - Select the used sensor type (RESISTANCE or
VOLTAGE)
• SENSOR - Select the used sensor from the list.
 Loading...