79
30
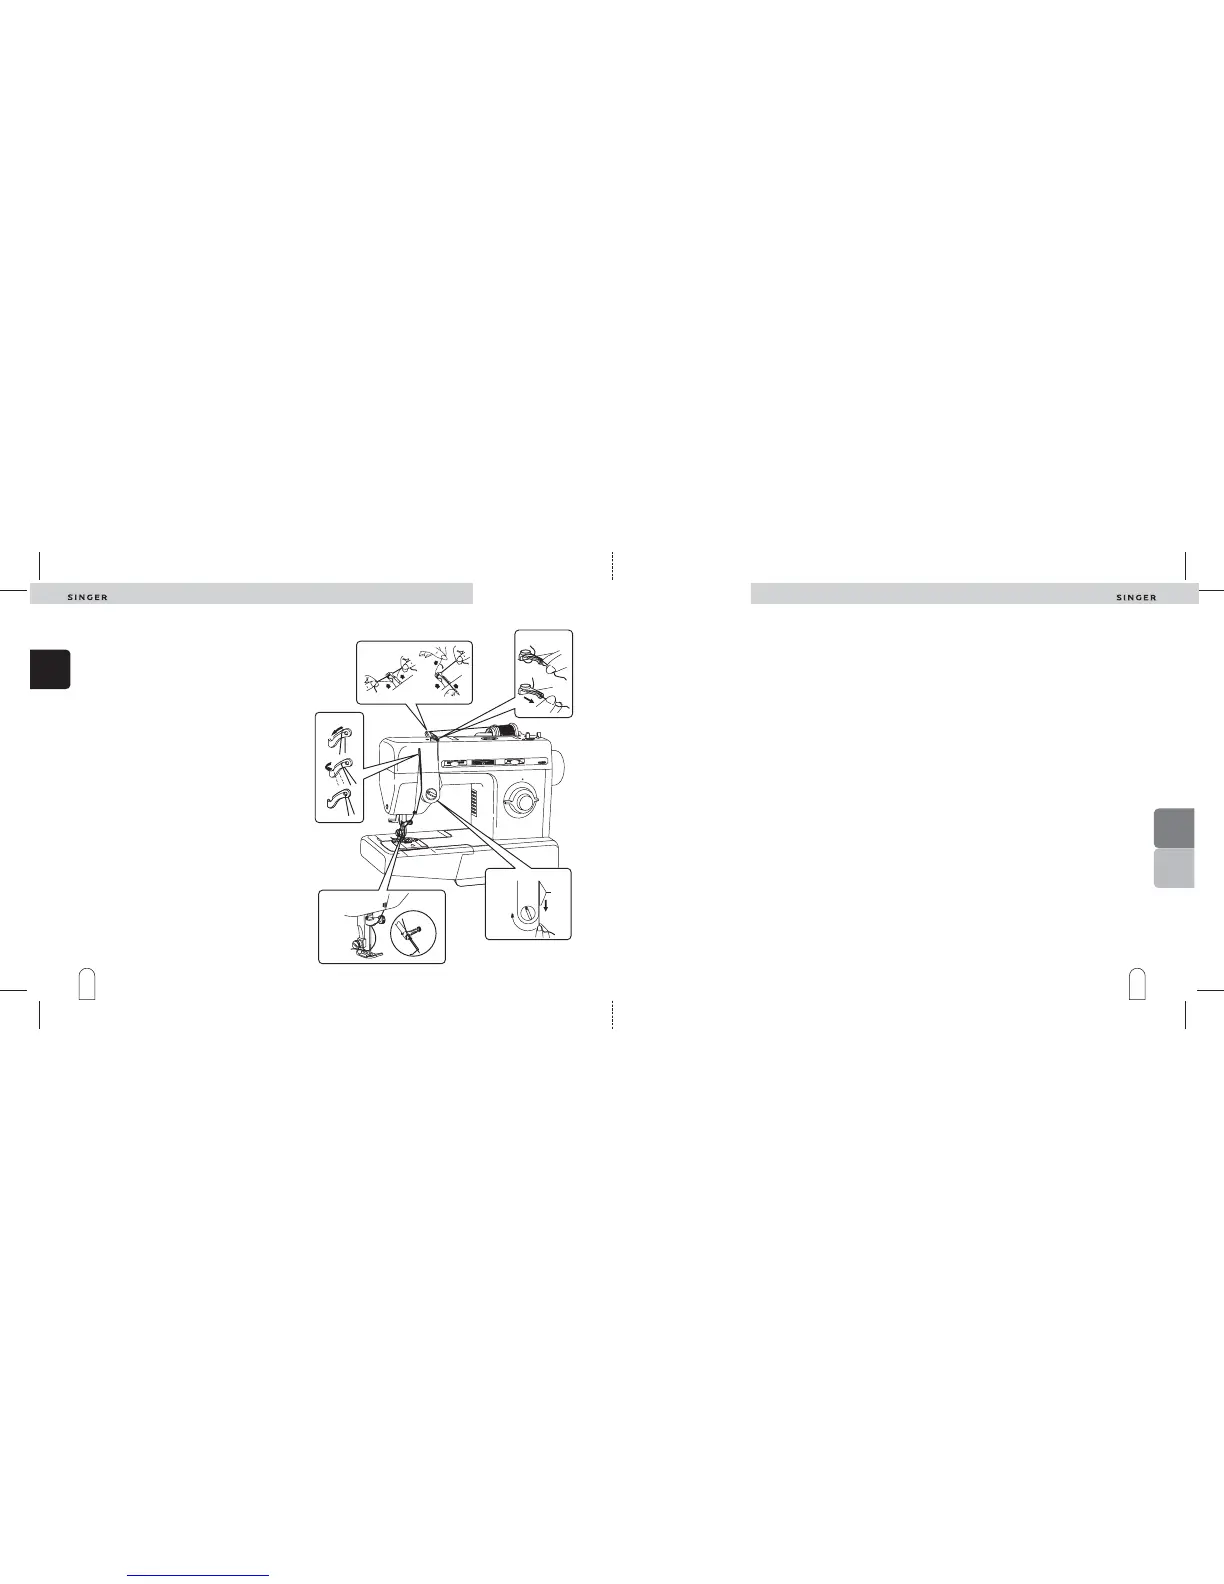
1. Place spool pin. Use the correct spool pin
holder to hold spool firmly in place.
2. Lift the presser foot, and turn the hand wheel
towards your direction until the take-up lever
reaches its highest position.
3. Lead thread passing it first through the lower
slot of the thread guide. Next through the
upper slot, leading the thread to the right and
arround (illustration 1).
4. pass the thread through the second thread
guide, by inserting it from the botton to the
top (illustration 2).
5. Pass the thread around the tension, so that it
slips between the tension disks (illustration
3).
6. With your right hand holding the spool still pull
the thread slightly up, by raising the spring
(illustration 4) and allowing the thread to
slide inside the protector (illustration 5).
7. Pass the thread through the take-up lever as
shown in the illustration 6.
Threading the machine
Preparing
the
machine
Preparing
the
machine
4
1
5
6
2
3
Pas 2
Pas 3
Pas 4
1. Relevez l’aiguille.
2. Tournez le sélecteur de longueur pour amener le
sym-bole (2) face au point (•).
3. Brodez le point d’arrêt (4) (quatre à six points).
1. Relevez l'aiguille.
2. Tournez le sélecteur de longueur pour amener le
symbole (3) face au point (•).
3. Brodez la deuxième lèvre (5).
1. Relevez l'aiguille.
2. Tournez le sélecteur de longueur pour amener le
symbole (4) face au point.
3. Brodez le point d'arrêt (6).
4. Relevez le pied presseur. Retirez l'ouvrage de la
machine.
5. Arrêtez les fils.
6. Avec précaution, coupez entre les deux lèvres de la
boutonnière à l'aide de ciseaux fins ou d'un
découseur.
Paso 2
Paso 3
Paso 4
1. Saque la aguja de la tela.
2. Gire el mando para ojales hacia el símbolo (2) del
ojal para realizar el segundo paso.
3. De un mínimo de cuatro puntadas, terminando en el
punto (4).
1. Saque la aguja de la tela.
2. Gire el mando de ojales hacia el símbolo (3) para
realizar el tercer paso.
3. Cosa hasta el punto (5).
1. Saque la aguja de la tela.
2. Gire el mando de ojales hacia el símbolo (4) para
realizar el cuarto paso.
3. De un mínimo de cuatro puntadas, terminando en el
punto (6).
4. Levante el prensatelas y quite la prenda de la máquina.
5. Corte los extremos de los hilos.
6. Corte el ojal con cuidado, abriéndolo con un desco-
sedor o con unas tijeras pequeñas y de punta aguda.
Paso 2
Paso 3
Paso 4
1. Saque la aguja de la tela.
2. Gire
el mando para ojales hacia el símbolo (2) del
ojal
para realizar el segundo paso.
3. De
un mínimo de cuatro puntadas, terminando en el
punto
(4).
1. Saque la aguja de la tela.
2. Gire el mando de ojales hacia el símbolo (3) para
realizar el tercer paso.
3. Cosa hasta el punto (5).
1. Saque la aguja de la tela.
2. Gire el mando de ojales hacia el símbolo (4) para
realizar el cuarto paso.
3. De un mínimo de cuatro puntadas, terminando en el
punto (6).
4. Levante el prensatelas y quite la prenda de la máquina.
5. Corte los extremos de los hilos.
6. Corte el ojal con cuidado, abriéndolo con un desco-
sedor o con unas tijeras pequeñas y de punta aguda.
Boutonniére
et boutons
Boutonniére
et
boutons
Ojales y
botones
Ojales y
botones