Balancing flexible stitches 48
Pattern stitching module 50
Removing and replacing pattern module 50
Decorative and Flexible stitch patterns 52
Patterns for Quilting 72
Blind hem stitching 74
Four-step buttonhole 76
Balancing the buttonhole 80
Inserting a zipper 82
Applications with straight stitching 84
Free-arm sewing 86
Aplications: Sleeves and buttons 86
How to use the Darning and Embroidery foot 88
Applications with the Darning and Embroidery foot 88
How to use the Even foot 90
Applications with the Even foot 92
Quilter table applications 94
Monogram and embroidering 96
Removing and replacing bobbin case 98
Cleaning the machine 100
Changing the light bulb 102
Lubricating the machine 104
Performance checklist 106
Buttonholes and buttons
Functions of the machine
Maintenance
Getting to know your machine
Preparing the machine to sew
Starting a seam
Straight stitch, zig-zag and other stitches
Parts 11
Accessories 14
Optional Accessories 16
Connecting the machine 18
Running the machine 18
Selectors 20
Choosing and changing needles 20
Changing the needle plate 22
Changing screw-on presser foot 22
Drop-feed 22
Changing snap-on presser foot 24
Winding a bobbin 26
Inserting a bobbin 28
Threading the machine 30
Raising the bobbin thread 34
Adjusting thread tension 36
Fabric, thread and needle table 38
Preparing a seam 40
Starting a seam 42
Guiding and supporting fabric 42
Straight stitching 44
Zig-zag stitching 46
Pattern groups selection 48
Flexible stitch patterns 48
Table of contents
Getting to
know your
machine
Getting to
know
your
machine
102
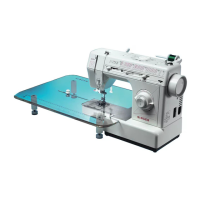
Changing the light bulb
Maintenance
Before changing light bulb, unplug machine from
socket outlet.
Use original SINGER light bulbs only ( )
1. Remove screw (A) located on face plate and remove
plate pulling it down and to the right.
2. Do not attempt to unscrew the light bulb. Push bulb up
into the socket and at the same time, turn it to the
direction indicated (clockwise) to unlock bulb pin
(illustration 2).
3. Pull bulb down and out of machine.
1. Push new bulb into socket, just as for the side pin
slides the slot of the socket. Push it up and turn to the
indicated direction (counterclockwise) to lock into
position.
2. Replace face plate again and tighten screw.
code 358207 6W .
Removing light bulb (illustration 2)
Replacing light bulb (illustration 3)
A
1
3
2