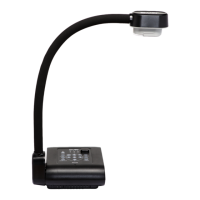
5. Turn on the document camera.
N N O T E S
o
The document camera image should show the target area in the center. You can adjust
the mat slightly if necessary.
o
The lines on the mat indicate where you can position the mixed reality cube while in
Mixed Reality mode (see Manipulating 3D models using Mixed Reality Tools on page
60).
Inserting and manipulating 3Dmodels
Before you can use MixedReality Tools, you need to insert a 3D model in your .notebook file. After
you insert a 3D model, you can manipulate it like any other object.
Inserting 3D models
3D models are available from the Gallery Sampler and the SMARTExchange™ website. You can
also insert your own 3D models if they are in one of the following formats:
l COLLADA (.dae)
l 3D Object (.obj)
l FBX (.fbx)
N N O T E
Textures and other information for some 3D models are stored in separate files and folders. When
inserting these 3D models, ensure the 3D model file is located in the correct folder structure with
the supporting files and folders.
g To insert a 3D model
1. Select Insert > 3D File.
The Insert 3D File dialog box appears.
2. Browse to and select the 3D model you want to insert.
3. Press Open.
The 3D model appears on the page.
C H A P T E R 7
Using Mixed Reality Tools for the SMARTDocumentCamera
54