Do you have a question about the Topcon GPT-8003A and is the answer not in the manual?
Important guidelines for safe and proper handling of the instrument.
Instructions on rotating the instrument, storage, and maintenance.
Explanation of warning displays and icons for safe operation.
Critical safety warnings and precautions for instrument usage.
User qualifications, required protectors, and manufacturer's disclaimer.
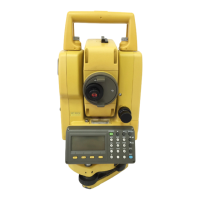
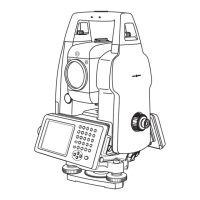
Identification of the parts and components of the instrument.
Explanation of the instrument's display screen and indicators.
Description of the function of each key on the instrument's control panel.
Details on how soft keys change function based on the measurement mode.
Accessing and navigating through the instrument's option screens.
Setting the automatic power off feature to conserve battery.
Options for outputting measured data to external devices.
Methods for rotating the instrument and telescope.
Instructions for using the RC-2II remote control system.
How to connect and communicate with a personal computer.
Connecting the instrument to power sources, including internal and external batteries.
Procedures for leveling and centering the instrument on a tripod.
Turning the instrument on, self-checking, and password options.
How to interpret the battery power indicator and its meaning.
Overview of the instrument's main menu icons and their functions.
Automatic correction for vertical and horizontal angle mislevelment.
Compensating for systematic errors like collimation and axis errors.
Memorizing and restoring the last display or mode upon power off/on.
Methods for entering alphanumeric data using the instrument's keyboard.
How to insert and extract memory cards for data storage.
Understanding how prism inclination affects measurement accuracy.
How to measure a moving target using the auto-tracking function.
Automatically aligning the instrument with a prism.
Understanding the laser range for effective auto-tracking and collimation.
Customizing parameters like search pattern, range, and speed for auto-tracking.
How to measure horizontal and vertical angles accurately.
Performing distance measurements in prism and non-prism modes.
Measuring and setting coordinates for points.
Transferring measurement data to a data collector or PC.
Setting a reference direction angle for orientation.
Storing and recalling coordinate data for subsequent measurements.
Measuring elevation of points where direct sighting is not possible.
Calculating distances and elevations between target points.
Measuring the height of a line or object.
Performing measurements offset from a primary target.
Measuring points offset by an angle from the instrument.
Measuring points offset by a distance from the instrument.
Measuring points on a plane where direct measurement is difficult.
Measuring points related to the circumference of a column.
Establishing communication with external devices or systems.
Initiating and managing communication with external devices.
Checking the memory size, free space, and battery status.
Applying protection to files to prevent accidental deletion.
Changing the name of files stored in memory.
Removing files from the instrument's memory.
Transferring files between internal memory and card memory.
Erasing all files from internal or card memory.
Configuring communication parameters like Baud rate for data transfer.
Receiving data files from a PC into the instrument.
Sending data files from the instrument to a PC.
Options for configuring measurement and display settings.
Configuring detailed parameters for measurement and communication.
Setting up and managing a password for instrument security.
Procedures for checking and adjusting the instrument constant value.
Verifying and adjusting the alignment of the instrument's optical axis.
Checking and adjusting theodolite functions and tribrach installation.
Adjusting systematic errors like tilt, collimation, and axis errors.
Viewing constant lists and switching compensation on or off.
Setting the instrument's date and time.
Inputting the instrument constant value obtained from checking.
Inspecting and adjusting the optic axis for the auto-tracking function.
Configuring prism and non-prism constant values for accurate measurements.
Understanding the formulas for calculating atmospheric correction.
Directly inputting temperature and pressure to set correction values.
Formulas used for calculating distances with corrections applied.
Information on removing, charging, and refreshing the BT-56Q battery.
Guidelines for charging, discharging, and storing batteries to maintain capacity and life.
Steps for removing and securing the instrument to the tribrach.
Securing the tribrach fixing lever to prevent accidental movement.
Overview of rechargeable batteries and compatible chargers for the instrument.
Guidance on arranging and using various prism systems.
Important precautions for handling, cleaning, and maintaining the instrument.
List of error codes, their descriptions, and recommended countermeasures.
Details on various optional accessories for the instrument.
Detailed technical specifications for the instrument and its components.
Explanation of dual axis compensation and its effect on horizontal angles.
Guidelines for charging, discharging, and storing batteries to maintain capacity and life.
Legal agreement regarding the use of embedded Microsoft software.
Terms of warranty and special provisions applicable to the product.
Specific legal provisions governing the software license agreement.
| Model | GPT-8003A |
|---|---|
| Category | Measuring Instruments |
| Type | Total Station |
| Magnification | 30x |
| Objective Lens Aperture | 45 mm |
| Field of View | 1°30' |
| Shortest Focusing Distance | 1.3 m |
| Stadia Multiplication Constant | 100 |
| Stadia Addition Constant | 0 |
| Compensator | Dual-axis |
| Compensator Working Range | ±3' |
| Setting Accuracy | 1" |
| Circular Level Sensitivity | 10'/2mm |
| Waterproof and Dustproof | IP66 |
| Operating Temperature Range | -20°C to +50°C |
| Range with prism | 3, 000 m (single prism) |
| Tube Level Sensitivity | 30''/2mm |