3-4 ESI and ESCi Modes of Operation
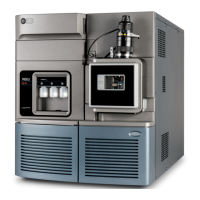
ESI probe mounted on the source enclosure, showing the connections
to the front panel:
6. Connect the ESI probe’s PTFE tube to the nebulizer gas connection.
7. Ensure that the probe adjuster assembly’s electrical lead is connected to
the instrument’s probe connection.
8. Connect the ESI probe’s electrical lead to the instrument’s HV
connection.
9. Connect the diverter valve to the ESI probe; use tubing of the
appropriate internal diameter (ID).
Tip: Two tubes of different ID are supplied with the instrument.
Requirement: If you are replacing the tubing supplied with the
instrument, you must minimize the length of the tube connecting the
diverter valve to the ESI probe. This minimizes delays and dispersion.
10. Close the instrument’s access door.
Warning: To avoid electric shock, do not use stainless steel
tubing to connect the diverter valve to the ESI probe; use the
PEEK™ tubing supplied with the instrument.
Thumbscrew
ESI probe
Nebulizer gas connection
Desolvation gas connection
Probe adjuster assembly
ESI probe
electrical lead
Probe adjuster
assembly
electrical lead
Vernier probe adjuster
Diverter valve
 Loading...