

S
shannon35Jul 27, 2025
How to recalibrate X-Rite Measuring Instruments?
- KKarina CharlesJul 27, 2025
If your X-Rite Measuring Instrument requests a “Recalibrate”, recalibrate the instrument using the Calibrate function in the Settings menu.
How to recalibrate X-Rite Measuring Instruments?
If your X-Rite Measuring Instrument requests a “Recalibrate”, recalibrate the instrument using the Calibrate function in the Settings menu.
What to do if X-Rite RM200QC Measuring Instruments is not responding?
If your X-Rite Measuring Instrument is not responding, hold down the on/off button for 10 seconds to turn it off, and then restart it.
What to do if X-Rite RM200QC detects too much ambient light?
If your X-Rite Measuring Instrument detects too much ambient light: * Ensure the instrument remains on the sample until the measurement is complete. * Shield the sample to prevent light from entering the optics, especially during measurements on rough or curved samples. * For transparent samples, block light from entering the sides or back. * Place the sample on a white background.
Important safety warnings and operational guidelines for using the RM200QC.
Advice on shipping the device containing a lithium-ion battery.
Instructions for proper disposal of the RM200QC according to WEEE regulations.
Declaration of compliance with EU directives for the RM200 Series.
Information regarding FCC compliance and potential radio frequency interference.
Covers warranty period, exclusions, customer responsibilities, and service procedures.
States express and implied warranties, and X-Rite's authorized warranty statements.
Details on copyright, proprietary data, and restrictions on manual reproduction and use.
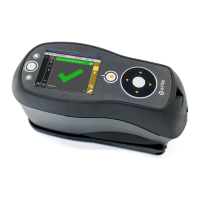
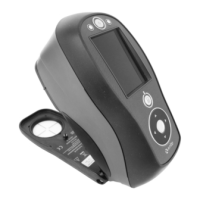
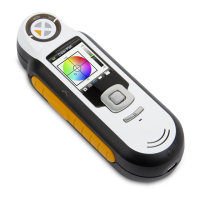
Introduces the RM200QC spectrocolorimeter and its benefits for color measurement.
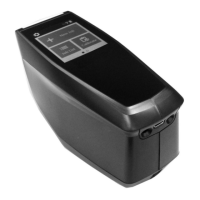
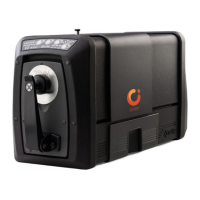
Identification and description of the physical parts of the RM200QC instrument.
Notes on display limitations and the importance of verifying color accuracy.
Details on environmental and sample-related variables that impact measurement results.
Steps for installing the required software and USB drivers for the RM200QC.
Procedure for charging the instrument's battery to ensure optimal performance and longevity.
Guide to interpreting the various battery level and charging indicator icons.
Details on the instrument's automatic power management features to save battery.
Instructions for manually shutting down the RM200QC device.
Guide to selecting the instrument's operating language upon first power-up.
How to navigate and select functions using the instrument's controls.
Summary of key function screens: Settings, Standard, Color QC, Quick Check, Smp Records.
Using the Tag menu to add notes or voice tags to sample measurements.
Step-by-step guide to taking a sample measurement with the RM200QC.
How to interpret the progress bar and view measurement results.
Details on the number of measurements that can be stored and how they are saved.
Procedure to change the measurement area between 4mm and 8mm.
Explains the 'Back', 'Select', and 'Exit' functions controlled by navigation buttons.
Highlights the RM200QC's versatility in measuring different sample types and textures.
Best practices for taking accurate measurements, including sample preparation and handling.
Techniques for measuring samples that are curved, thin, translucent, or unusually bright.
Details on the necessity of calibration and its recommended frequency.
A guide to performing the calibration process on the RM200QC.
Guidance for resolving common calibration errors and issues.
Overview of the Settings menu for instrument configuration and calibration.
Steps to select the preferred display language for the RM200QC.
Setting up the instrument to function as a USB storage device for data transfer.
Procedure for connecting the instrument to a computer via USB for data transfer.
Information on the QCREPORT.PDF and DATA.CSV files generated by the instrument.
Setting the preferred aperture size (4mm or 8mm) for measurements.
Enabling or disabling various data points shown on the Color QC screen.
Configuring the number of measurements to average for standards and samples.
Confirming and saving the selected averaging values.
Setting color comparison methods (CIE LAB, CMC) and the acceptable Delta E range.
Defining the light source and viewing angle for color measurements.
Setting the volume for system alerts and voice tag recordings.
Retrieving information like serial number, firmware, and battery status.
Setting the instrument's current date, time, and preferred format.
Steps to reset the instrument, which deletes all stored standards and records.
Instructions for activating or deactivating the security password feature.
How to enter the default password (999) and confirm settings.
Steps to re-enable password protection on the instrument.
Details on storing and managing up to 20 color standards.
Procedure for measuring and saving a new standard measurement.
Taking multiple measurements to achieve an averaged standard value.
Assigning a custom name to a measured standard and saving it.
Closing the virtual keyboard after entering a standard's name.
Finalizing the creation and saving of a new standard.
Choosing an existing standard from the list to modify.
Process of updating standard data and saving the modifications.
Prompt to confirm deletion of samples associated with an edited standard.
Confirming and saving the changes made to an existing standard.
Performing sample measurements and comparing them against pre-defined standards.
Understanding the various ways measurement results are presented.
Procedure for selecting reference standards and measuring test samples.
Understanding the PASS/FAIL status based on configured tolerance limits.
Exploring different data screens like QC Sample, Description, and Sample Image.
Accessing graphical and numerical data through Color Plot and Indices screens.
Steps for attaching descriptive tags to recorded measurements.
Detailed instructions for capturing voice notes associated with a measurement.
Listening to and deleting recorded voice tags for samples.
Using the virtual keyboard to enter text descriptions for measurements.
Introduction to the Quick Check menu for rapid, non-stored measurements.
Steps for measuring a standard and sample for quick color comparison.
Procedure for measuring sample opacity using the Opacity Check function.
Taking the sample measurement after the standard in Color Compare mode.
Understanding the outcome of the color comparison based on tolerance settings.
Steps for measuring opacity on different color backgrounds.
Understanding the calculated contrast ratio from opacity measurements.
Accessing, viewing, and deleting stored sample measurements.
Information on viewing sample data, text tags, and voice tags.
Procedure for removing all sample measurements linked to a specific standard.
Guidance for resolving common operational issues and symptoms.
Explanation of error codes and informational messages displayed on the instrument.
How to clean the outer casing of the RM200QC safely.
Detailed steps for cleaning the critical optical components of the instrument.
Steps to remove the aperture and clean the optics port with air.
How to clean the calibration tile using clean, dry air.
Details on the maximum number of standards and samples the instrument can store.
Reference to the relevant section for cleaning procedures.
Steps to resolve issues where the instrument does not power up.
Phone numbers and website for contacting X-Rite technical support.
| Type | Portable Spectrophotometer |
|---|---|
| Connectivity | USB, Bluetooth |
| Measurement Aperture | 8 mm |
| Spectral Range | 400 to 700 nm |
| Spectral Resolution | 10 nm |
| Colorimetric Data | Yes |
| Metamerism Index | Yes |
| Gloss | Yes |
| Color Space | CIE XYZ, CIE LAB, CIE LCh |
| Display | Color LCD |
| Power | Rechargeable Lithium-Ion Battery |
| Measurement Geometry | 45°/0° per CIE, DIN, ASTM, ISO |
| Short-term Repeatability | ΔE < 0.1 |