Chapter 2 Hardware Panels
Nebula Mobile Router User’s Guide
35
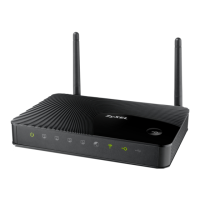
The following table describes the ports and buttons on your Nebula FWA510.
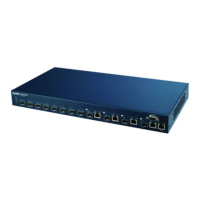
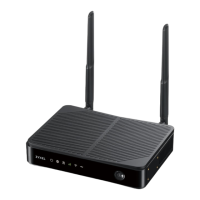
2.3.6 Nebula FWA710
Figure 17 Nebula FWA710 Ports Panel
The following table describes the ports and buttons on your Nebula FWA710.
Table 13 Nebula FWA510 Ports and Buttons
LABELS DESCRIPTION
ANT1-ANT2/Antenna Install the external antennas to strengthen the cellular signal.
Note: To use the external antennas, you must set the INT/EXT switch to EXT.
USB The USB port of the Zyxel Device is used for file sharing.
LAN2/WAN LAN mode: Connect a computer to the LAN using an RJ45 cable.
WAN mode: Connect the Zyxel Device to the Internet through the WAN.
LAN1 Connect a computer to the LAN using an RJ45 cable.
WiFi/WPS Press the WiFi/WPS button to activate WPS connection process. See Section 2.4 on
page 36 for more information.
RESET Press the RESET button to reboot or reset the Zyxel Device. See Section 2.5 on page 38
for more information.
ON/OFF Press the ON/OFF button after the power adapter is connected to start the Zyxel
Device.
POWER Connect the power adapter and press the ON/OFF button to start the Zyxel Device.
Micro SIM Insert a Micro-SIM card into the slot with the chip facing down and the beveled corner
in the top left corner.
INT/EXT Select between the internal or external cellular antennas.
Table 14 Nebula FWA710 Ports and Buttons
LABELS DESCRIPTION
USB (Type-C) The USB port of the Zyxel Device is used for maintenance only.
Note: The USB port can only be used by qualified technicians.
LAN (PoE) Connect the PoE port on the PoE injector to the Zyxel Device's LAN
port through an Ethernet cable. Connect the LAN port on the PoE
injector to your computer's RJ45 port through another Ethernet
cable.
SIM card Insert a micro-SIM card into the slot with the chip facing down and
the beveled corner in the top left corner.
 Loading...