*Subject to change without notice Atomos Sumo19 – User Manual Edition 1: September 2017 33
8. Monitoring and Recording cont.
AtomHDR cont.
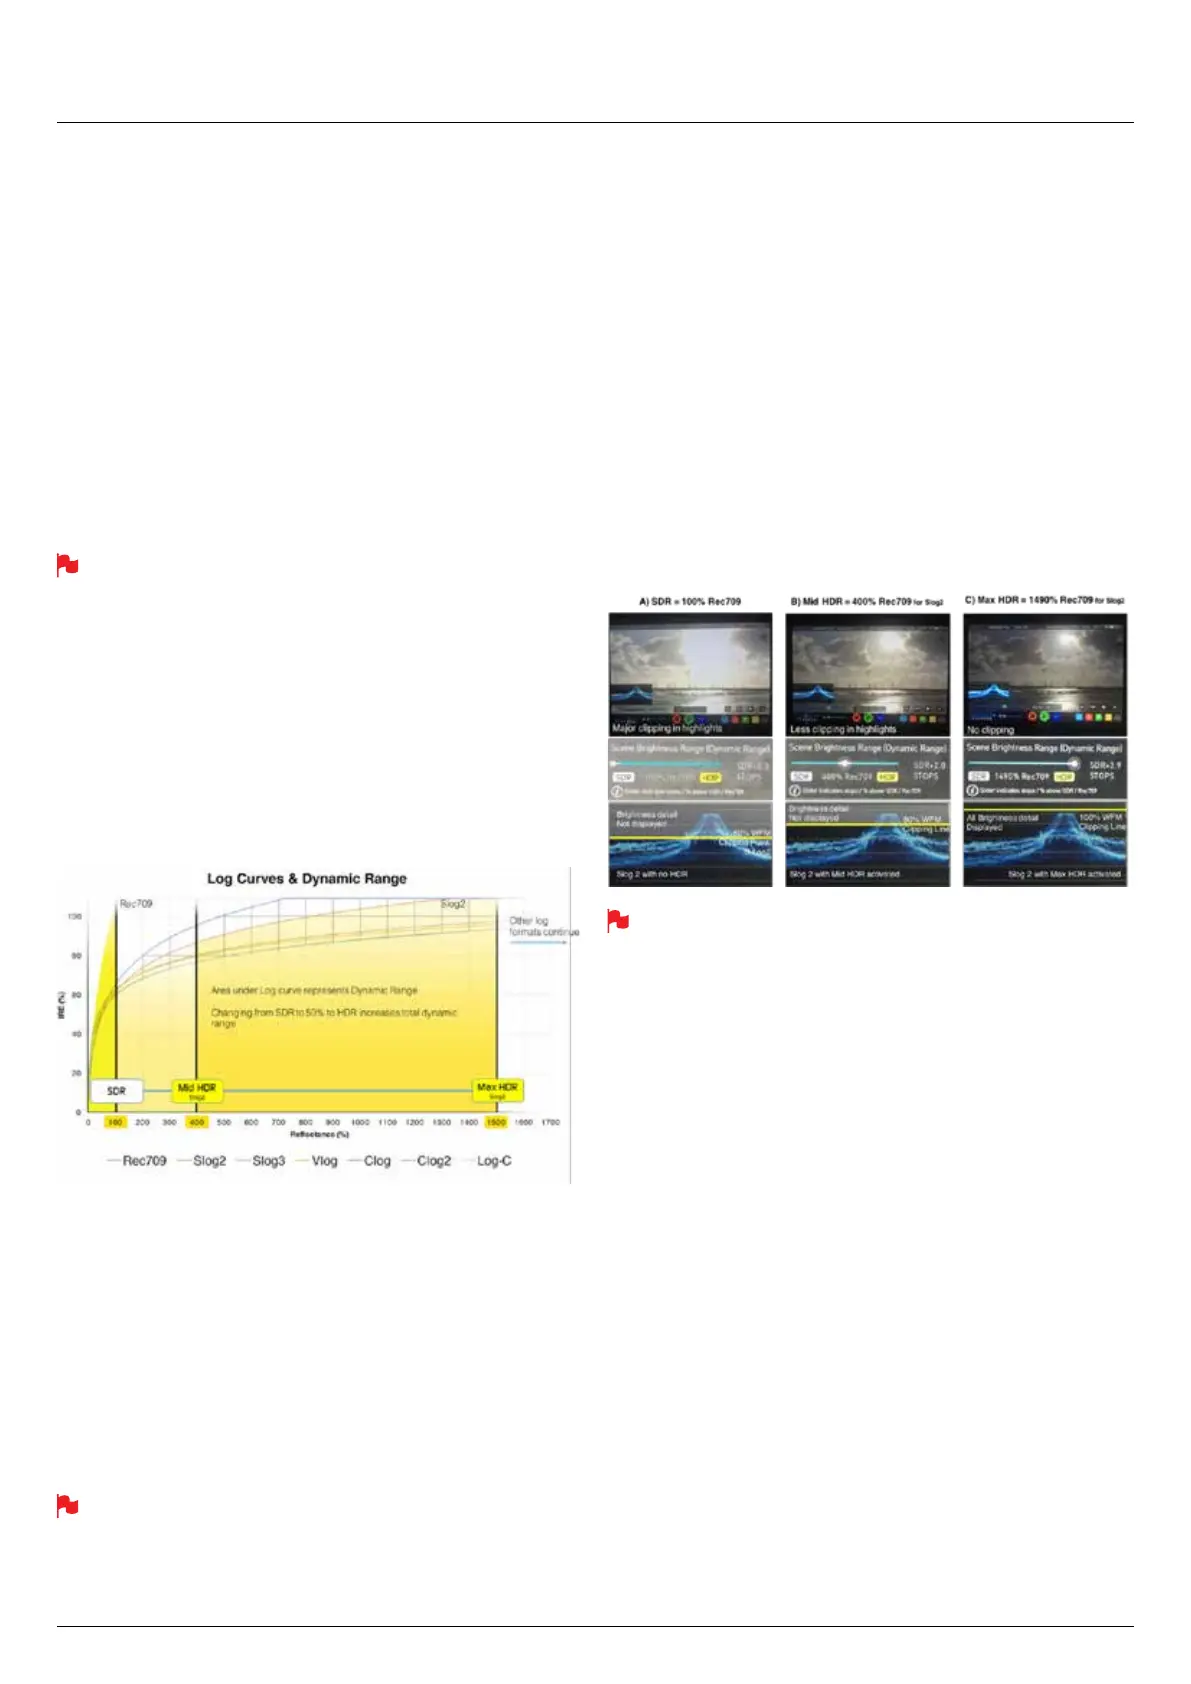
TherststepinHDRistorecognizeyouhaveaHDRscene.Lookfora
good range of contrast across the brightest and darkest parts of your
image and also across the color and tonal range as each color also
contains its own brightness or luminance information.
Secondly ensure you are sending a Log signal into the Sumo19 so that
you are recording the HDR Log information. Now you are ready to
captureLogbutuseAtomHDRimageprocessingtoresolvethenalHDR
resultintheeldratherthandealingwiththewashedoutlookofLogfor
critical exposure decisions
The main impact of HDR is apparent in the spectral highlights and bright
areas. Areas that would have previously been blown out will now contain
detail and information to enhance your content.
Alongside the physical light in the scene, the faster/brighter your
lens the greater the level of brightness you’ll have to play with.
Choosing a Cine style lens or those with a delicked manual aperture
can provide increased exibility over photo lenses that use an
electronic control aperture.
AtomHDR uses an in depth understanding of each Log curve and
combines it with the control of the panel processing and back light in
order to apply an increased brightness to the highlight areas of the
scene. Start using AtomHDR by selecting the icon and step through the
selection process to pick the camera, Log gamma signal and color
gamut matching your setup
Camera Manufacturer – tap to scroll through to the manufacturer of the
camera providing the input. Sony, Canon, Panasonic, Arri, Red and JVC
Log Gamma Format – For each manufacturer there may be a number of
different Log curves available and you can scroll through to the correct
selection by tapping the Gamma icon. In the case of Arri there is only
LOG-C but you need to set the ASA of the the Log Gamma to match the
input of the camera.
Gamut – the third selection allows you to select the Color Gamut of the
input. This is not applicable to all cameras but again ensure that this
matches the input of the camera to ensure accurate monitoring.
All adjustments are completely non destructive and will not effect
the recording. The adjustments you make to the exposure and
color Gamut on the camera will then be out put to be recorded on
the Inferno.
The HDR slider below these allows you to adjust the brightness of the
screen to match you scene. Sliding it to the right will increase the
dynamic range of the scene and allow you to monitor % or Stop
increases over REC.709. The screen is capable of displaying up to 10.2
stops of dynamic range. As you slide to the right you increase the
dynamic range the panel reproduces up to its maximum of 10.2 stops. In
terms of operation you want to adjust the slider so that the image on the
monitor matches the dynamic range of the scene. Leaving it too far down
the SDR end of the range means critical highlight detail will be clipped,
whereas sliding too far down the HDR end may result in the overall
brightness appearing too dark. The easiest way to get this right is to
either trust your eyes - judging what you see in reality matches what is on
screen or use the Waveform clipping tool (available with OS7.1) that lets
you pin point the precise dynamic range for your scene. With OS7.1 a
moving graticule or line on the waveform is introduced that illustrates the
luminance clipping point. This is illustrated below:
Whilst in AtomHDR mode 3D LUTs can not be used for either display
or loop out. We are actively looking in to this and it may change in
future Firmware releases. Manual adjustments to the Lift, Gamma
and Gain of the screen as the AtomHDR engine is dynamically
controlling these.