Chapter 4: Installing Pro Tools | Sync X
10
Register Pro Tools | Sync X
Pro Tools | Sync X includes a Registration card with a redemption code and a QR code that lets you register the unit. Registering your
Sync X lets you put it under Hardware Contract, access support, and access PDF documentation through your online Avid Master Ac-
count.
To register your Pro Tools | Sync X unit and access related downloads through your Avid Master Account:
1 Locate the Registration card.
2 Do one of the following:
• With your mobile device, scan the QR code on the Registration card. Follow the on-screen instructions and then continue with the
next step.
•Visit https://www.avid.com/register and continue with the next step.
3 Log in to your Avid Master Account. If you do not already have an Avid Master Account, create a new one and log in.
4 Enter the redemption code on the Registration card and click Register. If you scanned the QR code, your redemption code is entered
automatically.
5 Follow the on-screen instructions.
You are directed to the
My Products page for your Avid Master Account.
Download and Review PDF Documentation
Download and review PDF documentation for Pro Tools | Sync X and Pro Tools software from your Avid Master Account. Be sure to
consult any Read Me documentation for the latest known issues.
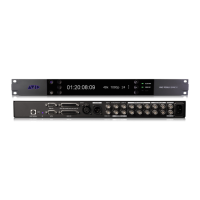
Rack Mounting Pro Tools | Sync X
If you install Pro Tools | Sync X into a 19-inch rack, use the included rack mount screws and washers. Pro Tools | Sync X, as with all
Avid peripherals, needs room at the front and back of the unit to maintain proper air flow for cooling. Do not block the front or back of
the unit. If the unit is rack mounted in a case, remove the case lids or doors before operating the system. Failure to do so can result in
the unit overheating, which can permanently damage sensitive components.
If you decide to not install Pro Tools | Sync X in a rack, you can affix the included adhesive rubber pads to the bottom of the unit to pro-
tect whatever surface you decide to set it on (for example, if you decide to use it as a desktop unit).
Connecting Cables
Once you have installed Pro Tools | Sync X in a rack (optional), you are ready to start connecting cables.
The following are the primary hardware connections on Pro Tools | Sync X:
• AC Power (power cable included)
• Sync X Host Serial port to the serial port on the Pro Tools system’s HD Native device or primary HDX card (serial cable included)
• Clock to Pro Tools audio interfaces using Loop Sync and/or Word Clock (2 BNC cables included)
• 9-pin to an external machine for MachineControl (cable not included)
• Synchronization, including positional and clock references to and from remote machines using various connection formats
(cables not included)
In order to meet EMC requirements and in order to obtain the highest performance of Pro Tools | Sync X, use high-quality, properly
shielded cables for all external connections.
To familiarize yourself with Pro Tools | Sync X front panel displays and controls, see Pro Tools | Sync X Front Panel. For information
about back panel connections, see Pro Tools | Sync X Back Panel.