16
Safety functions and alarms
User Manual PoolManager
®
46
16.7 Alarm settings
The following adjustments can be made in the menu Alarm settings.
16.7.1 Acoustic alarms
The following acoustic alarms can be activated and deactivated
individually:
• Acoustic signal for flow alarm
• Acoustic signal for level alarm
• Acoustic signal for miscellaneous alarms
• Acoustic signal for service notifications.
16.7.2 Flow alarm settings
• Duration of start delay
• Alarm delay for the flow alarm
• Flow alarm acknowledgement (automatic / manual)
• Input for flow monitoring:
• Flow [2]
• IN1 [6] / BNC
• Flow [2] & IN1 [6] / BNC
(Double flow monitoring)
16.7.3 Level alarm settings
• Level alarm pH active/inactive
(Level alarm can be deactivated if no low-level signal is available)
• Level alarm Cl, mV and/or O2 active/inactive
(Level alarm can be deactivated if no low-level signal is available)
• Dosage for level alarm (yes / no)
(If the canister is not yet entirely empty when a level alarm arises,
then dosage can be continued despite level alarm)
• Optional level input for pH plus
• Residual volumes in canister for level signal from suction lance
(Individually configurable for each canister)
16.8 Alarm relay
The alarm relay offers the chance to connect an external alarm device,
or to notify external systems of current alarms.
The alarm relay is turned on as long as there is at least one active
alarm and it has not yet been acknowledged.
16.8.1 Electrical connection
Requisite user qualification:
ELECTRICAL SPECIALIST
An electrical connection to an alarm relay may only be
performed by an ELECTRICAL
defined in the chapter User qualification.
IMPORTANT NOTICE!
Observe maximum flows
Observe the maximum permissible currents for the
alarm relay (max. 4A) and for the sum of all relay
switch outputs being used in 230V~ (in sum, max. 4A)
Please also refer to the Chapter 230V~ Power supply.
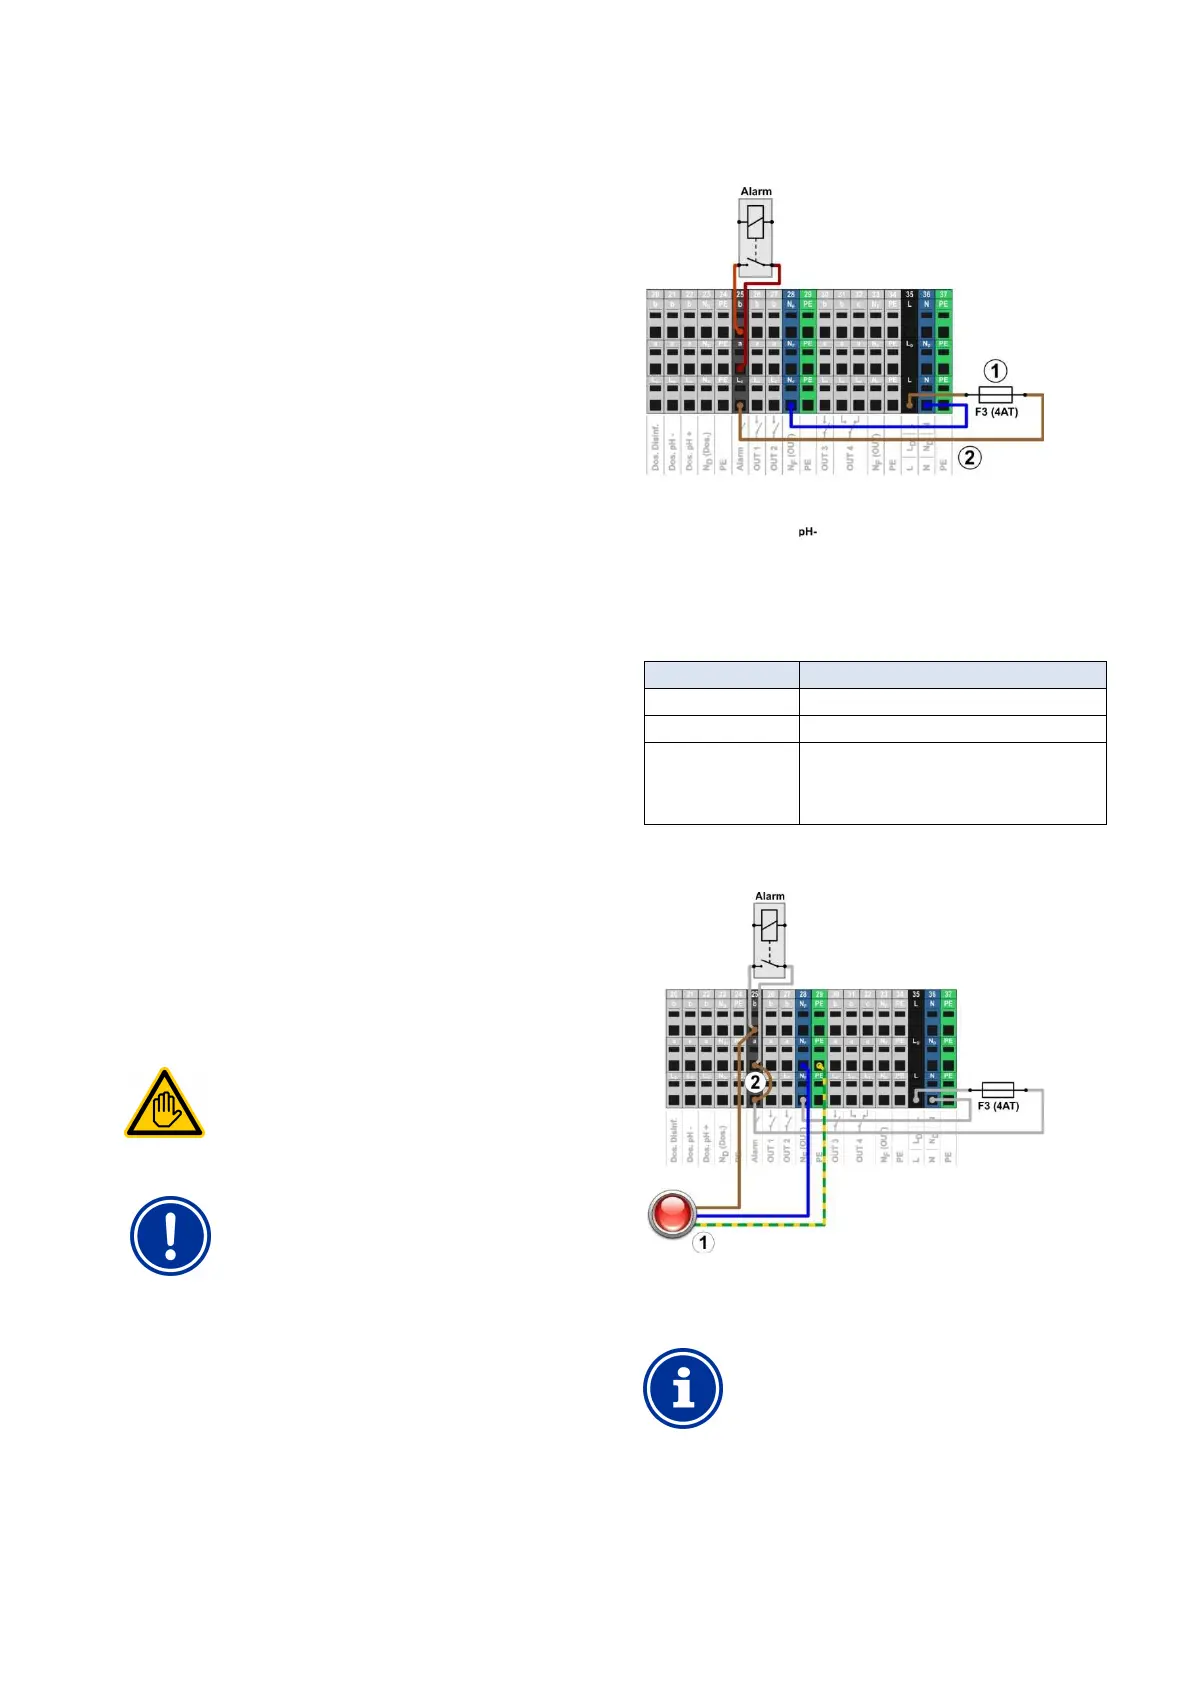
The following figure shows the internal wiring on the alarm relay. All
connections shown are run internally as conducting paths.
1 Fuse F3 (4AT)
2 230V~ phase L
F
for the alarm relay and the supplemental
functions (secured with 4A)
The terminal block [25] for the alarm relay is set up as follows:
Terminal Function
b Working contact
a Centre contact
L
F
Supply phase 230VAC for alarm relay and
supplemental functions. Can be bridged to the
centre contact if needed in order to control
230VAC devices.
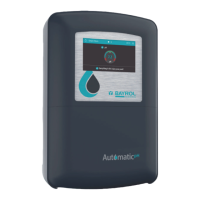
The following figure schematically shows the connection of a 230V~
alarm unit on the alarm relay.
1 Alarm unit 230V~
2 Wire bridge in the terminal box from phase L
F
to centre
relay contact a
INFO
Connection of neutral conductor N and PE
An alarm
unit's neutral conductor N and protective
earth PE can be connected to the terminal blocks
intended for the purpose N
F
figure.
When using the alarm relay as a potential free switch, the wire bridge
(2) is omitted and the connection is realised on terminal blocks [25a]
and [25b].