39
Decommissioning
• Remove the unit from the power supply.
•
Remove the dosing hoses from the pumps.
• Turn off measurement water supply.
•
Empty the measurement water circuit and hose pumps
completely.
•
Remove glass electrodes (pH and Rx electrode) from the
m
easuring chamber and seal screw apertures.
•
Store electrodes moistly. To do so, fill the quiver with water and
screw in the electrode
• Store electrodes in a location from frost.
After winter has passed, follow the instructions for first start
render the system operational again.
In doing so, be sure to inspect all components for their capacity to
function.
All dismounted parts (electrodes, dosage hoses) must be remounted
at their intended locations.
Check the settings in PoolManager
®
for first start-
up and calibrate the electrodes as described.
39 Decommissioning
If disposing of the device after its service life, be sure to rinse it
thoroughly and drain all water. This device has been manufactured in
compliance with th
e ROHS directive and the German laws on
electronic equipment disposal. Do not dispose of this equipment along
with regular waste.
Deliver the device to a suitable and accredited collection point.
User Manual PoolManager
®
Remove the dosing hoses from the pumps.
Empty the measurement water circuit and hose pumps
Remove glass electrodes (pH and Rx electrode) from the
easuring chamber and seal screw apertures.
Store electrodes moistly. To do so, fill the quiver with water and
After winter has passed, follow the instructions for first start
-up to
In doing so, be sure to inspect all components for their capacity to
All dismounted parts (electrodes, dosage hoses) must be remounted
llow the procedure
up and calibrate the electrodes as described.
If disposing of the device after its service life, be sure to rinse it
thoroughly and drain all water. This device has been manufactured in
e ROHS directive and the German laws on
electronic equipment disposal. Do not dispose of this equipment along
Deliver the device to a suitable and accredited collection point.
40
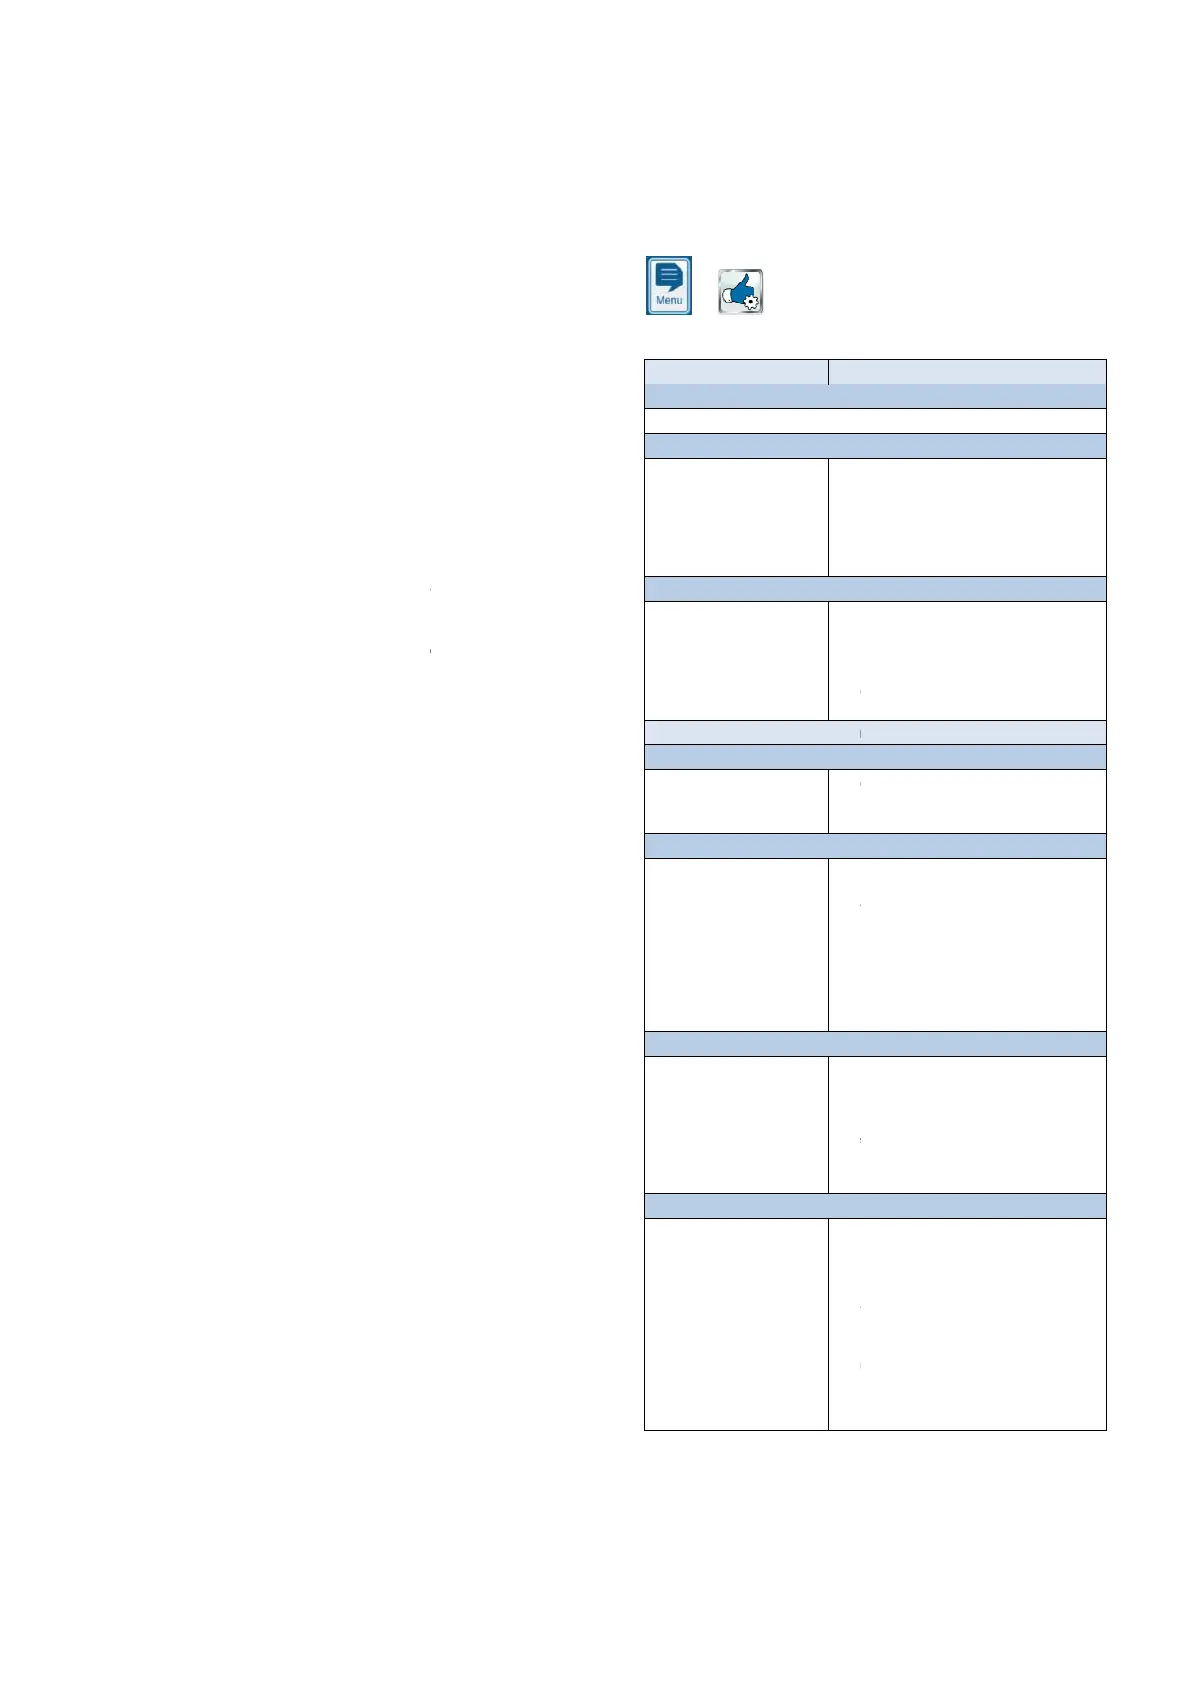
Commissioning step by step
PoolManager
®
has a menu for the first start
parameters relevant to successful installation.
This menu for first start-
up can be called up at any time as follows:
The following steps are exe
Action
Step 1: Menu language
Configuration of menu language
Step 2: Set default values
Here, the desired default set
can be selected and
activated.
Here, select the default set that best fits. In
cases of doubt, please check all default
values for their validity for the respective
For safety reasons, activation of the defaults
has to be confirmed at this point.
Step 3: System parameters
Configuration of pool and
system parameters
Pool volume of the connected swimming
Hose configuration of the pump hoses used.
This display is used to check the settings
made at the factory according to device
Variation A: PoolManager
®
Step 4: Calibration
Calibration (comparison) of
measured pH value
1-
point calibration pH. Please proceed as
Step 5: Control parameters pH
Configuration of the most
important parameters for
pH control
When refilling the pool, it may be sensible to
expand the top and bottom pH value alarms
can fluctuate somewhat during the starting
CAUTION: If the parameters are changed,
make absolutely sure that the val
back as soon as the pool water has stablised.
You can also use the configuration assistant.
Step 6: Manual dos. O2 (BayroSoft)
Start manual dosing
The dosing volume (for 0.5l BayroSoft/10m
water volume) is calculated upon entering the
pool volume and can be started here.
In order to increase the dosage volume for
the first dosage, thereby increasing the
certainty of disinfection, it's also possible to
select 2x or 3x the dosage volume.
Step 7: Dosage parameters O2
Configuration of the most
important parameters for
automatic BayroSoft dosing.
Dosage volume is calculated by entering the
pool volume and is displayed here to check
Select the dosage day such that it is directly
(e.g. high amount of swimming).
Temperature compensation ensures that
more BayroSoft is dosed for higher water
temperatures (higher product consumption). It
73
Commissioning step by step
has a menu for the first start
-up. This menu covers all
parameters relevant to successful installation.
up can be called up at any time as follows:
commissioning step by step
Here, select the default set that best fits. In
cases of doubt, please check all default
values for their validity for the respective
For safety reasons, activation of the defaults
has to be confirmed at this point.
Pool volume of the connected swimming
Hose configuration of the pump hoses used.
This display is used to check the settings
made at the factory according to device
point calibration pH. Please proceed as
Calibration pH.
When refilling the pool, it may be sensible to
expand the top and bottom pH value alarms
-range, as the pH value
can fluctuate somewhat during the starting
CAUTION: If the parameters are changed,
make absolutely sure that the val
ues are set
back as soon as the pool water has stablised.
You can also use the configuration assistant.
Step 6: Manual dos. O2 (BayroSoft)
The dosing volume (for 0.5l BayroSoft/10m
3
water volume) is calculated upon entering the
pool volume and can be started here.
In order to increase the dosage volume for
the first dosage, thereby increasing the
certainty of disinfection, it's also possible to
select 2x or 3x the dosage volume.
Dosage volume is calculated by entering the
pool volume and is displayed here to check
3
water volume). It can be
Select the dosage day such that it is directly
usage expected
(e.g. high amount of swimming).
Temperature compensation ensures that
more BayroSoft is dosed for higher water
temperatures (higher product consumption). It
set at least to normal.