36 09/08
Technical Data of the control terminals
Digital inputs (X210A.3 … X210B.2): Low signal: DC 0 V … 3 V, High signal: DC 12 V … 30 V,
input resistance: 2,3 kΩ, response time: 2 ms (STOA and STOB: 10 ms), PLC-compatible
Digital output (X210B.3): Low signal: DC 0 V… 3 V, High signal: DC 12 V … 30 V,
maximum output current: 50 mA, PLC-compatible
Multi-function output (X210B.4):
Analog signal: DC 19 V… 28 V, maximum output current: 50 mA, pulse width modulated (f
PWM
= 116 Hz),
Digital signal: Low signal: DC 0 V… 3 V, High signal: DC 12 V … 30 V, maximum output current: 50 mA,
PLC-compatible,
Frequency signal: output voltage: DC 0 V … 24 V, maximum output current: 40 mA,
Maximum output frequency: 150 kHz
Multi-function input (X210B.6):
Analog signal: input voltage: DC 0 V … 10 V (R
i
=70 kΩ), input current: DC 0 mA … 20 mA (R
i
=500 Ω),
Digital signal: Low signal: DC 0 V… 3 V, High signal: DC 12 V … 30 V, response time: 4 ms, PLC-compatible
Conductor cross section:
Suitable conductor cross sections for the control terminals are:
With wire end ferrule: 0.25…1.0 mm²
Without wire end ferrule: 0.14…1.5 mm²
3.7.1 External 24 VDC voltage supply
The bidirectional control terminals X210A.1/X210A.2 can be used as voltage output or voltage input. If an exter-
nal 24 VDC voltage supply is connected to the terminals X210A.1/X210A.2 the parameterisation and communica-
tion is possible and input and outputs are active, even if the mains voltage is switched off.
The specification of technical requirements of the external voltage supply can be found in the operating instruc-
tions manual.
Requirements of the external voltage supply
Input voltage range 24 VDC ±10%
Input rated current Max. 1.1 A
Inrush current peak Typical: < 25 A
External fuse protection Via commercial available circuit breakers for rated current, charakteristic: slow-
acting
Safety Extra safety low voltage (SELV) according to EN 61800-5-1
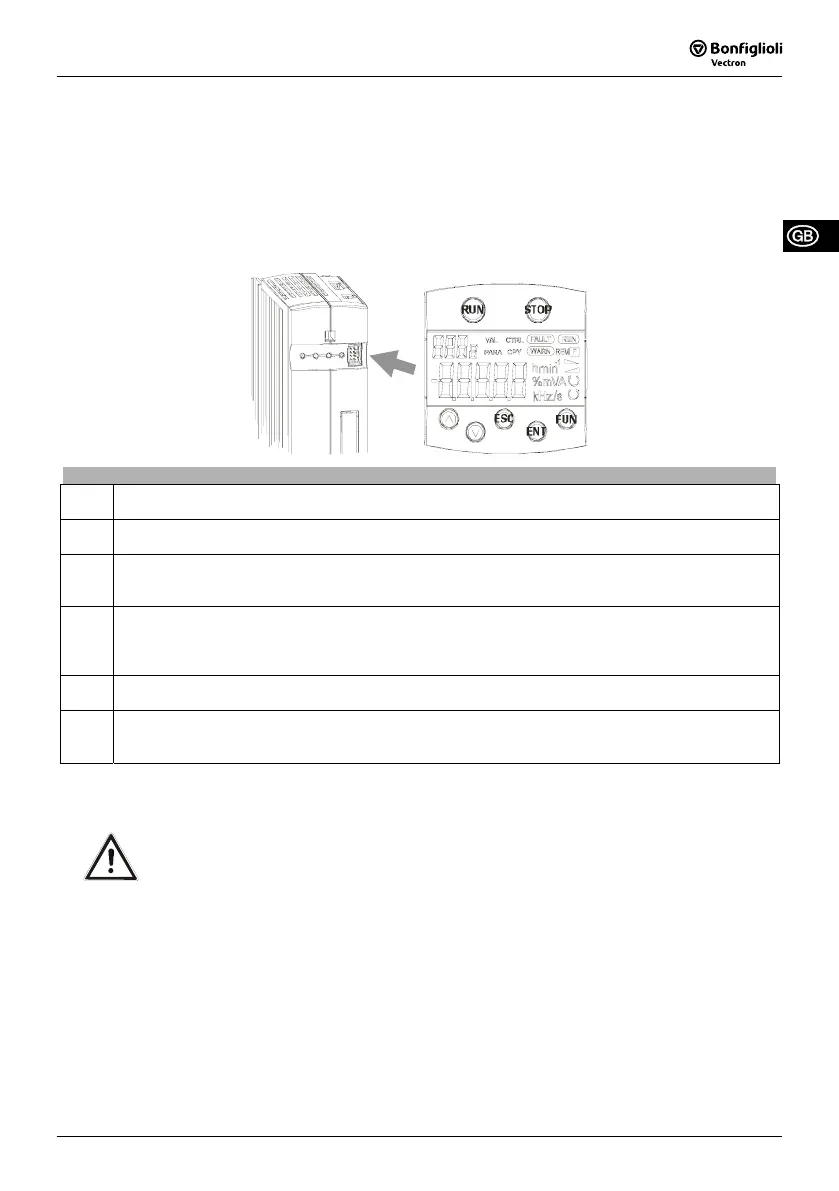
4 Commissioning via the control unit KP500
The optional control unit KP500 enables the parameterization, parameter display and control of the frequency
inverter. It must be connected to the front of the frequency inverter.
Note:
Further methods of commissioning (e.g. via optional communication modules) are described in the operating
instructions manual on the attached CD.
4.1 Functions of keys
Keys
RUN
Start drive (alternative to control signal S2IND or S3IND). Opening the CTRL menu.
Opening the motor potentiometer function.
STOP
Stop drive (alternative to control signal S2IND or S3IND). Opening the CTRL menu.
Acknowledging faults
▲ ▼
Adjusting the output frequency in the Motor potentiometer function Pot.
Navigating in the menu structure and selecting parameters.
Increasing/decreasing of parameter values.
ENT
Reversal of the direction of rotation independent of the control signal on the terminals Clockwise
S2IND or Anticlockwise S3IND.
Opening parameters or switching to another menu within the menu structure.
Confirmation of the selected function or the parameter setting.
ESC
Aborting parameter settings or switching back to the previous menu within the menu structure.
Cancelling the function or resetting the parameter value.
FUN
Switching over the key function. Access to special functions.
Changing from Internal reference value int or Motor potentiometer function Pot to the adjusted JOG-
frequency; the drive starts. Releasing the FUN key stops the drive.
4.2 Guided Commissioning
Warning!
The frequency inverter may be connected to power supply every 60 s. More frequent switch-on
operations may damage the device. Consider this for a jog operation of a mains contactor.
• Disable the frequency inverter; open contacts at control inputs STOA (digital input S1IND/terminal X210A.3)
and STOB (digital input S7IND/terminal X210B.2).
• Switch on mains power.
The frequency inverter carries out a self-test.
Attention!
Before starting the Guided commissioning the machine should not have been in operation because part of the
machine data depends on the operating temperature.
09/08 37
 Loading...