38
2. While holding down the
SOURCE pad
and the
HOLD pad,
tum the power
ON.
1.
Make
sure that the power is
OFF.
This section will explain how you can (for example) "use
sounds that were sampled on the SP-202 to play the rhythm
part
of
a
GS sound source device."
Channel
10
is normally used for the rhythm part, so you will
need to set the MIDI channel of the SP-202 to channel 10,
and assign the pads to note numbers which are not used by
the rhythm part of
a
GS sound source.
The SP-202 provides an easy way to make these settings.
I
Using the SP-202 as a
rhythm
sound module
When the SP-202 receives
Note
messages (note-on, note
number) from an external MIDI device on the
matching
MIDI channel, the
bank/pad
corresponding
to
the received
note number will light, and the sample assigned to that pad
will play.
*
If
the
pads
do not light and the samples do
not
play,
check the MIDI channel and the note numbers.
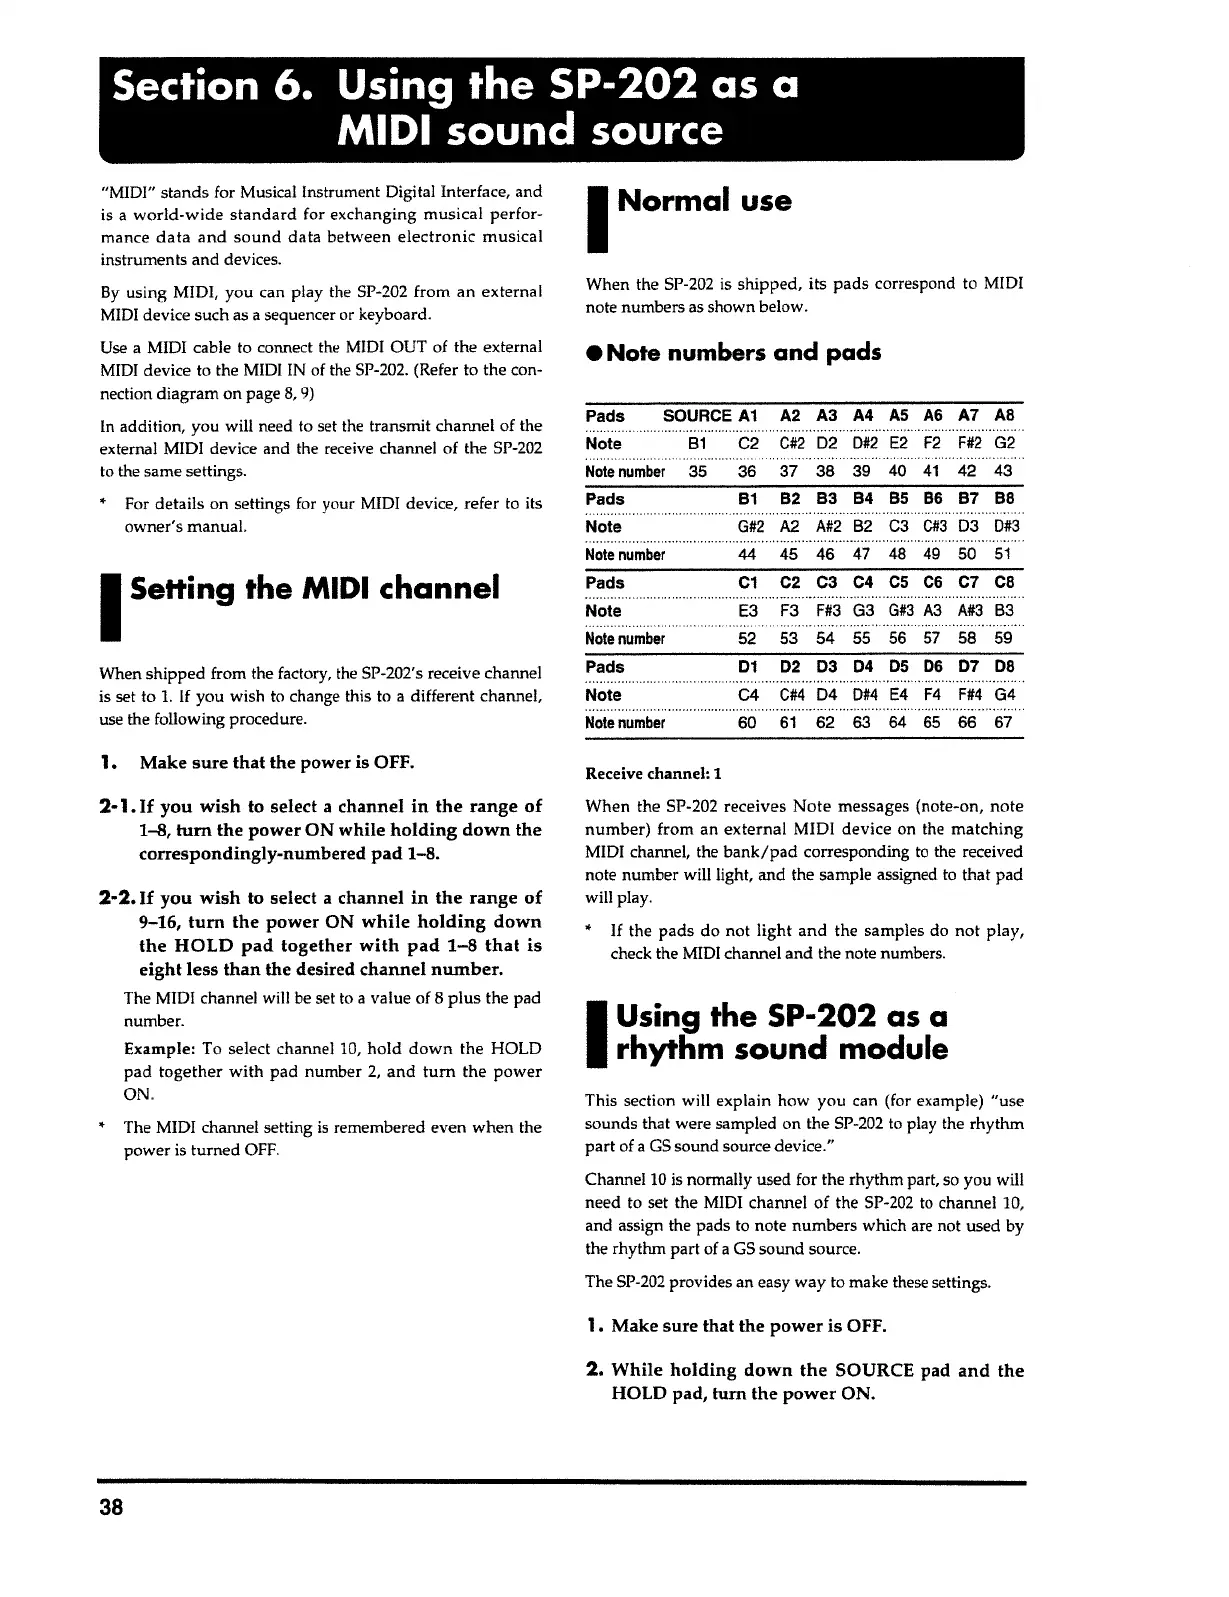
Receive
channel:
1
60
61
62 63 64
65
66 67
Note number
01 02 03 04
OS
06 07
DB
.................................................................
C4
C#4
04
0#4
E4
F4
F#4
G4
Pads
Note
F3
F#3
G3
G#3
A3
A#3
83
52 53 54 55 56
57
58 59
Note
number
C2 C3 C4
CS
CS
C7
CB
45 46 47 48
49
50
51
87 88
A2.
A#2
82 C3
C#3
03
0#3
Note
number
35
36
Pads
81
Note
G#2
Note
number
44
Pads C1
............
,.
......
Note
E3
A7 AB
F#2
G2
42 43
A2
A3 A4
AS
AS
...................
C#2
02
0#2
E2
F2
37 38
39
40
41
82
83
84
BS
86
Pads SOURCE
A1
.....
...........•..••.••.••.••.
Note
81
C2
• Note numbers and pads
When the SP-202 is shipped, its
pads
correspond to MIDI
note numbers as shown below.
I
Normal
use
•
The MIDI channel setting
is
remembered even when the
power is turned OFF.
Example: To select channel
10,
hold down
the HOLD
pad
together
with pad number
2,
and
turn
the
power
ON.
2·2.
If you wish
to select a
channel in the range of
9-16,
tum the power
ON
while holding down
the HOLD pad together with pad 1-8 that is
eight less than the
desired
channel number.
The MIDI channel will be set to
a
value of
8
plus
the pad
number.
2·
1.
If you wish
to select a
channel in the range of
1-8,
tum the power
ON
while holding down the
correspondingly-numbered pad
1-8.
1. Make
sure that the
power is OFF.
When shipped from the factory, the SP-202's receive channel
is set to
1.
If you wish to change this to
a
different channel,
use the following procedure.
I
Setting
the
MIDI
channel
By
using MIDI, you can play the SP-202 from an external
MIDI device such as a sequencer or keyboard.
Use
a
MIDI cable to connect the MIDI OUT of the external
MIDI device to the MIDI IN of the SP-202. (Refer to the con-
nection diagram on page
8,
9)
In
addition, you will need to set the transmit channel of the
external MIDI device and the receive channel of the SP-202
to the same settings.
• For details on settings for your MIDI device, refer to its
owner's manual.
"MIDI" stands for Musical Instrument Digital Interface, and
is
a
world-wide standard
for exchanging musical perfor-
mance
data and sound data
between
electronic
musical
instruments and devices.
Section 6. Using
the
SP-202 as a
MIDI
sound
source