[11
Winding the lower thread
Ill Bobinage du fil inferieur
III
Bobinado del hilo inferior
[11
Aufwickeln des Unterfadens
A CAUTION/ ACHTUNG/ ATTENTION/ A
TEN
CION
~-
Do
not touch any
of
the moving parts
or
place any objects against the machine while winding the lower
thread,
as
this may result in personal injury
or
damage
to
the machine.
• Beruhren Sie beim Aufwickeln des Unterfadens keine sich bewegenden Teile und halten
Sie
auch keine Ge-
genstande
an
solche Teile, weil Sie sich verletzen konnen und die Nahmaschine beschadigt werden
kann.
•
Ne
toucher aucune des parties mobiles ni
ne
placer aucun objet contre
Ia
machine lors du bobinage du fil in-
ferieur, sinon on risquera de
se
blesser ou d'endommager
Ia
machine.
• No tocar ninguna de las piezas m6viles o colocar ningun objeto contra
Ia
maquina mientras bobina
el
hilo in-
ferior, pues podria
resultar
en
heridas o
Ia
maquina pod ria resultar daiiada.
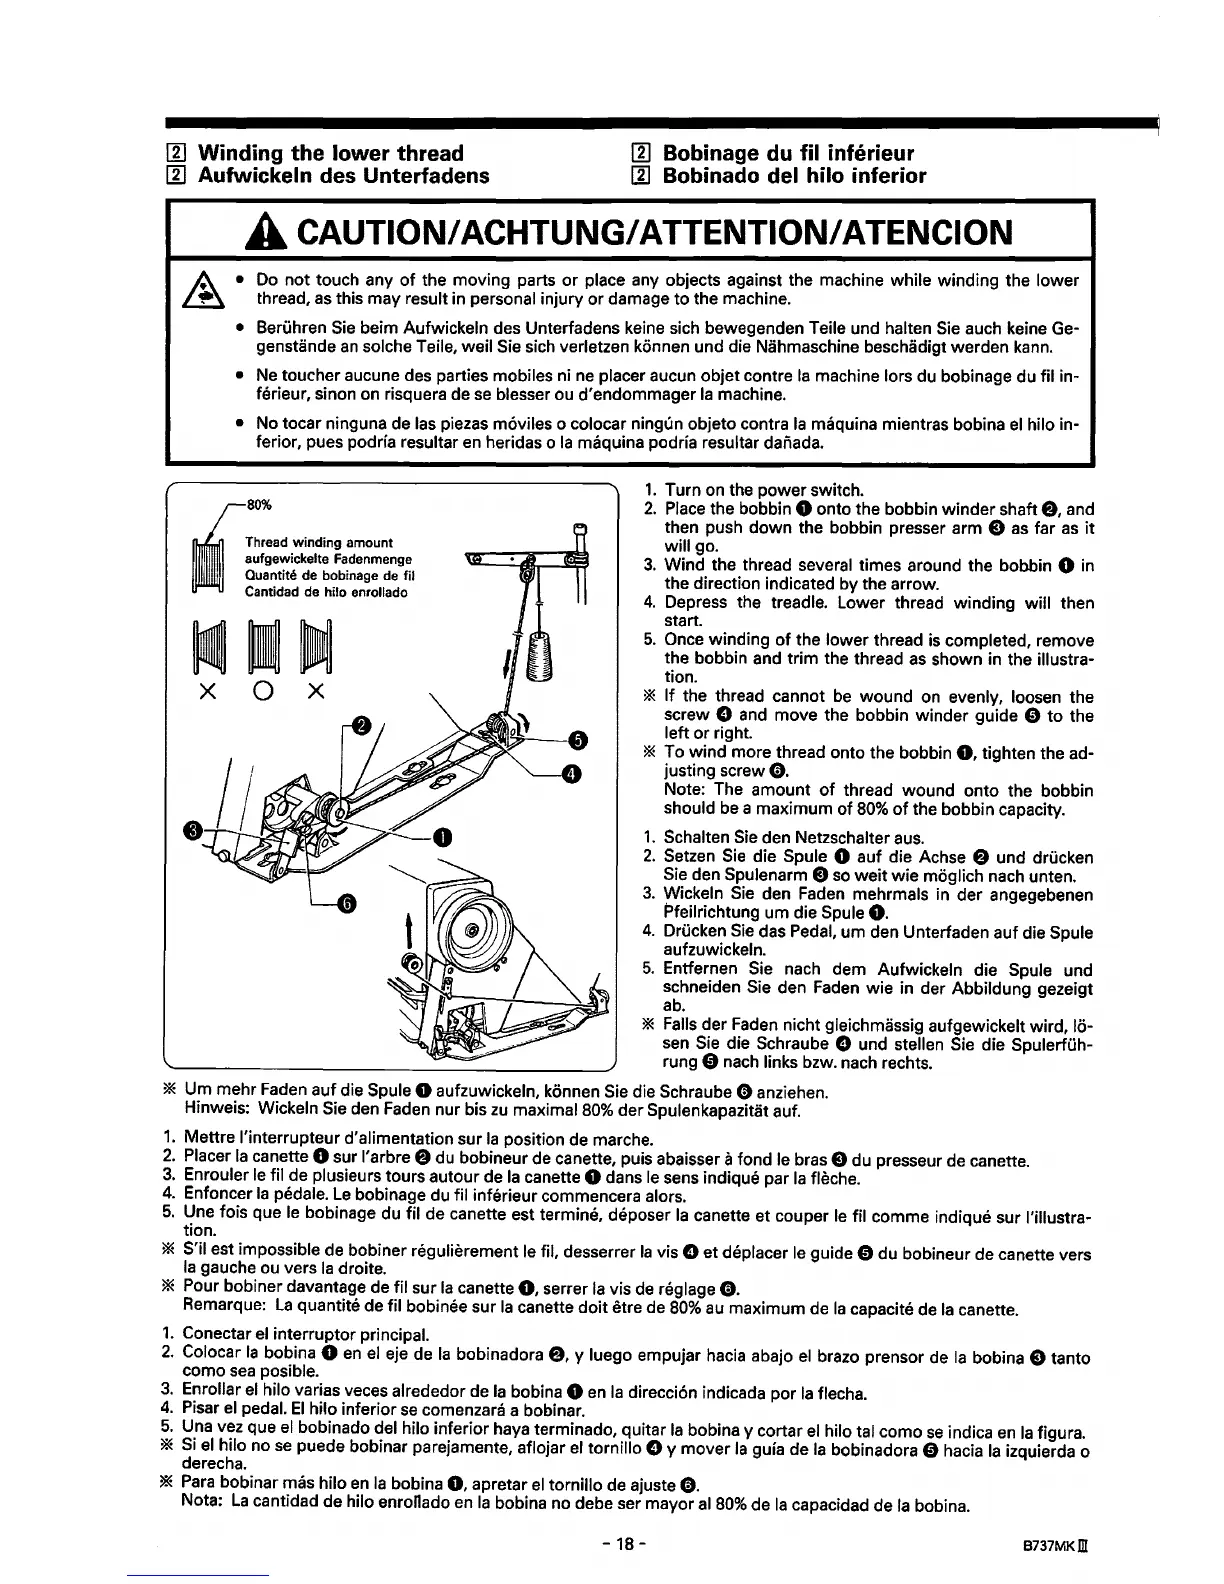
1.
Turn on the
power
switch.
{
80%
Thread winding amount
aufgewickelte Fadenmenge
Ouantite de bobinage de fil
Cantidad de hilo enrollado
2.
Place the bobbin 0 onto the bobbin winder shaft
f),
and
then push down the bobbin presser arm
e
as
far
as
it
will go.
3.
Wind the thread several times around the bobbin 0 in
the direction indicated by the arrow.
X
0
X
4.
Depress the treadle. Lower thread winding will then
start.
5.
Once winding
of
the lower thread
is
completed, remove
the bobbin and
trim
the thread
as
shown in the illustra-
tion.
*
If
the thread cannot be wound on evenly, loosen the
screw
0 and move the bobbin winder guide 0
to
the
left
or
right
* To wind more thread onto the bobbin
0,
tighten the ad-
justing screw
e.
Note: The amount
of
thread wound onto the bobbin
should be a maximum
of
80%
of
the bobbin capacity.
1.
Schalten Sie den Netzschalter a
us.
2.
Setzen
Sie
die Spule 0 auf die Achse 8 und drucken
Sie den Spulenarm E) so
weit
wie
moglich nach unten.
3.
Wickeln Sie den Faden mehrmals in der angegebenen
Pfeilrichtung urn die Spule
0.
4.
Drucken
Sie
das Pedal, urn den Unterfaden auf die Spule
aufzuwickeln.
5.
Entfernen Sie nach dem Aufwickeln die Spule und
schneiden
Sie den
Faden
wie in der Abbildung gezeigt
a
b.
*
Falls
der Faden nicht gleichmassig aufgewickelt wird, lo-
sen
Sie die Schraube 0 und stellen Sie die Spulerfuh-
rung 0 nach links bzw. nach rechts.
* Urn mehr Faden auf die Spule 0 aufzuwickeln, konnen Sie die Schraube 0 anziehen.
Hinweis:
Wickeln Sie den Faden nur bis
zu
maximal
80%
der Spulenkapazitat auf.
1.
Mettre l'interrupteur d'alimentation sur
Ia
position demarche.
2.
Placer
Ia
canette 0 sur l'arbre
f)
du bobineur de canette, puis abaisser a
fondle
bras E) du presseur de canette.
3.
Enrouler le fil de plusieurs tours autour de
Ia
canette 0 dans le sens indique par
Ia
fli~che.
4.
Enfoncer
Ia
pedale.
Le
bobinage du fil inferieur commencera alors.
5.
Une fois que le bobinage du fil de canette est termine, deposer
Ia
canette et couper
le
fil comme indique sur !'illustra-
tion.
* S'il est impossible de bobiner regulierement le fil, desserrer
Ia
vis 0 et deplacer le guide 0 du bobineur de canette vers
Ia
gauche ou vers
Ia
droite.
* Pour bobiner davantage de fil sur
Ia
canette
0,
serrer
Ia
vis de reglage
0.
Remarque:
La
quantite de fil bobinee sur
Ia
canette
doit
etre de
80%
au
maximum de
Ia
capacite de
Ia
canette.
1.
Conectar
el
interrupter principal.
2.
Colocar
Ia
bobina 0
en
el
eje de
Ia
bobinadora
f),
y luego empujar hacia abajo
el
brazo prensor de
Ia
bobina E) tanto
como
sea
posible.
3.
Enrollar
el
hilo varias veces alrededor de
Ia
bobina 0
en
Ia
direcci6n indicada por
Ia
flecha.
4.
Pisar
el
pedal.
El
hilo inferior
se
comenzara a bobinar.
5.
Una vez que
el
bobinado del hilo inferior haya terminado, quitar
Ia
bobina y cortar
el
hilo tal como
se
indica
en
Ia
figura.
*
Si
el
hilo
nose
puede bobinar parejamente, aflojar
el
tornillo 0 y mover
Ia
guia de
Ia
bobinadora 0 hacia
Ia
izquierda o
derecha.
*
Para
bobinar mas hilo
en
Ia
bobina
0,
apretar
el
tornillo de ajuste
0.
Nota:
La
cantidad de hilo enronado
en
Ia
bobina no debe ser
mayoral
80%
de
Ia
capacidad de
Ia
bobina.
-
18-
B737MKm
 Loading...