INSTALLATION
MONTAGE
A
CAUTION/
ACHTUNG
The sewing machine should only be installed
by a qualified technician.
Ask your Brother dealer
or
a qualified electri-
cian for any electrical
work
that may need to
be
done.
The sewing machine weighs more than
37
kg.
The installation should be carried out by
two
or more people.
Die
Nahmaschine darf nur von einem qualifi-
zierten Fachmann montiert werden.
Falls
Elektrikerarbeiten gemacht werden mus-
sen,
wenden Sie sich
an
lhren Brother-Handler
oder
an
einen qualifizierten Elektriker.
Weil die Nahmaschine mehr
als
37
kg
wiegt,
sind zur Montage mindestens zwei Personen
notwendig.
ITJ
Installing the machine head
Do
not connect the power cord until installa-
tion
is
complete, otherwise the machine will
operate
if
the treadle
is
pressed by mistake,
which could result in injury.
Be
sure to connect the ground. If the ground
connection
is
not secure, serious electric
shocks
will result.
Install the belt cover to the machine head.
SchlieBen
Sie
das Netzkabel erst nach abge-
schlossener Montage
an,
weil sonst durch eine
unbeabsichtigte Betatigung des Pedals die
Maschine
in
Gang gesetzt und Verletzungen
verursachen
kann.
Erden
Sie
die Maschine unbedingt.
Bei
falsch
geerdeter Maschine besteht die Gefahr eines
elektrischen Schlages.
Bringen
Sie den Riemenschutz am Maschinen-
oberteil
an.
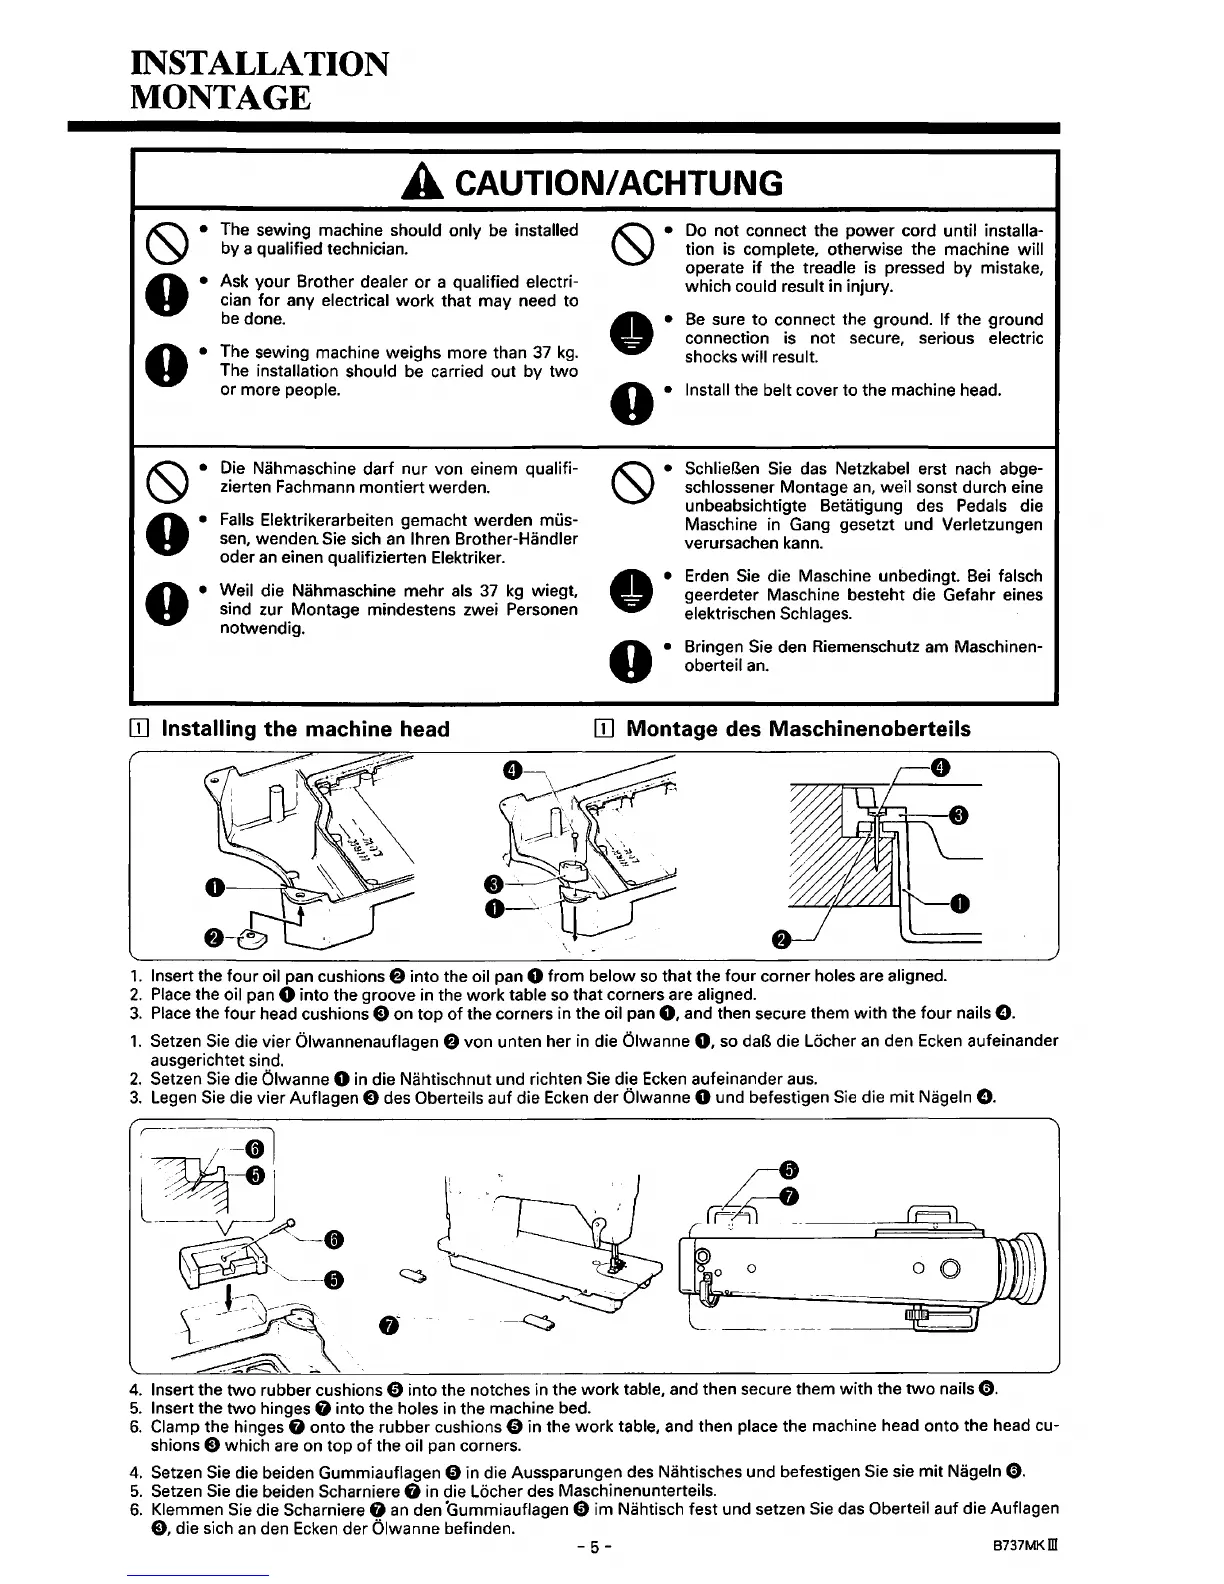
1.
Insert the four oil pan cushions 8 into the oil pan 0 from below
so
that the four corner holes are aligned.
2.
Place
the oil pan 0 into the groove
in
the work table
so
that corners are aligned.
3.
Place
the four head cushions
E)
on top of the corners in the oil
pan
0,
and then secure them with the four nails
e.
1.
Setzen
Sie
die vier Olwannenauflagen 8 von unten her
in
die Olwanne
0,
so
daB
die Locher
an
den
Ecken
aufeinander
ausgerichtet sind.
2.
Setzen
Sie
die Olwanne 0
in
die Nahtischnut und richten
Sie
die
Ecken
aufeinander a
us.
3.
Legen
Sie
die vier Auflagen
E)
des Oberteils auf die
Ecken
der Olwanne 0 und befestigen
Sie
die mit Nageln
e.
~
r-~<tl
l~~
~
·'---0
~··'--8
~---~
-.
--
:
\----~
~
'
·~~
l
'
'
4.
Insert the
two
rubber cushions 0 into the notches in the work table, and then secure them with the
two
nails
e.
5.
Insert the
two
hinges 0 into the holes
in
the machine bed.
6.
Clamp the hinges 0 onto the rubber cushions 0 in the work table, and then place the machine head onto the head cu-
shions e which are on top
of
the oil
pan
corners.
4.
Setzen
Sie
die beiden Gummiauflagen 0 in die Aussparungen des Nahtisches und befestigen Sie sie mit Nageln
e.
5.
Setzen
Sie
die beiden Scharniere 0
in
die Locher des Maschinenunterteils.
6.
Klemmen
Sie
die Scharniere 0
an
den Gummiauflagen 0 im Nahtisch fest und setzen
Sie
das
Oberteil auf die Auflagen
E),
die sich
an
den
Ecken
der Olwanne befinden.
-5-
B737MKill
 Loading...