4.0 CONFIGURATION MENU
Cheetah Xi Programming Manual 4-23
P/N: 06-651 Rev 1, 09/2013
4.3.4.2 HOW TO SET HOLIDAY SETTINGS FOR DAYTIME SENSITIVITY
The Holidays screen allows you to enter up to twenty holiday dates associated with the daytime sensitivity
option. On holiday dates, smoke sensors enabled for daytime sensitivity will continue to operate using the
Night Alarm Level. They will revert to using the Day Alarm Level when the holiday is over.
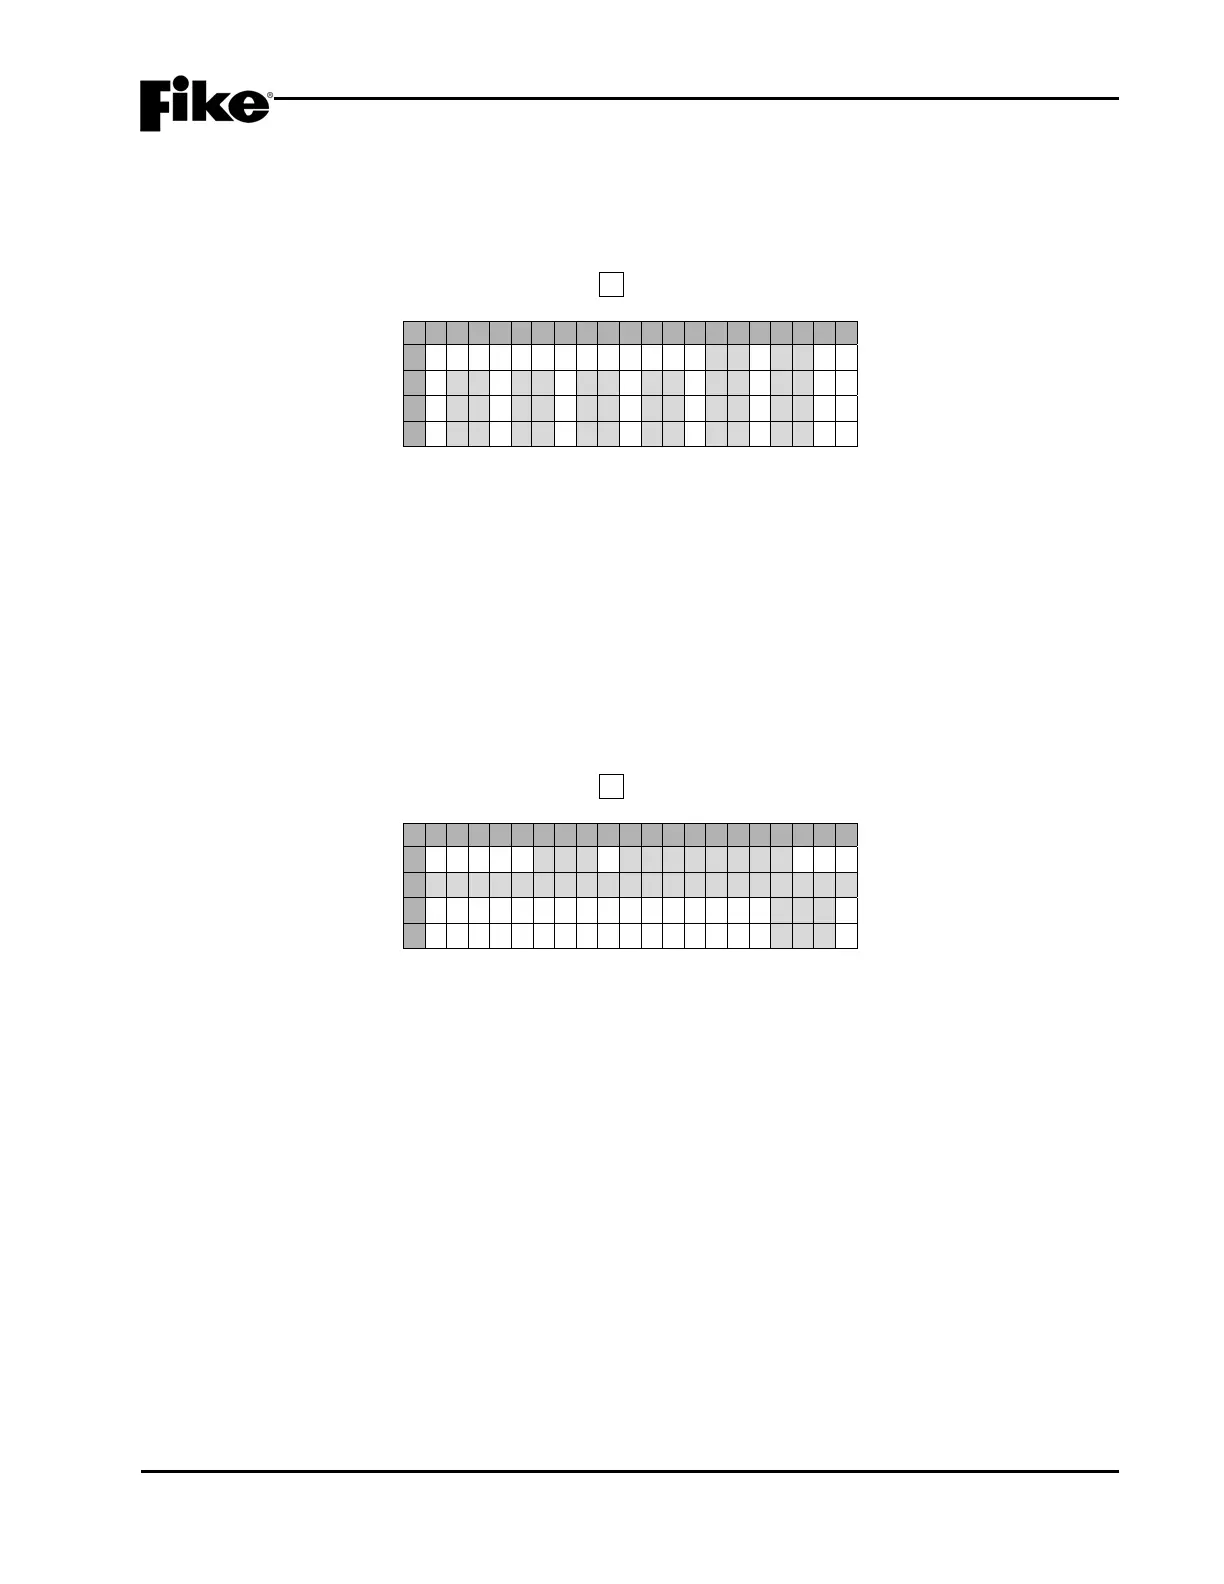
From the “Daytime Sensitivity Menu” screen, press F2 to access the “Holidays” screen, as shown below:
1 2 3 4 5 6 7 8 9 0 1 2 3 4 5 6 7 8 9 0
A
H O L I D A Y S ( 1 ) 0 1-0 1
B
0 1 - 0 1 0 1-0 1 0 1-0 1
C
0 1 - 0 1 0 1-0 1 0 1-0 1
D
0 1 - 0 1 0 1-0 1 0 1-0 1
Exhibit 4-34: Holidays Screen
• Row A-D - These 10 editable fields allow you to enter the Month (MM)-Day (DD) of holiday. Use the
◄► arrow keys to position the cursor under the field; then use the +/- keys to increment/decrement
the value at the field.
There are 2 holiday screens available to provide 20 holidays. To access the Holidays (2) menu, use
the ◄► arrow keys to move the cursor to the last field on the right (D18) on Row D; then press the
right ► direction arrow.
4.3.5 HOW TO ENABLE/DISABLE AND ASSIGN CUSTOM MESSAGES TO ZONES
The Zone Configuration screen allows you to enable/disable and assign a custom message to any of the
Cheetah Xi’s 254 available operating zones.
From the “Configuration Menu 2” screen, press the F5 key to access the “Zone” screen, as shown below:
1 2 3 4 5 6 7 8 9 0 1 2 3 4 5 6 7 8 9 0
A
Z O N E 0 0 1:E N A B L E D
B
C U S T O M M E S S Z O N E 0 0 1
C
A U T O C O U N T D O W N : 0 3 0S
D
M A N U C O U N T D O W N : 0 1 0S
Exhibit 4-35: Zone Configuration Screen
• Row A - These fields allows you to set the Enable/Disable status of the selected Zone. Use the ◄►
arrow keys to position the cursor under the field; then use the +/- keys to change zone number.
Use the ◄► arrow keys to position the cursor under the enable status field; then use the +/- keys to
toggle the status (Enable/Disable).
• Row B - This range of fields allows you to set the Custom Message for the zone displayed in Row A.
Use the ◄► arrow keys to position the cursor under the field; then use the +/- button to cycle
through all ASCII characters and display the desired character.
• Row C – Allows you to set the automatic pre-discharge countdown time for the selected zone (0 –
255 seconds, default 30 seconds).
• Row D – Allows you to set the manual pre-discharge countdown time for the selected zone (0 – 30
seconds, default 10 seconds).
 Loading...