EasyManua.ls Logo

Dahua XVR7416L User Manual

Dahua XVR7416L
527 pages
To Next Page IconTo Next Page
To Previous Page IconTo Previous Page
Page #220 background imageLoading...
Page #220 background image
207
SN
Icon
Name
Function
B
n port
RS485_B.It is the cable B. You can connect to the control
devices such as speed dome PTZ.
11
Power socket
Power input port
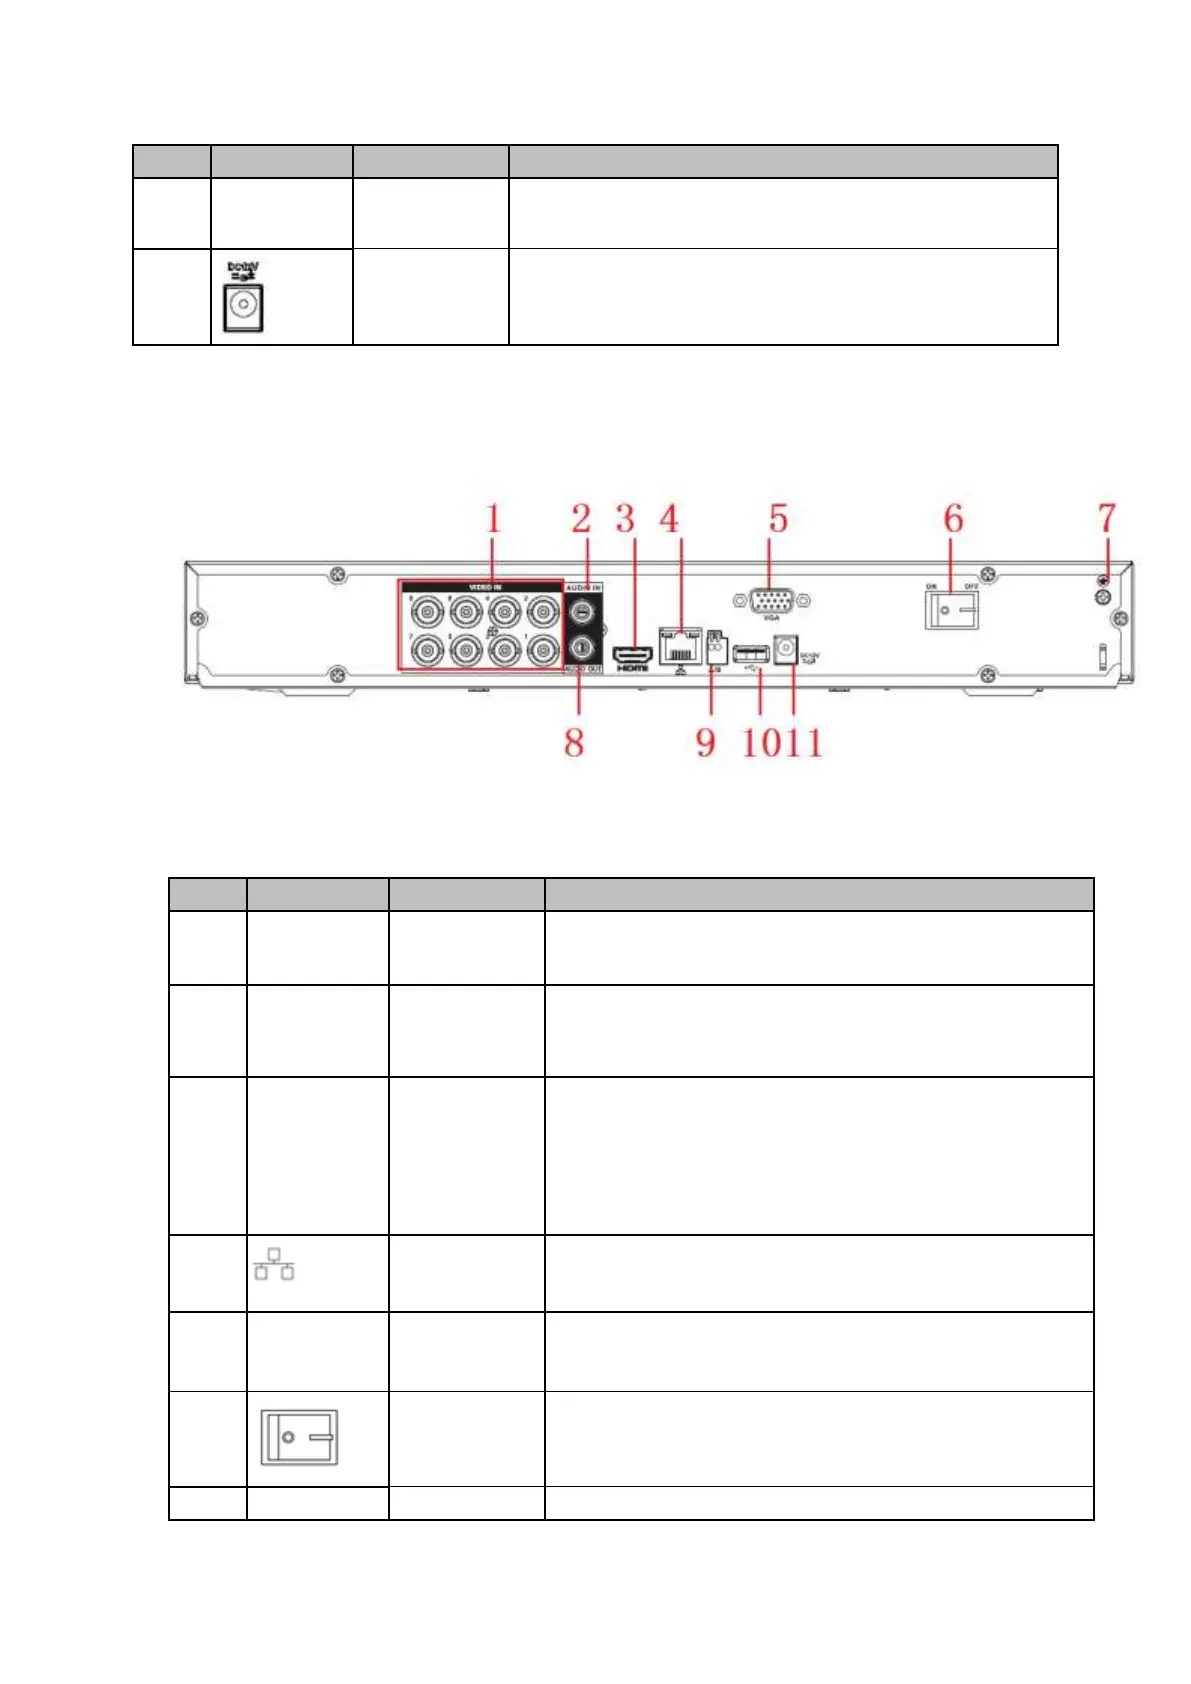
2.2.35 HCVR72XXAN-4M Series
The rear panel is shown as in Figure 2-82.
The following figure is based on the HCVR7208SAN-4M series product.
Figure 2-82
Please refer to the following sheet for detailed information.
SN
Icon
Name
Function
1
VIDEO IN
Video input
port
Connect to analog camera, video input signal.
2
AUDIO IN
Audio input
port
Connect to microphone and etc to input signal.
3
HDMI
High definition
media
interface
High definition audio and video signal output port. It
transmits the same video signal as that of the VGA/TV or
different video signal from that of the VGA/TV(support
customized setup).
Support mouse operation.
4
Network port
1000M Ethernet port
5
VGA
VGA
VGA video output port
6
Power switch
Power on/off button.
7
GND
Power switch
Power on/off button.

Table of Contents

Question and Answer IconNeed help?

Do you have a question about the Dahua XVR7416L and is the answer not in the manual?

Dahua XVR7416L Specifications

General IconGeneral
BrandDahua
ModelXVR7416L
CategoryDVR
LanguageEnglish

Summary

1 FEATURES AND SPECIFICATIONS

1.1 Overview

General introduction to the standalone DVR product for security fields.

1.2 Features

Lists the key features of the product, including surveillance, storage, and compression.

1.3 Specifications

Details the technical specifications for various HCVR series models.

2 OVERVIEW AND CONTROLS

2.1 Front Panel

Describes the front panel layout and buttons for different series of DVRs.

2.2 Rear Panel

Details the rear panel connections and ports for various DVR models.

3 INSTALLATION AND CONNECTIONS

3.3 HDD Installation

Important safety precautions and steps for installing the HDD in the DVR.

4 Overview of Navigation and Controls

4.1 Boot up and Shutdown

Steps for powering the DVR on and off, including auto-resume after power failure.

4.2 Set/Reset Password

Procedures for setting or resetting the administrator password and security questions.

4.3 Startup Wizard

Steps for initial device configuration using the startup wizard after booting up.

4.4 Live Viewing

How to view live video, adjust system settings, and use preview control functions.

4.5 Right-Click Menu

Explains the functions available via the right-click menu in the preview interface.

4.9 Operation

General operational procedures for the DVR system.

4.10 Information

Viewing system details like HDD status, record, BPS, and firmware version.

4.11 Setting

General system settings, including camera, network, event, storage, and system configurations.

5 WEB OPERATION

5.1 Network Connection

Checking network connection and setup before operating via web client.

5.2 Login

Steps for logging into the device via a web browser using IE.

5.3 LAN Mode

Understanding the main window layout and function buttons in LAN mode.

5.4 Real-time Monitor

Viewing live video feeds, device IP, and channel information.

5.5 PTZ

Operating PTZ functions after setting the correct protocol.

5.8 Setup

Configuring camera, network, event, storage, and system settings.

5.10 Playback

Accessing playback functions to review recorded video.

7 FAQ

DVR can not boot up properly.

Troubleshooting steps for issues preventing the DVR from booting.

Can not log in client-end or web.

Troubleshooting client-end and web login issues.

Network connection is not stable.

Troubleshooting unstable network connections.

Appendix A HDD Capacity Calculation

Appendix G Earthing

1. What is the surge?

Explanation of surges, their sources, and effects on electronic devices.

2. The earthing modes

Description of different earthing methods like one-point, multiple-point, and mixed ground.

Related product manuals