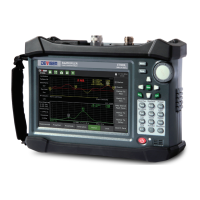
Handheld Cable/Antenna Analyzer
7-1 Setting Up a DTF Measurement
The following is a step-by-step guide for preparing to conduct a distance-to-fault measurement using the
E7000L SitePROFILER cable analyzer.
Procedure:
1.
To set the instrument in the cable analyzer mode, press the
Menu
button to view the measurement
mode desktop. Tap the
Cable & Antenna
softkey.
2.
Tap the
Measurement
main menu softkey to open the Measurement menu on the right side of the
display. Under the
Standard
submenu, select either
DTF
Return Loss
or
DTF
VSWR
.
a.
To determine the best measurement for your needs, see the Introduction of this chapter.
3.
Tap the
Freq/Dist
main menu softkey. Under the
Frequency
submenu, set your desired Start and
Stop frequencies. There are two ways to accomplish this.
a.
Manually enter the desired start frequency by tapping
Start Freq
and using the arrow keys,
data keypad, or rotary knob. Press Enter to confirm. Repeat for
Stop Freq
.
b.
Open the
Signal Standard
submenu and tap
Select Signal STD.
Double-tap your preferred
signal standard on the list to select it and return to the submenu, then select the signal type
by tapping
Uplink, Downlink
, or
Uplink + Downlink
.
4.
For a DTF measurement, you must now specify the length of the transmission line (“distance”) and
the type of cable in use. The cable type determines the propagation velocity and cable loss.
NOTE: Selecting the correct cable is vital for achieving accurate measurements and locating faults.
Specifying an incorrect cable type, or setting a measurement frequency out of the cable’s range, will
affect the DTF trace.
5.
Still under Freq/Dist, open the
Distance
submenu. Enter the start and stop distance; be sure that you
toggle
Dist Units
to highlight the correct unit.
6.
Still under Freq/Dist, open the
DTF Setup
submenu and tap
Cable
. Double-tap your preferred cable
on the list to select it and return to the DTF Setup submenu.
a.
If you are sweeping the entire feedline (jumpers plus main feeder), use the main feedline as
the cable type for your measurement.
7.
If “ON” appears under Calibration Status on the left-hand side of the display, continue to step 8.
Otherwise, you will need to calibrate the instrument. See Chapter 3 — Calibrating the E7000L.
8.
Tap the
Amplitude
main menu key and use the
Top
and
Bottom
softkeys to set the amplitude scale.
The ideal amplitude scale will differ depending on which reflection measurement you selected in
step 2. Some general guidelines for best measurements results are:
a.
For DTF Return Loss, set Top to 0dB and Bottom to 60dB, or simply tap
Full Scale
.
b.
For DTF VSWR, set Top to 60dB and Bottom to 1dB, or simply tap
Full Scale
or
Auto Scale
.
9.
Press the
Sweep
(#3) datakey to open the Sweep submenu. Tap
Data Points
to select the resolution
of your measurement. You may choose 130, 259, 517, 1033, or 2056 data points.
a.
The default setting is 517. The higher the setting, the longer it will take to complete a sweep.
10.
In the Sweep submenu, tap
RF Immunity
to toggle interference rejection between
High
and
Low
depending on your measurement needs.
a.
The default setting is Low. Use High when you suspect a high level of RF signal energy from
neighboring cell sites, or other potential interference in the area.