Eaton 9355 Parallel UPS (10/15 kVA) User's Guide 164201601—Rev E0 vii
LLiisstt ooff FFiigguurreess
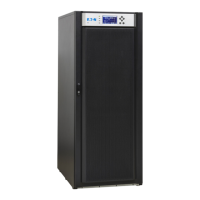
Figure 1. The Eaton 9355 UPS and EBM (3-High Cabinets Shown) ........................................................................1
Figure 2. Removing the Stabilizing Bracket Bolts ............................................................................................. 14
Figure 3. Removing the Brackets and Shipping Pad.......................................................................................... 15
Figure 4. Unloading the Cabinet ................................................................................................................... 16
Figure 5. Removing the Pallet...................................................................................................................... 16
Figure 6. Removing the Vertical Bracket ........................................................................................................ 17
Figure 7. Reinstalling the M4 Screws and Remove Pallet Brackets ...................................................................... 17
Figure 8. Removing the Front Shipping Bracket and Shipping Pad ....................................................................... 18
Figure 9. Unloading the Cabinet ................................................................................................................... 19
Figure 10. Removing the Pallet...................................................................................................................... 19
Figure 11. Version 1 Parallel Tie Cabinet Front Cover.......................................................................................... 20
Figure 12. Version 1 Internal Cover................................................................................................................. 21
Figure 13. Version 1 Parallel Bypass Breaker .................................................................................................... 21
Figure 14. UPS Rear View (3-High Shown) ....................................................................................................... 22
Figure 15. UPS Terminal Block (3-High Shown) ................................................................................................. 23
Figure 16. Version 1 UPS Output to Parallel Tie Cabinet Wiring ............................................................................ 23
Figure 17. Version 1 Load Connections ........................................................................................................... 24
Figure 18. Version 1 Bypass AC Input Wiring.................................................................................................... 25
Figure 19. Version 2 Parallel Tie Cabinet Front Door and Cover............................................................................. 26
Figure 20. Version 2 Parallel Tie Cabinet Front Cover Open.................................................................................. 27
Figure 21. Version 2 Parallel Tie Cabinet Internal Cover....................................................................................... 28
Figure 22. Version 2 Parallel Tie Cabinet Bypass Breaker .................................................................................... 29
Figure 23. UPS Rear View (3-High Shown) ....................................................................................................... 30
Figure 24. UPS Terminal Block (3-High Shown) ................................................................................................. 31
Figure 25. Version 2 Tie Cabinet UPS Output to Parallel Tie Wiring........................................................................ 32
Figure 26. Version 2 Tie Cabinet Load Connections............................................................................................ 33
Figure 27. Version 2 Tie Cabinet Bypass AC Input Wiring .................................................................................... 34
Figure 28. Communication Options and Control Terminals .................................................................................. 35
Figure 29. Powerware Hot Sync CAN Bridge Card ............................................................................................. 35
Figure 30. Removing the Front Covers............................................................................................................ 36
Figure 31. CAN Bridge Card Wiring ................................................................................................................ 37
Figure 32. Removing Knockout Tabs .............................................................................................................. 38
Figure 33. Reinstalling the Front Covers .......................................................................................................... 38
Figure 34. Lowering the Leveling Feet ............................................................................................................ 39
Figure 35. Stabilizing Bracket with One Cabinet ................................................................................................ 40
Figure 36. Stabilizing Bracket with Two Cabinets .............................................................................................. 40
Figure 37. Stabilizing Bracket with Three Cabinets............................................................................................. 41
Figure 38. Typical EBM Installation (2-High Cabinets Shown) ............................................................................... 42
Figure 39. Front Ground Strap Installation (2-High Cabinets Shown) ...................................................................... 43
 Loading...