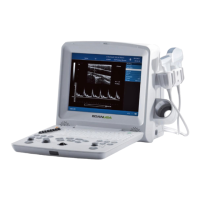
DUS 60 Digital Ultrasonic Diagnostic Imaging System User Manual Transportation and Storage
- 14 -
Chapter 3 Transportation and Storage
3.1. Moving the System
The system is designed to be portable and easily transported. Power off the system and secure all
accessories before moving it to another location.
CAUTION
1. Switch off the ultrasound system. Unplug the power cord from the power source and
secure the power cable.
2. Put the probes in the probe holder, or remove them and place them in the protective
carrying cases.
3. Disconnect and secure the footswitch and the connecting cable.
4. Raise the brakes away from the front and back caster wheels.
5. Push the handle to roll the system forward and maneuver it to its new location and
lock the wheel caster brakes.
6. Connect optional system accessories, such as the single-pedal footswitch.
7. Secure the system and complete the system setup, and then perform all the daily
checking before using it.
3.2. Storage
Do not place the device near the ground, walls or the roof.
Keep good indoor ventilation. Avoid strong and direct sunlight, and erosive gas.
3.3. Transportation
To prepare the system for shipment over long distances or rough terrain, repack the system in the
factory packing
To prepare the system for transport over distances: load the system into a vehicle using a lift gate.
To prevent lateral movement of the system, secure the system with cargo straps. To prevent
sudden jarring of the system during transport, provide anti-shock cushions beneath the system.
It is suitable for transportation by air, railway, highway and ship. Protect the system from
inversion, collision, and splashing with rain and snow.
DUS 60 Digital Ultrasonic Diagnostic Imaging System User Manual Installation Instructions
- 15 -
Chapter 4 Installation Instructions
4.1. Environmental Requirements
Keep the device away from equipment with strong electric field, strong magnetic and high
voltage field, and protect the display screen from direct exposure to strong sunlight. Keep good
ventilation.
4.2. Unpacking Inspection
Visually examine the package prior to unpacking. If any signs of mishandling or damage are
detected, contact the carrier to claim for damage. After unpacking the device, you should follow
the packing list to check the product carefully and to make sure that no damage has occurred
during transportation. Then, install the device according to the installation requirements and
methods.
WARNING
1. Do not use the device if it is found to be damaged or defective.
2. Do not drop or collide with the probe. Otherwise you shall give up using it.
4.3. Connecting Procedure
1. Take the main unit and accessories out from the package.
2. Connect the cable holder and battery (if it is configured) to the main unit correctly.
3. Connect the probes to the main unit correctly.
4. Connect the printer and load the recording paper.
5. Connect the power cable
1) Connect the main unit and the common earth terminal firmly via a potential equalization
conductor.
2) Plug one end of the power cable to the power socket of the main unit, and the other end
to the special power output socket of the hospital.
6. Switch on the main unit.
Press power switch on the rear side of the main unit, and press the power on/off key on the
top right of the control panel. You can operate the main unit after the main interface appears.