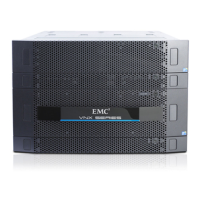
Figure 15 Installing the enclosure in the cabinet
2. Push the enclosure completely into the cabinet so that the tabs on the left rail secure
the enclosure as follows (Figure 16 on page 31):
l
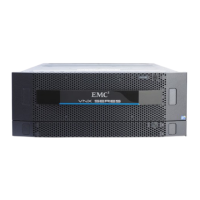
The bottom of the enclosure hooks into a tab on the bottom back of each rail.
l
The notch of the left rear of the enclosure inserts into the tab on the inside rear of
the left rail.
When the enclosure is correctly attached to the rail tabs, the enclosure extends ½
inch beyond the channels in the front of the cabinet.
Figure 16 Rear of the enclosure inserted into the tabs on the left rail
3. If the rear of the enclosure does not connect with the rails properly:
a. Loosen the eight screws (four per rail) that attach the front of the rails to the
cabinet front channels.
b. Adjust the rails to allow the tabs to fit into the notches.
Assemble components in your cabinet
Installing the storage processor enclosure 31
 Loading...