93
Reference Manual
00809-0100-4772, Rev FA
Troubleshooting
March 2016
Troubleshooting
Install the electronics boards
1. Verify that power to the flowmeter is off.
2. Align the sockets on the bottom of the two electronics boards over the pins
protruding from the bottom of the housing cavity.
3. Carefully guide the sensor cable through the notches on the edge of the circuit
boards.
4. Slowly press the boards into place. Do not force the boards down. Check the
alignment if they do not glide into place.
5. Use care to insert sensor cable clip into the electronics board.
6. Tighten the three captive screws to anchor the two electronics boards. Ensure that
the SST washer is under the screw in the 2o’clock position.
7. Reinsert jumpers into proper location.
8. If the meter has the LCD display option, insert the 10-pin header connector into the
LCD display board.
a. Remove jumpers from the electronics board.
b. Put the connector through the bezel on the electronics board.
c. Carefully press the LCD display onto the electronics board.
d. Tighten the two screws that retain the LCD display.
e. Insert the alarm and security jumpers in the correct location.
9. Replace the electronics board compartment cover.
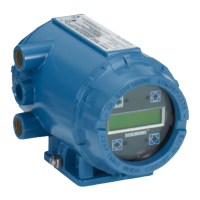
7.5.3 Replacing the FOUNDATION Fieldbus electronics housing
The flowmeter electronics housing can be replaced easily when necessary. Use the
following procedure:
Tools needed
5
/32 in. (4 mm) hex wrench
5
/16 in. (8 mm) open-end wrench
Screwdriver to disconnect wires
Tools to disconnect conduit (if applicable)
Removing the electronics housing
1. Turn off the electric power to the flowmeter.
2. Disconnect the power wires and conduit (if applicable) from the housing.
3. Use the
5
/32 in. (4 mm) hex wrench to loosen the housing rotation screws (at the
base of the electronics housing) by turning the screws clockwise (inward) until they
clear the support tube. See Figure 7-8.
See “Safety messages” on page 81 for complete warning

 Loading...