29
4. Remove the screws (circled in the diagram below) in the back panel of the appliance
5. On the back of the appliance remove the one screw from each of the four red tabs and set each pair
of tabs from open position (shown below) to the close position.
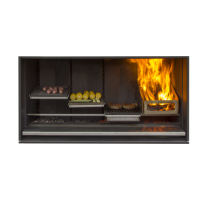
6. Then remove the 2 screws in the chassis (shown circled below) and remove the side brackets (shown
shaded below) by pulling them in towards the centre of the fire.