No. Name Description
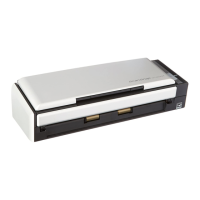
7 [Scan] button (*1) Starts scanning. Can be pressed even when the stacker is closed.
Indicates the status of the ScanSnap as follows:
Blue (lit): Ready
Blue (flashing): Scanning
Orange (flashing): Error
8 Stacker Pull it out to use it.
Stacks up the ejected documents.
9 Receipt Guide Attach it to the ADF paper chute (cover) for it to be used.
If you use the Receipt Guide, you can place documents with different
widths such as receipts in it to scan them at the same time.
*1: When the ScanSnap has turned off automatically because of the automatic power off function,
perform the following to turn the ScanSnap back on.
l iX1600/iX1500
Press the touch panel, or close the ADF paper chute (cover) and open it again
l iX1400
Press the [Scan] button (this will not start scanning), or close the ADF paper chute (cover)
and open it again
For details, refer to "Automatic Power OFF (iX1600 / iX1500 / iX1400 / iX500 / iX100 / SV600 /
S1300i)" (page 100).
Back
No. Name Description
10 USB connector Slide the cover of the USB connector up to open it and then connect
the USB cable to the USB connector.
The cover of the USB connector slides up either one or two levels.
Open the cover according to the type of the USB cable you have.
l First level: USB 2.0 cable
l Second level: USB 3.0 cable
11 Power connector Used to connect a power cable.
12 Security cable slot Used to connect an anti-theft security cable (commercially available).
13 Ventilation port Holes for ventilating hot air from inside the ScanSnap.
Parts and Functions
70

 Loading...