1. Put on protective eye wear.
2. Set the power switch to off.
3. Disconnect the sample supply. Let the sample cool if hot.
4. Open the tubing enclosure.
5. Use sample flow that is not hot to find the leak.
6. Tighten fittings as necessary. Look for additional leaks and repair if possible.
7. After the leaks are repaired, remove excess water that is on the inside and underside of the
enclosure with paper towels. Let the enclosure dry completely with the door open.
8. Use a towel or mop to remove spills around the analyzer.
9. Close the enclosure door. Set the power switch to on.
10. Do a plumbing test to make sure that the analyzer can operate without leaks. Refer to Do a
plumbing test on page 48.
Replace a fuse
D A N G E R
Fire hazard. Use the same type and current rating to replace fuses.
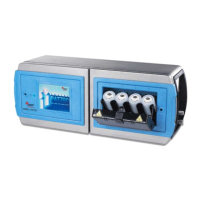
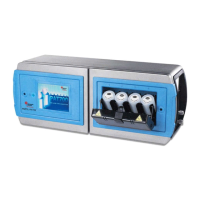
Fuse failure may be an indication that the instrument has a problem that requires service. Figure 12
shows the fuse location.
Item to collect:
1.25 A, 250 V EN60127 type T fuse
1. Toggle the power switch to off. Disconnect the instrument from the power outlet.
2. Use the supplied tool to open the display-side door.
3. Use a flat-blade screwdriver to remove the fuse holder.
4. Replace the fuse with a fuse of the same type and rating.
5. Use the flat-blade screwdriver to install the fuse holder.
6. Close the display-side door with the supplied tool. Make sure that the door is tightly closed to
keep the enclosure rating and the safety protections.
7. Connect the instrument to the power outlet. Toggle the power switch to on.
Figure 12 Fuse location
1 Fuse (2x)
Drain the instrument
To prepare the instrument for storage or shipment, remove all water from the instrument. Water left in
the instrument may freeze, expand and cause instrument damage. Water in the measurement cell
may contain contaminants that will cause damage to instrument components.
English 41